
How to Paint Fur in Oil and Acrylic
Painting fur can seem like a daunting task, but with the right techniques and a little practice, you can create stunningly realistic fur textures in both oil and acrylic mediums. Whether you're capturing the sleek sheen of a cat’s coat or the fluffy softness of a dog, understanding the nuances of fur is key to bringing your artwork to life. In this article, we will explore various methods and tips that will guide you through the process from preparation to those all-important finishing touches. So, grab your brushes and let’s dive into the fascinating world of fur painting!
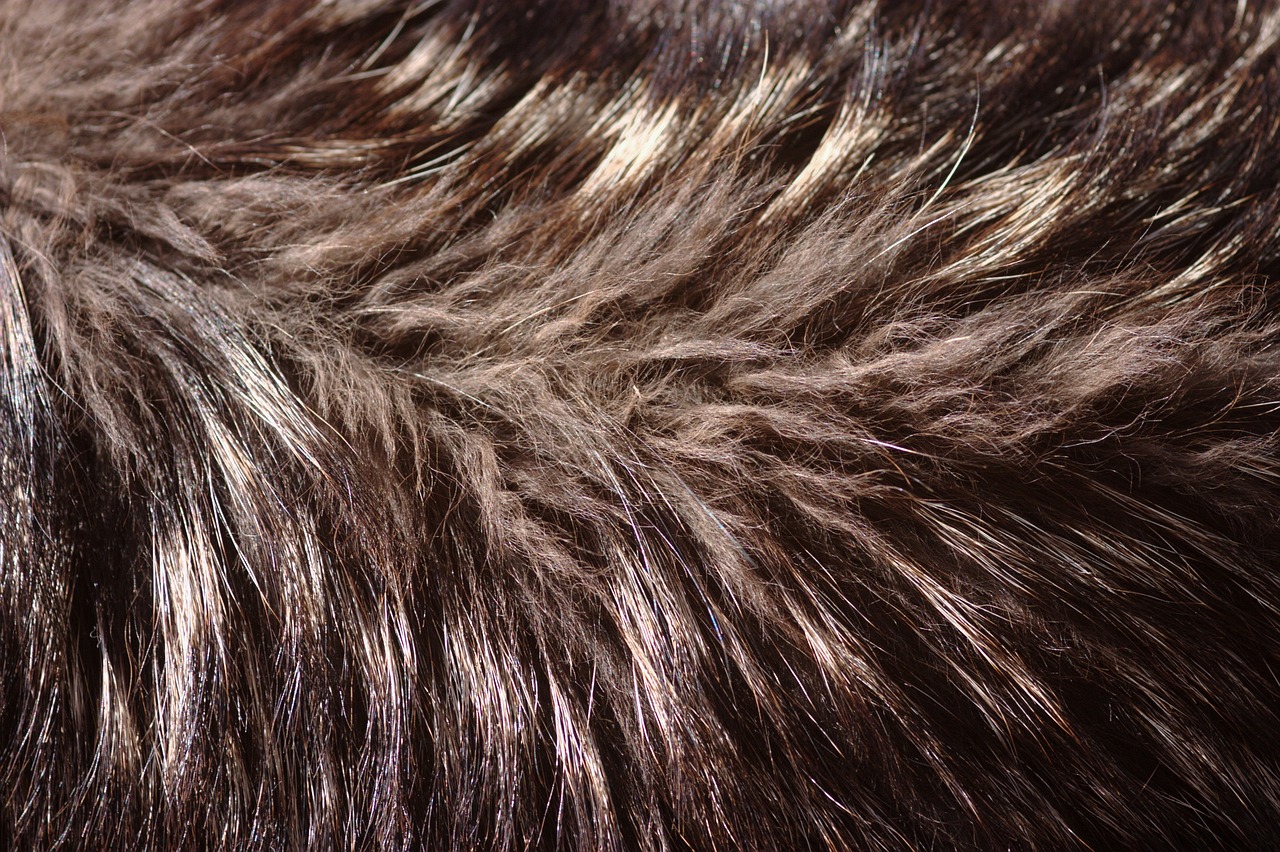
Fur is not just a single texture; it comes in a variety of forms, each with its own unique characteristics. To replicate these textures effectively, you must first observe them closely. Take a moment to examine the fur of different animals—notice how it lays, the way light interacts with it, and the subtle variations in color. For instance, a rabbit's fur is soft and fluffy, while a wolf’s coat is sleek and coarse. By understanding these differences, you can enhance the realism and depth of your paintings. Remember, the goal is to not only see the fur but to feel it through your artwork.
The brushes you choose can dramatically affect the outcome of your fur painting. Each type of brush serves a specific purpose, and using the right one can make all the difference in achieving that lifelike quality. Here are some brush types to consider:
- Flat Brushes: Great for broad strokes and filling in larger areas.
- Round Brushes: Perfect for detailed work and adding fine lines.
- Fan Brushes: Excellent for creating texture and fine details.
Understanding how to utilize these brushes will allow you to mimic the intricate details of fur effectively. For example, flat brushes can be used for the initial layers of color, while fan brushes can add the finishing touches that create that fluffy appearance.
When it comes to painting fur, both flat and round brushes have their advantages. Flat brushes are ideal for covering larger areas quickly, allowing you to lay down a base color efficiently. In contrast, round brushes excel at creating intricate details, such as the individual strands of fur or subtle variations in color. To achieve a realistic effect, consider using a combination of both. Start with a flat brush for the base, then switch to a round brush for detailing.
Fan brushes are a secret weapon in the world of fur painting. Their unique shape allows for the creation of fine details and textures that can mimic the look of real fur. To use a fan brush effectively, dip it lightly in paint and use a flicking motion to apply color. This technique can help you achieve that soft, layered look that is so characteristic of animal fur. Experiment with different pressures and angles to see what works best for your specific project.
Blending is crucial for creating realistic fur. The key is to blend colors and textures seamlessly to avoid harsh lines. Start by applying a base color, then gradually introduce lighter or darker shades using a clean brush. A soft, circular motion can help you blend the colors together without losing their vibrancy. Remember, the goal is to create a smooth transition that mimics the natural flow of fur.
Layering is essential for adding depth and dimension to your fur paintings. Begin with a solid base layer, then build up additional layers of color to create richness. Each layer should dry before you add the next, particularly when working with oils. This technique allows you to create a more complex and realistic appearance, as the underlying colors will subtly influence the top layers. Don’t be afraid to experiment with different color combinations to see what brings your fur to life!
Understanding color mixing is vital for painting fur accurately. The colors found in fur are often more complex than they appear at first glance. For example, a golden retriever's fur may seem uniformly golden, but upon closer inspection, you'll notice subtle hints of cream, brown, and even gray. To replicate this, mix your colors on the palette, paying attention to the undertones that will give your painting depth.
Shadows play a significant role in adding depth to fur. By mixing darker shades that complement the base color, you can create shadows that enhance the three-dimensional effect of your painting. Apply these shadows carefully, focusing on areas where the fur naturally falls or overlaps. This technique will help your fur appear more lifelike and dynamic.
Just as shadows are important, highlights bring fur to life. Using a lighter shade of your base color, apply highlights to areas where light would naturally hit the fur. This could be the tips of the fur or areas that catch the light due to the animal's posture. Ensure that your highlights complement the underlying colors and textures for a cohesive finish.
The final touches can elevate your painting from good to stunning. Once you have completed your fur painting, take a step back and assess your work. Look for areas that may need more detail or adjustment. Once satisfied, consider applying a varnish to protect your artwork and enhance its vibrancy. Varnishing not only preserves your painting but also gives it a professional finish that can really make your fur textures pop!
- What type of paint is better for fur painting, oil or acrylic? Both mediums have their advantages. Oils allow for longer blending times, whereas acrylics dry faster, making them ideal for quick layering.
- How can I make my fur look more realistic? Focus on observing real fur, practice blending, and pay attention to shadows and highlights.
- Can I use regular brushes for fur painting? While you can use regular brushes, specialized brushes like fan and round brushes will give you better results.

Understanding Fur Texture
When it comes to painting fur, understanding the texture is absolutely crucial. Fur is not just a single color; it is a complex interplay of shades, highlights, and shadows that create the illusion of softness and depth. Observing the way light interacts with fur can significantly enhance the realism of your artwork. For instance, think about how a cat's fur might appear sleek and shiny, while a dog's fur could be fluffy and voluminous. Each type of fur has its own unique characteristics, and recognizing these can help you replicate them on canvas.
To begin, it's essential to closely observe the subject you are painting. Look at images or real-life animals and take note of the following:
- Length: Is the fur long, short, or a mix of both?
- Density: Is it thick and plush, or sparse and fine?
- Texture: Is it smooth, coarse, or silky?
- Color Variations: Are there subtle shifts in color, such as darker tips or lighter bases?
Once you have a good grasp of these elements, you can start to think about how to replicate them in your painting. One effective technique is to use a combination of brush strokes that mimic the direction and flow of the fur. For example, when painting a fluffy coat, utilize short, quick strokes to build up texture, creating the illusion of volume and movement. On the other hand, for sleek fur, longer, smoother strokes will be more appropriate.
Another important aspect to consider is the lighting. The way light hits the fur can dramatically change its appearance. Shadows can create depth, while highlights can bring certain areas to life. By understanding where the light source is coming from, you can accurately depict shadows and highlights to enhance the three-dimensionality of the fur.
In summary, understanding fur texture is about more than just color; it involves a careful examination of length, density, and how light interacts with the surface. By paying close attention to these details and practicing various techniques, you can develop a more realistic representation of fur in your paintings.
Choosing the Right Brushes
When it comes to painting fur, the right brushes can make all the difference. Think of brushes as your tools; just like a chef needs the right knives to create a masterpiece in the kitchen, an artist needs the right brushes to bring their vision to life. Each brush type offers unique capabilities that can enhance the texture and realism of your fur paintings. So, how do you choose the best brushes for your furry subjects? Let's dive into the world of brush types and their specific uses.
First off, you need to consider the size and shape of the brush. For instance, a larger brush can cover more area quickly, making it ideal for the base layers of your painting. However, when it comes to detailing the fur, smaller brushes are essential. In this context, you might find the following brush types particularly useful:
| Brush Type | Best Use |
|---|---|
| Flat Brushes | Great for broad strokes and filling in larger areas of fur. |
| Round Brushes | Perfect for detailing and creating fine lines that mimic fur strands. |
| Fan Brushes | Excellent for texture and adding fine details to fur. |
Let’s take a moment to explore these brush types in more detail. Flat brushes, for example, are fantastic for laying down the initial layers of color. They allow for smooth, even coverage, which is crucial when establishing the base of your painting. On the other hand, round brushes are your go-to for intricate work. Their pointed tips can create the illusion of individual fur strands, giving your artwork that much-needed realism.
Now, have you ever tried a fan brush? If not, you’re missing out! Fan brushes are particularly versatile; they can create both texture and detail. When you use a fan brush, you can flick it across the canvas to replicate the uneven, natural look of fur. It’s almost like magic, as it effortlessly creates the illusion of depth and movement.
Another important aspect to consider is the material of the brushes. Synthetic brushes are often more affordable and can work well with acrylics, while natural hair brushes, like those made from sable, can provide superior blending and a smoother finish, especially in oil painting. Understanding the materials will help you select brushes that suit your preferred medium and style.
Finally, don’t forget about brush maintenance. Keeping your brushes clean and in good condition will extend their lifespan and ensure that you achieve the best possible results. A well-cared-for brush can be the difference between a painting that looks flat and one that pops with life. So remember to wash your brushes thoroughly after each session, and consider investing in a brush holder to keep them in optimal shape.
In summary, choosing the right brushes for painting fur is about understanding the specific needs of your project. Whether it's the shape, size, or material, each factor plays a crucial role in achieving the desired effect. So, next time you’re at the art supply store, take a moment to consider your options carefully. After all, the right brush can be your best friend in the journey to create stunning fur paintings!
- What type of brush is best for beginners? A good starter brush is a round brush, as it can be used for both broad strokes and finer details.
- Can I use the same brushes for oil and acrylic painting? While you can use some brushes for both mediums, it's best to have separate brushes for each to maintain their quality.
- How do I clean my brushes properly? Use soap and water for synthetic brushes and a solvent for natural hair brushes, ensuring they’re thoroughly rinsed.
Flat vs. Round Brushes
When it comes to painting fur, choosing the right brush can make all the difference in achieving that lifelike texture and depth. Flat brushes and round brushes each have their unique strengths, and understanding their uses can elevate your artwork significantly. Flat brushes, with their broad and rectangular shape, are fantastic for laying down larger areas of color and creating smooth, sweeping strokes. They are particularly useful when you want to cover a big patch of fur quickly or create a base layer. Think of them as the wide paint rollers of the brush world—perfect for getting that initial coat down without much fuss.
On the other hand, round brushes are your go-to for detail work. Their pointed tip allows for precision, making it easier to replicate the fine strands of fur that add realism to your painting. When you're trying to capture the delicate nuances of a creature's coat, a round brush can help you get into those tight spots and create intricate textures. Imagine trying to paint the whiskers of a cat; a round brush is your best friend in this scenario, giving you the control you need to create those fine lines.
To give you a clearer idea of how these brushes can be utilized, here’s a quick comparison:
| Brush Type | Best For | Techniques |
|---|---|---|
| Flat Brush | Large areas, base layers | Strokes, blending |
| Round Brush | Detail work, fine lines | Precision, layering |
In practice, many artists find it beneficial to use both types of brushes in their fur painting process. Start with a flat brush to establish the overall color and texture, then switch to a round brush to add those essential details that make the fur pop. This combination allows for a smooth transition between broad strokes and intricate detailing, creating a harmonious and realistic fur effect. So, the next time you set out to paint fur, remember this duo—flat for the foundation and round for the finesse!

Using Fan Brushes
When it comes to painting fur, fan brushes are like the Swiss Army knife of your art toolbox. They can create a variety of textures and details that mimic the natural look of fur. If you've ever tried to replicate the softness of a cat's coat or the wildness of a wolf's mane, you know just how tricky it can be. But fear not! With the right techniques and a bit of practice, fan brushes can help you achieve stunning results.
One of the best things about fan brushes is their unique shape. The bristles are arranged in a way that allows you to create fine lines and soft edges, which are essential for capturing the essence of fur. When you use a fan brush, you're not just painting; you're sculpting the fur with each stroke. The key is to use a light touch and let the brush do the work. Instead of pressing down hard, gently flick the brush across the canvas to create the illusion of individual fur strands.
Here are some tips to get the most out of your fan brush:
- Experiment with Pressure: Varying the pressure you apply can drastically change the outcome. Light strokes will give you delicate fur, while more pressure can create thicker, coarser textures.
- Use Different Paint Consistencies: Mixing your paint with a medium can help achieve different effects. For instance, a thinner paint will allow for more transparency, creating a soft look, while thicker paint can add dimension.
- Practice Layering: Don’t be afraid to layer your strokes. Start with a base color and gradually add lighter and darker shades to build depth. This layering technique is crucial for creating realistic fur.
To illustrate the effectiveness of fan brushes, consider the following table that compares different brush types and their uses in fur painting:
| Brush Type | Use | Effect |
|---|---|---|
| Fan Brush | Creating texture and fine details | Realistic fur strands |
| Round Brush | Detail work and outlining | Defined fur edges |
| Flat Brush | Filling in large areas | Base color application |
Incorporating fan brushes into your fur painting can truly elevate your artwork. Just remember, practice makes perfect! So grab your brushes, mix those colors, and let your creativity flow. With each stroke, you'll find yourself getting closer to capturing the beauty and intricacy of fur in your paintings.
Q: Can I use a fan brush for other painting styles?
A: Absolutely! While fan brushes are excellent for fur, they can also be used for landscapes, foliage, and other textures. Their versatility makes them a valuable tool in any artist's kit.
Q: What type of paint works best with fan brushes?
A: Both oil and acrylic paints work well with fan brushes. However, the techniques may vary slightly due to the different drying times and consistencies of these mediums.
Q: How do I clean my fan brushes?
A: Clean your fan brushes immediately after use to prevent paint from drying in the bristles. For acrylics, rinse them in water; for oils, use a solvent like turpentine or mineral spirits.
Blending Techniques
When it comes to painting fur, are your secret weapon for achieving that lifelike quality that makes your artwork truly pop. Think of blending as the magic wand that smooths out the transitions between colors, creating a seamless flow that mimics the natural look of fur. If you’ve ever touched a soft animal coat, you know how the colors subtly shift and blend together. Your goal as an artist is to replicate that sensation on your canvas.
One of the most effective methods for blending is the wet-on-wet technique. This involves applying wet paint onto wet paint, allowing the colors to merge beautifully. To do this, start by laying down your base colors and then use a clean brush to gently stroke the edges where two colors meet. The key is to use a light touch; you want to coax the colors together rather than scrub them. Imagine you’re gently caressing the fur, not battling with it!
In addition to the wet-on-wet technique, you can also use a dry brushing method. This technique involves using a dry brush with minimal paint to softly blend colors together. It’s particularly useful for creating fine details in fur, such as the delicate tips of hair. To achieve this, load your brush with a small amount of paint and wipe off the excess on a paper towel. Then, lightly drag the brush across the surface of your painting, allowing the bristles to catch on the texture of the canvas. This creates a soft, feathery effect that mimics the way light catches on real fur.
Another important aspect of blending is understanding the color wheel and how colors interact with one another. When blending, consider using complementary colors to create depth and interest in your fur. For example, if you’re painting a golden retriever, mixing in a touch of purple can help to create shadows that enhance the richness of the gold. This technique not only adds dimension but also makes your painting more visually engaging.
Lastly, don’t forget about the power of layering. Once you’ve blended your base colors, you can add additional layers to enhance the texture and depth of the fur. Each layer should be applied with care, allowing the previous layer to show through slightly. This creates a multi-dimensional effect that draws the viewer in. Think of it like building a sandwich; each layer adds flavor and complexity to the final product!
In summary, mastering blending techniques is crucial for painting realistic fur. Whether you’re using wet-on-wet, dry brushing, or understanding color interactions, these methods will help you create stunning fur textures that leap off the canvas. Remember, practice makes perfect, so don’t be afraid to experiment and find the techniques that work best for you!
- What is the best medium for painting fur? Both oil and acrylic are excellent choices, but they offer different advantages. Oils provide a longer drying time for blending, while acrylics dry quickly and are easier to work with for beginners.
- How can I achieve a realistic fur texture? Focus on blending techniques, layering colors, and using the right brushes. Observing real fur closely will also help you replicate its texture more accurately.
- Can I use a palette knife for blending fur? Yes, a palette knife can create interesting textures, but it’s typically more effective for broader strokes rather than fine details.
- How do I know when to stop blending? Trust your instincts! If the colors look harmonious and the texture appears realistic, it’s likely time to move on. Over-blending can lead to a muddy appearance.

Layering Colors
When it comes to painting fur, is not just a technique; it's an art form that can truly transform your work from flat to fabulously lifelike. Imagine building a beautiful, intricate tapestry where each layer adds depth and dimension, much like the way light dances on a furry coat. To achieve this, start with a solid base color that reflects the primary hue of the fur you’re trying to replicate. This base will serve as your foundation, much like the canvas for a masterpiece.
Once your base is dry, it's time to think about your second layer. Here’s where the magic happens! Use a slightly darker shade to add depth and shadows. This technique is akin to sculpting; you’re carving out the form of the fur with color. Don't be afraid to use transparent glazes to build up these layers gradually. The beauty of oil and acrylic paints is that they allow for such versatility. With oils, you can take your time, blending and layering over days, while acrylics dry faster, letting you build layers in a matter of hours.
As you layer, consider the direction of the fur. Each stroke should mimic the natural flow and growth of the hair. This is where your brush choice comes into play. A flat brush can create broad strokes for undercoats, while a round brush is perfect for adding the finer details. Think of it like a chef seasoning a dish; each layer of flavor enhances the overall taste. In this case, each layer of color enhances the overall realism of your painting.
Don’t forget about the importance of highlights. Once you've added your darker tones, it's time to bring your fur to life with lighter shades. A well-placed highlight can make a world of difference, giving the illusion of light bouncing off the fur. Use a small brush to apply these highlights sparingly; think of them as the finishing touches on a gourmet meal. Too many highlights can overwhelm the piece, so aim for a balanced approach.
Finally, remember that layering is not just about color; it’s also about texture. You can create texture by varying your brush strokes and applying paint in different ways. For instance, a stippling technique can mimic the look of short, soft fur, while longer, sweeping strokes can represent longer hair. The key is to observe real fur closely. Take a moment to study how light interacts with it, and let that guide your layering process.
In summary, layering colors in fur painting is a journey of exploration and creativity. With each stroke, you have the opportunity to breathe life into your canvas. So grab your brushes, choose your colors wisely, and let the layering begin!
- What is the best way to start layering colors for fur? Begin with a base color that matches the primary hue of the fur, and then gradually add darker and lighter shades to create depth and highlights.
- Can I use the same brushes for layering in both oil and acrylic? Yes, while the techniques may vary slightly due to drying times, the same types of brushes can be effective in both mediums.
- How do I know when to stop layering? Step back from your painting regularly; if the colors and textures look balanced and realistic, you’re likely at a good stopping point.
Color Mixing for Fur
When it comes to painting fur, understanding color mixing is crucial for achieving that realistic look that makes your artwork pop. Fur is not just a single color; it’s a complex interplay of shades, tones, and highlights that mimic the natural world. Think of fur as a canvas of colors, where each strand reflects light differently, creating a mesmerizing effect. To capture this, you need to pay attention to the hues present in the fur you’re trying to replicate. For instance, a golden retriever's fur isn’t just golden; it has undertones of cream, brown, and even a hint of gray. This is where your color mixing skills come into play.
Start by observing the fur closely. Look for the base color, which is the predominant shade, and then identify the secondary colors that add depth. Mixing colors isn’t just about combining two paints; it’s about creating a spectrum that reflects the nuances of the fur. For example, if you’re painting a black cat, you might think you need only black paint. However, mixing in some blues or purples can give the fur a rich, velvety texture that truly captures its essence.
To help you get started, consider this simple color mixing chart:
| Fur Color | Base Color | Mixing Suggestions |
|---|---|---|
| Golden Retriever | Yellow | Mix in white and a touch of brown |
| Gray Tabby | Gray | Add hints of brown and black for depth |
| Calico Cat | Orange | Mix with white, black, and patches of brown |
| Black Labrador | Black | Incorporate blues and purples for richness |
When mixing colors, it’s also essential to think about the lighting conditions under which the fur is viewed. Natural light can bring out different shades than artificial light, so always test your mixes under the lighting you’ll be using for your final piece. This will ensure that your colors remain true to life and vibrant.
Once you have your base and secondary colors mixed, it’s time to think about how to apply them. You can use a variety of techniques to layer these colors effectively. For instance, using a dry brush technique can help you apply lighter shades on top of your base color, creating the illusion of depth and texture. Remember, the goal is to build up your colors gradually. This layering process will not only enhance the realism but will also give your painting a sense of dimension.
In conclusion, mastering color mixing for fur is a journey that requires patience and practice. By observing closely, mixing thoughtfully, and applying your colors with intention, you can create fur that looks alive and full of character. So grab your paints, experiment with your mixes, and let your creativity flow!
- What colors should I start with for painting fur?
Begin with a basic palette of browns, blacks, whites, and yellows. From there, you can mix to create the specific shades you need. - How can I make my fur look more realistic?
Focus on layering colors and using highlights and shadows to create depth. Observing real fur closely can also help you understand how colors interact. - Can I use acrylics for painting fur?
Absolutely! Both oil and acrylic paints can be used effectively for painting fur. The techniques may vary slightly, but the principles of color mixing remain the same.
Creating Natural Shadows
When it comes to painting fur, one of the most critical aspects to consider is the use of shadows. Shadows are not just dark spots on your canvas; they are the essence of depth and dimension. They give your furry subjects a three-dimensional feel, making them pop off the canvas. But how do you create these natural shadows effectively? Let's dive into the techniques that can help you achieve realistic shadows in your fur paintings.
First and foremost, observe how light interacts with fur in real life. Natural light casts shadows that vary in intensity and color depending on the fur's texture and the light source. For instance, a sunny day will produce sharper shadows, while overcast conditions will result in softer, diffused shadows. By understanding these nuances, you can replicate them in your artwork. A good practice is to take reference photos of animals in different lighting conditions. This will not only help you see how shadows form but also how they can enhance the overall look of the fur.
Next, let's talk about color mixing. To create shadows that feel natural, you need to mix colors that reflect the underlying hues of the fur. For example, if you are painting a golden retriever, the shadow colors should be a darker version of the gold, perhaps mixed with a touch of brown or gray. This approach will maintain the harmony of the color palette and ensure that the shadows complement the highlights. It's essential to avoid using pure black for shadows, as this can make your painting look flat and unnatural. Instead, opt for darker shades of the base color or even complementary colors to add richness.
When applying shadows, consider the direction of your light source. Shadows will fall opposite to where the light is coming from, so keep this in mind as you paint. Use a soft brush to apply the shadow color gently, building it up gradually. This technique will allow for smooth transitions and softer edges, mimicking the way shadows appear in real life. You might also want to experiment with layering; start with a light wash of your shadow color and then add darker layers as needed. This method not only provides depth but also allows for greater control over the final look.
Another effective technique is to use glazing to create shadows. Glazing involves applying a transparent layer of paint over a dry layer. This can help to deepen the shadow without losing the underlying colors. It’s particularly useful for achieving subtle shadows that blend seamlessly into the rest of the fur. This technique works well with both oil and acrylic paints, although the approach may differ slightly depending on the medium you choose.
Lastly, don't forget about the importance of practice. Creating natural shadows takes time and experimentation. Spend time observing real animals, take notes on how their fur behaves under different lighting, and practice mixing and applying shadow colors until you find the techniques that work best for you. Remember, every artist has their unique style, so don't shy away from developing your approach to shadowing in fur painting.
- What colors should I use for shadows on fur? It's best to use darker shades of the base color of the fur, mixed with other colors like browns or grays, rather than pure black.
- How do I know where to place shadows? Observe the light source and how it interacts with the fur. Shadows will fall opposite to the light source.
- Can I use the same techniques for both oil and acrylic paints? Yes, many techniques are transferable, although the application methods may vary slightly between the two mediums.
Highlighting Techniques
When it comes to painting fur, highlights are what truly make your artwork pop and breathe life into the canvas. Think of highlights as the sparkle in your subject's fur; they give it dimension and realism that can transform a flat painting into a vibrant depiction. To achieve effective highlighting, it’s crucial to understand the light source in your work. Are you painting in natural light, or is there a dramatic spotlight? The direction and intensity of light will dictate where you place your highlights.
One effective technique is to use a lighter shade of the base color for your highlights. For instance, if you're painting a golden retriever, mixing a bit of white or yellow with your base gold can create a beautiful, shimmering effect. When applying these highlights, use a gentle touch; you want to build them up gradually rather than slapping on a bright spot that looks out of place. Remember, fur isn’t just a flat surface; it has depth and layers, so your highlights should reflect that.
Another important aspect is the brush technique. A dry brush technique can be particularly effective for highlights. By using a brush with very little paint on it, you can lightly drag the bristles across the surface. This method allows the underlying colors to show through while adding just the right amount of brightness to the fur. In contrast, a wet-on-wet technique can also work wonders, especially when you want to blend highlights seamlessly into the fur. Just remember to work quickly, as acrylics and oils behave differently when wet.
Additionally, consider the texture of the fur you are painting. Some fur is sleek and shiny, while others are fluffy and matte. For shiny fur, applying highlights with a bit of gloss medium can enhance that reflective quality. Conversely, for matte fur, using a more opaque paint will help maintain that soft, fluffy look. It’s all about understanding the characteristics of the fur you’re depicting and adjusting your technique accordingly.
Lastly, don’t forget about the importance of contrast. The most effective highlights are those that stand out against the darker areas of the fur. If you’ve laid down a rich, dark base, your lighter highlights will not only pop but also create a more dynamic and engaging piece. So, when you’re planning your highlights, think about the overall composition and how the light interacts with the fur.
In summary, highlighting fur is an art in itself. By considering your light source, employing various brush techniques, and adjusting your approach based on the texture of the fur, you can create stunning, lifelike highlights that elevate your paintings to a whole new level. Remember, practice makes perfect—so don’t hesitate to experiment with different techniques until you find what works best for you!
- What type of paint is best for highlighting fur? Both oil and acrylic paints can be used effectively for highlights. It depends on your personal preference and the effect you want to achieve.
- How do I create a realistic highlight? Use a lighter shade of your base color, apply it with a light touch, and consider the texture of the fur to determine the best approach.
- Can I use a palette knife for highlights? Yes! A palette knife can create unique textures and effects when applying highlights, especially for thicker fur.

Final Touches and Varnishing
As you approach the end of your fur painting journey, it’s time for those all-important final touches that can truly elevate your artwork from good to breathtaking. This stage is where your painting can transform into a masterpiece, so let’s explore some key techniques that will help you achieve that stunning finish. First off, take a moment to step back and assess your piece. Are there areas that need more depth? Perhaps the highlights could use a little more pop? This is your chance to refine and enhance the details that will make your fur look alive.
One of the most satisfying aspects of painting fur is adding those last-minute details that can bring your subject to life. You might want to consider using a fine brush or a liner brush to add tiny strands of fur or to accentuate the highlights. These subtle details can make a world of difference, giving your painting a sense of realism that draws viewers in. Remember, when painting fur, the goal is to create an illusion of depth and texture. This means paying attention to the direction of your brush strokes; they should mimic the natural flow of the fur.
After you’ve perfected the details, it’s time to think about varnishing. Varnish serves a dual purpose: it not only protects your painting from dust, dirt, and UV rays but also enhances the colors, making them appear more vibrant. There are several types of varnishes available, each with its own properties and finishes. For fur paintings, a gloss varnish can add a beautiful sheen that mimics the natural luster of fur, while a matte varnish can provide a more subdued finish. The choice ultimately depends on the effect you want to achieve.
When applying varnish, here are a few tips to keep in mind:
- Ensure the painting is completely dry: This is crucial, especially for oil paintings, which can take weeks to dry fully.
- Use a clean, soft brush: This will help you apply the varnish evenly without disturbing your painting.
- Apply in thin layers: It’s better to do multiple thin coats rather than one thick layer, as this helps prevent drips and uneven surfaces.
Once you’ve applied the varnish, allow it to dry thoroughly before displaying your artwork. This not only ensures that the varnish sets properly but also gives you a chance to admire your work from a fresh perspective. You might even notice areas that could use a bit more attention, and that’s perfectly okay! The final touches are all about making your painting the best it can be.
In conclusion, the final touches and varnishing process is where your painting can truly shine. By paying attention to details, choosing the right varnish, and applying it carefully, you’ll protect your artwork while enhancing its beauty. So take a deep breath, step back, and enjoy the satisfaction of knowing you’ve created something special.
Here are some common questions artists have regarding final touches and varnishing:
- How long should I wait before varnishing my painting? It’s essential to wait until your painting is completely dry, which can take anywhere from a few days to several weeks, depending on the medium used.
- Can I use spray varnish instead of brush-on varnish? Yes, spray varnish can be a great alternative, offering an even application. Just ensure you apply it in a well-ventilated area.
- What if I don’t like the finish of my varnish? If you’re unhappy with the finish, you can remove the varnish with a solvent and reapply a different type once your painting is dry.
Frequently Asked Questions
- What types of brushes are best for painting fur?
When it comes to painting fur, the right brushes can make all the difference! Flat brushes are great for broad strokes and creating a base layer, while round brushes are perfect for detailing and adding texture. For fine fur details, fan brushes are a fantastic choice. They help create those delicate strands that bring your artwork to life!
- How do I achieve realistic fur textures?
To capture realistic fur textures, start by closely observing the fur you want to paint. Notice how light interacts with it—this will guide your color choices and blending techniques. Layering different shades and utilizing various brush strokes can mimic the natural flow and direction of fur, making your painting pop with realism.
- What is the importance of color mixing in fur painting?
Color mixing is crucial for painting fur because it helps you create the natural hues found in real fur. By understanding how to mix colors effectively, you can achieve a more authentic look. Don’t forget to consider the shadows and highlights as well; they add depth and dimension, making your fur look three-dimensional!
- How can I create shadows and highlights in my fur paintings?
Shadows are essential for adding depth to your fur paintings. Mix darker shades of your base color to create shadows in the fur’s recesses. For highlights, use lighter shades or even pure white sparingly on the fur’s tips to suggest light reflection. This contrast between light and dark will give your artwork a lifelike quality!
- What are the final touches I should consider for my fur paintings?
The final touches can elevate your painting from good to stunning! After ensuring all layers are dry, consider applying a varnish to protect your artwork and enhance its vibrancy. Adding tiny details, like individual fur strands or subtle color adjustments, can also make a significant difference in the overall appearance.


