
Mastering Line Art in Your Drawings
Line art is more than just a simple collection of lines; it's a profound method of expression that allows artists to convey emotions, tell stories, and captivate viewers with just a few strokes. Whether you're a budding artist or a seasoned pro, mastering line art can significantly enhance your creativity and precision in artwork. Imagine being able to create stunning illustrations that resonate with viewers, drawing them into a world crafted by your imagination. In this article, we'll dive deep into the essential techniques and tips for mastering line art, ensuring that you have all the tools you need to elevate your artistic journey.
When we talk about line quality, we're referring to the thickness, texture, and smoothness of the lines we create. Each line can evoke different emotions and set the tone for your artwork. For instance, a thick, bold line might suggest strength and confidence, while a thin, delicate line could convey fragility and elegance. By varying line quality, you can enhance visual interest and create a more dynamic composition. Think of line quality as the voice of your drawing—different tones can express different feelings. Experimenting with line quality can lead to unexpected surprises in your art, making it a crucial aspect of mastering line art.
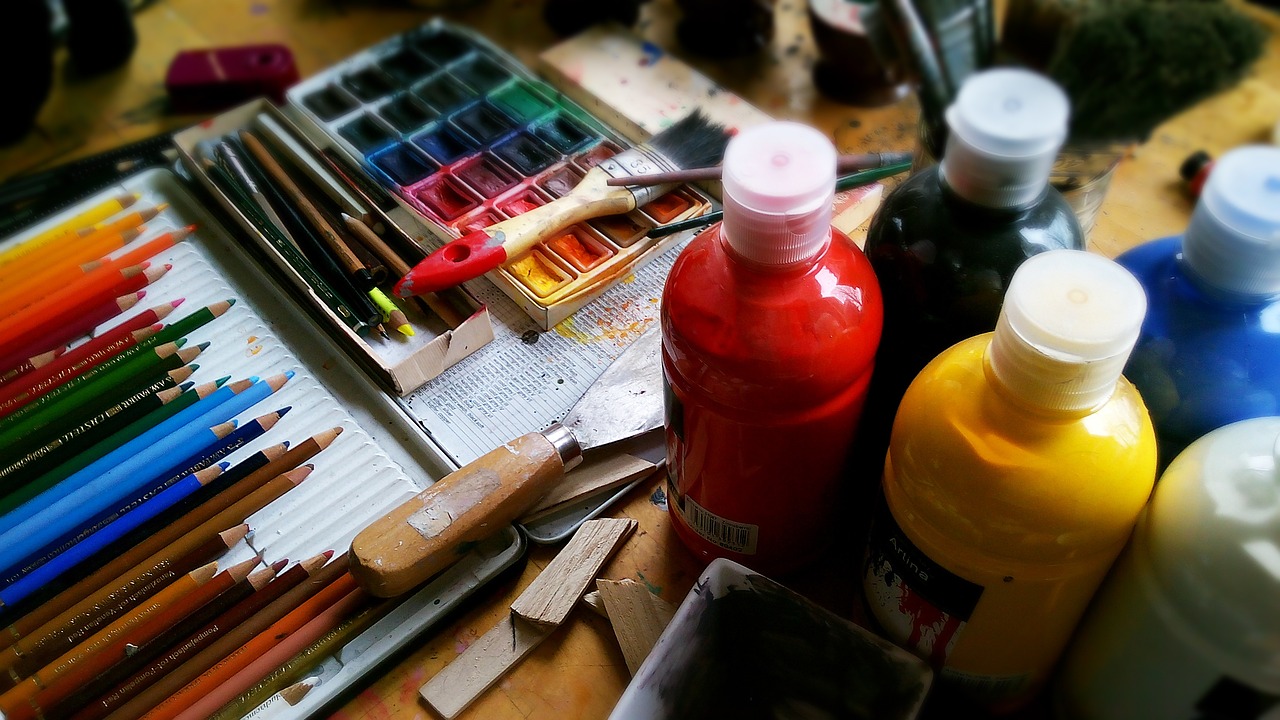
Choosing the right tools is vital for creating effective line art. The tools you use can dramatically influence the final outcome of your work. Whether you prefer traditional methods or digital techniques, having the right arsenal at your disposal can make all the difference. Here’s a look at some essential tools that can help you achieve the desired effects in your line work:
Artists often find themselves at a crossroads when deciding between traditional and digital mediums for line art. Each method has its benefits and drawbacks. Traditional tools, such as pens and pencils, offer a tactile experience that many artists cherish. However, digital tools provide flexibility and the ability to easily undo mistakes. Consider the following when choosing your medium:
- Traditional Tools: These include pens, brushes, and pencils that allow for a hands-on approach.
- Digital Tools: Software and tablets offer features like layering, which can enhance your workflow.
Ultimately, the choice depends on your personal style and comfort level with each medium.
When it comes to line art, not all pens are created equal. Different types of pens offer unique line qualities that can elevate your artwork. Here’s a quick overview of some of the best pens for achieving fine details and bold strokes:
| Pen Type | Line Quality | Best For |
|---|---|---|
| Fine Liners | Thin, precise lines | Detail work |
| Brush Pens | Variable line width | Dynamic strokes |
| Gel Pens | Vibrant colors | Colorful line art |
Digital tools can significantly enhance your line art creation. Software such as Adobe Illustrator, Procreate, and CorelDRAW offer powerful features for line drawing, including layering and brush customization. These tools allow you to experiment with different styles and techniques without the limitations of traditional mediums. If you're looking to take your line art to the next level, investing in good digital software can be a game-changer.
Mastering techniques for dynamic lines can elevate your artwork to new heights. A few methods to consider include varying pressure, speed, and angle while drawing. Imagine how a dancer moves gracefully across the stage—each movement fluid and captivating. Similarly, your lines should flow and convey movement. By practicing these techniques, you can create lines that not only look good but also add a sense of life and depth to your art.
Even experienced artists can stumble when creating line art. It’s essential to be aware of common mistakes that can hinder your progress. Here are a couple of pitfalls to watch out for:
One of the most common mistakes is overworking lines, which can lead to a cluttered and messy appearance. Knowing when to stop refining your lines is crucial for maintaining clarity and impact in your artwork. Trust your instincts; sometimes, less is more.
Composition plays a vital role in the effectiveness of line art. A well-composed piece draws the viewer's eye and creates a harmonious balance. Take the time to consider the placement of elements within your artwork, ensuring that they work together to create a cohesive and engaging piece.
Adding color to line art can enhance its visual appeal, but it requires a careful approach. The key is to integrate color without overpowering the line work. Here are some techniques to help you achieve a harmonious blend:
Understanding color theory is essential for effectively integrating color into line art. Familiarize yourself with fundamental concepts such as complementary colors, color harmony, and the emotional impact of colors. This knowledge can guide your color choices and enhance your artwork.
Different methods of applying color can significantly affect the overall look of your line art. Techniques such as layering, blending, and using gradients can help you achieve a polished finish. Think of your artwork as a symphony, where each color plays its part to create a beautiful harmony.
1. What is line art?
Line art is a form of illustration that uses distinct straight or curved lines without gradation in shade or color to represent two-dimensional or three-dimensional objects.
2. Do I need special tools for line art?
While you can create line art with basic tools like pencils and pens, investing in quality materials can enhance your results. Consider trying different types of pens and digital software to find what works best for you.
3. How can I improve my line quality?
Practicing varying your pressure, speed, and angles while drawing can greatly improve your line quality. Experiment with different techniques and tools to find your unique style.
Understanding Line Quality
When it comes to mastering line art, one of the most crucial aspects to grasp is line quality. Line quality refers to the characteristics of the lines you use in your artwork, including their thickness, texture, and smoothness. These elements can dramatically influence the overall feel and emotion conveyed in your drawings. Think of line quality as the personality of your artwork; just as people have different voices and styles of expression, lines can evoke various moods and energies through their unique qualities.
Imagine you're drawing a serene landscape. The gentle curves of the trees and the soft, flowing lines of the clouds can create a sense of calm and tranquility. In contrast, if you were to use jagged, harsh lines, it might evoke tension or chaos instead. This ability to manipulate the viewer's emotions through line quality is what makes it such a powerful tool in an artist's arsenal.
To better understand line quality, consider how different line types can serve distinct purposes in your art:
- Thick Lines: Often used to emphasize certain elements or to create a bold statement. They can draw the viewer's eye to focal points within your piece.
- Thin Lines: Ideal for intricate details and delicate features. They can add a sense of elegance and refinement to your work.
- Textured Lines: Lines that vary in texture can add depth and interest. They can mimic the feel of different materials, such as fur, fabric, or foliage.
- Smooth Lines: These create a sense of fluidity and movement, making them perfect for dynamic compositions.
As you experiment with different line qualities, you'll find that they can be combined in various ways to enhance your artwork. For instance, using a thick line to outline a subject and then incorporating thin, textured lines for detail can create a striking contrast that adds depth and dimension. Additionally, varying the pressure applied to your drawing tool can result in a dynamic range of line qualities, making your art feel more alive and engaging.
In summary, mastering line quality is essential for any artist looking to elevate their line art. By understanding how different line characteristics influence the viewer's perception and emotional response, you can create artwork that resonates on a deeper level. So grab your pens or stylus, and start experimenting with the myriad ways you can express yourself through line quality!

Essential Tools for Line Art
Creating stunning line art is not just about having the skill; it's also about using the right tools. The tools you choose can significantly affect the quality and style of your artwork. Whether you're a seasoned artist or just starting out, understanding the essential tools for line art will help you elevate your work to new heights. From traditional tools like pens and pencils to digital software, each option has its own unique advantages that can enhance your creative process.
When it comes to traditional line art, a variety of pens can produce different line qualities, allowing you to express your creativity in countless ways. For instance, fine-tipped pens are excellent for intricate details, while brush pens can create bold strokes that add depth and character to your artwork. It's essential to experiment with different types of pens to find what feels comfortable and suits your style. Here’s a quick overview of some popular traditional tools:
| Tool Type | Characteristics | Best For |
|---|---|---|
| Fine-liner Pens | Thin, precise lines | Detail work and outlines |
| Brush Pens | Flexible tip for varied line width | Dynamic strokes and shading |
| Pencils | Soft and hard leads for different effects | Sketching and initial drafts |
On the other hand, digital tools have revolutionized how artists create line art. With the advent of advanced software, artists can achieve precision and flexibility that traditional methods sometimes lack. Programs like Adobe Illustrator and Procreate offer features such as layering, customizable brushes, and undo options, making the process smoother and more efficient. The ability to adjust line quality with just a click can save you time and enhance your creative expression.
When choosing between traditional and digital tools, consider factors such as your personal preference, the type of artwork you want to create, and your comfort level with technology. Both mediums have their unique charm, and many artists find a way to blend them to create stunning mixed-media pieces. Ultimately, the best tool is the one that inspires you to create and brings your artistic vision to life.
In summary, whether you prefer the tactile experience of traditional tools or the versatility of digital software, having the right tools for line art is crucial. Take the time to experiment with various options to discover what works best for you. Remember, the journey of mastering line art is as important as the final piece, so enjoy the process and let your creativity flourish!
- What are the best pens for beginners in line art? Fine-liner pens and brush pens are great starting points as they offer versatility and ease of use.
- Can I use regular pencils for line art? Yes, regular pencils can be used for initial sketches and outlines, but fine-tipped pens are better for final line work.
- Is digital software better than traditional tools? It depends on your personal preference. Digital tools offer more flexibility, while traditional tools provide a tactile experience.
Traditional vs. Digital Tools
When it comes to creating stunning line art, the age-old debate of traditional versus digital tools often arises. Each medium has its unique charm and advantages, making the choice largely dependent on your personal style and preferences. Let's dive into the characteristics of both methods, so you can make an informed decision that aligns with your artistic vision.
Traditional tools, such as ink pens, pencils, and brushes, evoke a sense of nostalgia and authenticity. Many artists appreciate the tactile experience of working on paper, where each stroke feels personal and deliberate. The imperfections that come with traditional methods can add character and depth to your artwork. Moreover, you can experiment with various surfaces, from textured paper to canvas, which can significantly influence the final outcome of your line work. However, one of the downsides is the limited ability to undo mistakes; once ink is on paper, it’s there to stay!
On the flip side, digital tools have revolutionized the way artists create line art. Programs like Adobe Illustrator and Procreate offer incredible versatility, allowing you to easily manipulate your lines, adjust colors, and undo errors with just a click. The ability to work with layers means you can separate different elements of your artwork, making it easier to experiment and refine your designs without the fear of ruining the entire piece. Digital art also provides a vast array of brushes and effects that can mimic traditional tools while offering enhanced precision and control.
To help you weigh your options, here’s a quick comparison:
| Feature | Traditional Tools | Digital Tools |
|---|---|---|
| Tactile Experience | Yes, feels authentic | No, lacks physical feel |
| Undo Mistakes | No | Yes |
| Experimentation | Limited | Extensive with layers |
| Variety of Effects | Depends on materials | Wide range of brushes and effects |
| Portability | Less portable | Highly portable with devices |
Ultimately, the choice between traditional and digital tools boils down to your individual artistic goals. Some artists thrive in the organic feel of traditional methods, while others find their flow in the flexibility of digital platforms. Many have even found a way to blend both worlds, incorporating traditional sketches into their digital workflows for a unique touch. So, why not try both? You might just discover a new favorite way to express your creativity!
- Can I combine traditional and digital tools in my artwork? Absolutely! Many artists blend both methods to take advantage of the strengths of each.
- What are some recommended traditional tools for beginners? Start with a set of quality pencils, fine liners, and a smooth sketchbook to practice your line art.
- Is digital art easier than traditional art? It depends on your comfort level with technology. Digital art offers more flexibility, but traditional art can be more intuitive for some.
- Do I need expensive software to create digital line art? While there are premium programs available, there are also free options that provide excellent features for beginners.
Best Pens for Line Art
When it comes to creating stunning line art, the choice of pen can make all the difference. The right pen not only influences the quality of your lines but also enhances your overall creative expression. There are various types of pens available, each offering unique characteristics that can help you achieve your desired effects. Whether you're aiming for fine details or bold strokes, selecting the best pen for your style is essential.
One of the most popular choices among artists is the fineliner pen. These pens have a precise tip that allows for clean and consistent lines, making them ideal for intricate designs. They come in various sizes, enabling you to play with line thickness and create depth in your artwork. Brands like Pigma Micron and Staedtler Triplus Fineliner are favored for their reliability and vibrant ink.
For those who enjoy a more traditional approach, ink pens with nibs can provide an unparalleled level of control. These pens require a bit of practice but offer the ability to vary line thickness through pressure and angle. Artists often use dip pens with different nibs to achieve everything from delicate lines to bold strokes. The beauty of ink pens lies in their fluidity and the unique character they bring to each line.
Additionally, brush pens are gaining popularity among artists for their versatility. They allow for a dynamic range of line quality, from thick to thin, depending on how you apply pressure. Brands like Pentel Pocket Brush and Faber-Castell Pitt Artist Brush Pens are excellent choices for those looking to add a touch of flair to their line art. With these pens, you can create expressive lines that breathe life into your drawings.
To help you choose the right pen for your line art needs, here's a quick comparison table of some of the best options available:
| Pen Type | Best For | Recommended Brands |
|---|---|---|
| Fineliner Pen | Precise, detailed work | Pigma Micron, Staedtler Triplus |
| Ink Pen (Dip Pen) | Variable line thickness | Speedball, Hunt |
| Brush Pen | Dynamic and expressive lines | Pentel, Faber-Castell |
Ultimately, the best pen for your line art will depend on your personal style and the effects you wish to achieve. Experimenting with different types can open up new avenues for creativity and enhance your drawing skills. So, don’t be afraid to try out various pens and find the one that feels just right for you!
- What is the best pen for beginners? For beginners, fineliner pens are often recommended due to their ease of use and consistent results.
- Can I use regular pens for line art? While regular pens can work, they may not provide the same quality and precision as art-specific pens.
- How do I maintain my pens? To maintain your pens, store them horizontally and avoid leaving them uncapped for extended periods.
Digital Software Recommendations
When it comes to creating stunning line art, the right software can make all the difference. In today's digital age, artists have a plethora of options at their fingertips, each offering unique features that cater to various styles and preferences. Whether you are a seasoned professional or a budding artist, choosing the right program can significantly enhance your workflow and creativity.
One of the most popular choices among digital artists is Adobe Illustrator. This vector-based software is renowned for its precision and scalability, making it ideal for creating clean, crisp lines. With its powerful pen tool and customizable brushes, you can achieve a variety of line qualities that are essential for detailed line art. Furthermore, Illustrator’s layering capabilities allow you to manage complex compositions effortlessly, enabling you to focus on your creativity without getting bogged down by technicalities.
Another fantastic option is Procreate, especially for those who prefer working on tablets. This app is packed with features that cater to artists who love to sketch and paint digitally. Procreate offers a wide range of brushes, including those specifically designed for line art, allowing you to experiment with different textures and styles. The intuitive interface and responsive touch controls make it a favorite among illustrators who want a natural drawing experience.
For those who are looking for a free alternative, Krita is a powerful open-source program that should not be overlooked. Krita is designed specifically for artists and offers a robust set of features, including customizable brushes and an advanced layering system. Its user-friendly interface makes it accessible for beginners, while still providing the depth that experienced artists crave. Plus, with its focus on digital painting, Krita is great for experimenting with color in your line art.
If you are leaning towards a more graphic design-oriented approach, CorelDRAW is another excellent choice. This software excels in vector graphic design and offers a variety of tools that can help you create intricate line art. CorelDRAW’s user-friendly interface and extensive library of templates and clip art can save you time, allowing you to focus more on your artistic vision rather than getting lost in the technical details.
To help you compare these software options, here’s a quick overview of their key features:
| Software | Platform | Key Features |
|---|---|---|
| Adobe Illustrator | Windows, Mac | Vector-based, customizable brushes, advanced layering |
| Procreate | iPad | Touch controls, extensive brushes, natural drawing experience |
| Krita | Windows, Mac, Linux | Open-source, customizable brushes, user-friendly interface |
| CorelDRAW | Windows, Mac | Vector graphic design, templates, clip art library |
Ultimately, the best software for your line art will depend on your personal preferences and artistic style. Don’t hesitate to try out a few options to see which one resonates with you the most. The right tool can unlock your potential and take your line art to the next level!
1. What is the best software for beginners?
For beginners, Krita and Procreate are excellent choices due to their user-friendly interfaces and robust features.
2. Can I use Adobe Illustrator for free?
Adobe Illustrator does not offer a free version, but you can access a 7-day free trial to explore its features.
3. Is Procreate available on desktop?
No, Procreate is specifically designed for iPad and is not available on desktop platforms.
4. Can I use Krita for professional work?
Absolutely! Krita is a powerful tool that many professional artists use, especially for digital painting and illustrations.
Techniques for Creating Dynamic Lines
Creating dynamic lines in your artwork is akin to adding a heartbeat to your drawings; they bring life, movement, and emotion to your creations. To master this essential skill, it's important to understand how various techniques can influence the flow and energy of your lines. One of the most effective methods is to vary your pressure while drawing. By applying more pressure at certain points and lifting it at others, you can create a beautiful contrast between thick and thin lines, which can evoke a sense of depth and dimension. Think of it as playing a musical instrument where the intensity of your touch alters the sound; the same principle applies to your lines.
Another technique to explore is the speed of your stroke. Quick, fluid motions can create a sense of urgency and excitement, while slow, deliberate strokes can convey calmness and stability. Imagine how a swift brushstroke can suggest wind or movement, while a slower one might depict a serene landscape. This variation not only adds interest but also guides the viewer's eye throughout your artwork, creating a narrative of its own.
Additionally, changing the angle at which you draw can significantly affect the appearance of your lines. For instance, drawing at a steep angle can produce sharper, more angular lines, while a more horizontal approach may yield softer, rounded edges. Experimenting with these angles can help you discover unique styles and effects that resonate with your artistic vision. Remember, the goal is to create a rhythm within your lines; just as a dancer moves gracefully across a stage, your lines should flow seamlessly across the page.
Lastly, don’t shy away from incorporating gestural drawing techniques. This approach emphasizes the movement and energy of the subject rather than focusing solely on precision. By allowing your hand to move freely and expressively, you can capture the essence of your subject, resulting in lines that are full of life and character. Think of it as capturing a fleeting moment – the more you embrace spontaneity, the more dynamic your lines will become.
In conclusion, mastering the art of dynamic lines is about finding the right balance between control and freedom. By varying your pressure, speed, angle, and embracing gestural techniques, you can create lines that not only enhance your artwork but also tell a story. So grab your tools, let your creativity flow, and watch as your drawings transform into vibrant expressions of art!
- What is line quality? Line quality refers to the thickness, texture, and smoothness of lines in art, which can evoke different emotions.
- How can I improve my line art skills? Practice varying your pressure, speed, and angles while drawing to create dynamic lines.
- What tools are best for line art? Pens, pencils, and digital tools can all be effective, depending on your preferred medium.
- Can I mix traditional and digital tools? Absolutely! Many artists find that combining both methods enhances their creative expression.

Common Mistakes to Avoid
Creating line art can be a thrilling journey, but even the most seasoned artists can stumble into common pitfalls. Recognizing these mistakes is crucial for refining your craft and achieving the stunning results you desire. One of the primary errors is overworking lines. It’s easy to get caught up in the details, continuously refining your lines to achieve perfection. However, this can often lead to a messy appearance, where the original intent of the artwork gets lost. The key is to know when to stop. A good rule of thumb is to take a step back and evaluate your work periodically. If you find yourself adding more and more detail without a clear purpose, it might be time to put down the pen.
Another common mistake is ignoring composition. Composition is the backbone of any artwork, and neglecting it can result in a piece that feels disjointed or chaotic. It’s essential to consider how different elements interact within your artwork. Are they balanced? Do they guide the viewer’s eye throughout the piece? To avoid this mistake, try sketching out a rough layout before diving into the details. This can help you visualize the overall composition and ensure that everything works harmoniously together.
In addition to these pitfalls, artists often overlook the importance of line variation. Using the same thickness and style throughout your piece can make it feel flat and lifeless. Instead, experiment with varying line weights and textures to add depth and interest. For instance, using thicker lines for foreground elements can create a sense of depth, while thinner lines can be used for background details. This variation can significantly enhance the overall impact of your line art.
To further illustrate these points, consider the following table that highlights some common mistakes alongside their potential solutions:
| Common Mistake | Solution |
|---|---|
| Overworking lines | Step back periodically and assess if further detailing is necessary. |
| Ignoring composition | Sketch a rough layout to ensure balance and flow in your artwork. |
| Lack of line variation | Incorporate different line weights and textures for added depth. |
By being mindful of these common mistakes, you can elevate your line art to new heights. Remember, every artist makes mistakes, but the key is to learn from them and keep pushing forward. Embrace the journey, and don’t be afraid to experiment. After all, art is about expression, and sometimes the best pieces come from unexpected choices!
Q: What is the most important aspect of line art?
A: The most important aspect of line art is line quality, which includes thickness, texture, and smoothness. Varying these qualities can significantly impact the emotional response to the artwork.
Q: Can I use any pen for line art?
A: While you can use various pens, it's best to select those designed for line work, such as fineliners or brush pens, to achieve the desired effects and precision.
Q: How do I know when to stop working on my line art?
A: A good practice is to periodically step back and view your work from a distance. If further detailing doesn’t add clarity or impact, it may be time to stop.
Q: Is digital line art better than traditional?
A: It depends on personal preference. Digital line art offers flexibility and ease of editing, while traditional methods can provide unique textures and a tactile experience.
Overworking Lines
When it comes to creating line art, one of the most common pitfalls artists encounter is . It’s easy to get caught up in the details, constantly refining and adjusting your strokes to achieve that perfect finish. However, this obsession can lead to a cluttered and chaotic appearance, detracting from the overall impact of your artwork. Imagine trying to cook a gourmet meal; if you keep adding spices without tasting, you might end up with a dish that’s too overwhelming and unbalanced. The same principle applies to line art.
Recognizing when to stop is crucial. Overworking lines can create a sense of confusion, making it hard for the viewer to focus on the main subject of your piece. Instead of enhancing your art, excessive detailing can result in a muddled composition. To avoid this, consider the following tips:
- Step Back: Frequently take a step back from your work to assess it from a distance. This will help you see if the details are adding value or if they’re just noise.
- Limit Your Revisions: Set a specific number of times you will go back to edit your lines. This will help you resist the urge to keep tweaking.
- Trust Your Instincts: If you feel that a line is good enough, trust that feeling. Perfectionism can be an artist’s worst enemy.
Additionally, it’s helpful to embrace the idea of imperfection. Sometimes, the beauty of line art lies in its rawness and authenticity. Think of the great artists who embraced spontaneity and allowed their work to breathe. After all, art is not just about technical precision; it’s about expression and emotion.
In conclusion, while it’s important to strive for quality in your line art, be mindful of the tendency to overwork your lines. By recognizing when enough is enough, you can maintain clarity and impact in your artwork, allowing your creativity to shine through without unnecessary distractions.
Here are some common questions artists have regarding overworking lines in their artwork:
- What are the signs that I’m overworking my lines? If your lines start to look messy, or if you can’t determine the main focus of your piece, you might be overworking it.
- How can I improve my ability to recognize when to stop? Practice stepping back from your work regularly and ask for feedback from peers or mentors.
- Are there any techniques to avoid overworking lines? Yes! Setting limits on revisions and embracing imperfections can help.
Ignoring Composition
When it comes to line art, one of the biggest pitfalls many artists encounter is the tendency to overlook composition. You might be thinking, "Why is composition so important?" Well, imagine building a house without a solid foundation; it might look great on the outside, but it won't stand the test of time. Similarly, a well-composed piece of art is essential for creating a visually appealing and engaging artwork. Composition refers to the arrangement of elements within your drawing, and it can make or break your overall piece.
So, what should you consider when focusing on composition? First off, think about balance. You want to distribute visual weight evenly across your artwork. This can be achieved through symmetrical or asymmetrical balance. For instance, if you have a heavy, detailed area on one side of your drawing, consider adding lighter elements on the opposite side to create harmony. This balance keeps the viewer's eye moving across the piece, preventing it from getting stuck in one area.
Another factor to consider is the focal point. Every artwork should have a point that draws the viewer's attention. This could be a character, an object, or a particular detail in your line work. To create a strong focal point, use contrast—this could mean making the focal area darker or lighter than the surrounding elements. In line art, this can often be achieved through varying line thickness or incorporating intricate details in the focal area while keeping the rest simpler.
Moreover, don't forget about the flow of your lines. Lines guide the viewer's eye through the artwork, creating a visual journey. Think of lines as paths that lead the viewer from one element to another. You want to avoid creating a chaotic mess where the eye doesn't know where to go. Instead, use lines that curve and twist to create a sense of movement and direction. This not only enhances the composition but also adds depth to your artwork.
Lastly, consider the negative space in your artwork. This is the area around and between the subjects of your drawing. Ignoring negative space can lead to a cramped and cluttered look, whereas utilizing it can give your composition room to breathe. It’s like having a well-organized room; when everything has its place, it feels more comfortable and inviting. By thoughtfully incorporating negative space, you can enhance the overall composition and make your line art more dynamic.
In summary, ignoring composition can lead to a disjointed and ineffective piece of line art. Remember to focus on balance, establish a strong focal point, create flow with your lines, and utilize negative space effectively. By paying attention to these elements, you'll elevate your line art from good to truly exceptional. So, the next time you sit down to create, take a moment to plan out your composition. It might just be the key to unlocking your artistic potential!
- What is composition in art? Composition refers to the arrangement of visual elements within a piece of artwork. It helps to create balance, focus, and a visual flow for the viewer.
- Why is composition important in line art? Good composition enhances the overall appeal of the artwork, guides the viewer’s eye, and ensures that the piece communicates its intended message effectively.
- How can I improve my composition skills? Practice by studying the compositions of other artists, experimenting with different arrangements in your own work, and seeking feedback from peers.

Incorporating Color into Line Art
Adding color to your line art can transform a simple black-and-white drawing into a vibrant masterpiece. The key is to enhance your artwork without overwhelming the intricate line work that you’ve painstakingly created. Think of color as a supporting actor in a film; it should complement the lead role, which is your line art, rather than steal the spotlight. So, how do you effectively incorporate color into your line art? Let's dive into some essential techniques and concepts that will help you achieve a harmonious blend of both elements.
First off, understanding color theory is crucial. This involves knowing how colors interact with one another and the emotions they evoke. For instance, warm colors like reds and yellows can create feelings of energy and excitement, while cool colors like blues and greens often convey calmness and serenity. By carefully selecting your color palette, you can guide the viewer's emotions and reactions to your artwork. A well-thought-out color scheme can elevate your line art to new heights.
When it comes to applying color, there are several techniques you can utilize. One effective method is layering. This involves applying multiple layers of color to build depth and richness. You can start with a base color and gradually add darker shades for shadows and lighter ones for highlights. This technique not only makes your artwork more dynamic but also allows for smooth transitions between colors. Another popular technique is blending, where you mix colors together to create gradients or softer edges. This can add a sense of realism and dimension to your line art.
Moreover, consider using gradients in your color application. Gradients can create a sense of movement and flow within your artwork. For example, if you have a character in your line art, applying a gradient to their clothing can make it appear more three-dimensional and engaging. You can achieve this effect digitally with software tools or traditionally with colored pencils or markers.
To illustrate the importance of color in line art, let's take a look at a simple example:
| Color Choice | Effect on Line Art |
|---|---|
| Warm Colors | Creates energy and draws attention |
| Cool Colors | Conveys calmness and balance |
| Monochromatic Scheme | Provides unity and harmony |
| Complementary Colors | Creates contrast and visual interest |
Incorporating color into line art isn't just about slapping on some hues; it's about making deliberate choices that enhance your overall composition. Always remember to take a step back and evaluate your work as a whole. Does the color support the lines? Is it drawing attention to the right areas? This reflective practice will help you refine your technique and produce more compelling artwork.
Lastly, don't shy away from experimenting! Art is all about exploration, and sometimes the most stunning results come from unexpected color combinations. Try using color in unconventional ways to see how it affects your line art. You might just stumble upon a unique style that sets your work apart from others.
- What tools are best for adding color to line art?
There are various tools, including colored pencils, markers, watercolors, and digital software like Adobe Photoshop or Procreate, that can effectively add color to your line art. - Can I use any color scheme?
While you can technically use any color scheme, it's advisable to choose one that complements your line art and conveys the intended mood or message. - How do I avoid overpowering my line art with color?
Focus on using color to enhance rather than dominate. Use lighter shades and transparencies to allow the lines to remain visible and impactful. - Is it better to color before or after inking?
This depends on your technique. Some artists prefer to ink first to define their lines, while others might color first and then ink to maintain a softer look.
Color Theory Basics
Understanding color theory is essential for any artist looking to enhance their line art. This foundational concept revolves around how colors interact with each other and how they can evoke emotions and set the mood in your artwork. At its core, color theory is divided into three primary categories: primary colors, secondary colors, and tertiary colors. Primary colors—red, blue, and yellow—are the building blocks of all other colors. When you mix these colors, you create secondary colors: green, orange, and purple. Tertiary colors emerge from mixing a primary color with a secondary color, resulting in hues like red-orange or yellow-green.
One of the most exciting aspects of color theory is the color wheel, a circular diagram that showcases the relationships between colors. It serves as a visual guide for artists when choosing color combinations. Colors that are opposite each other on the wheel, known as complementary colors, create a striking contrast and can make your line art pop. For example, pairing blue with orange can create a vibrant dynamic that draws the viewer's eye. On the other hand, colors that are next to each other, called analogous colors, offer a more harmonious and soothing effect, perfect for creating a sense of unity in your artwork.
Moreover, understanding warm and cool colors can significantly impact the emotional tone of your line art. Warm colors, such as reds and yellows, evoke feelings of energy and warmth, while cool colors like blues and greens can convey calmness and serenity. This emotional connection is crucial when you're deciding how to use color in your line art. For instance, if you're illustrating a lively scene, incorporating warm colors can enhance the vibrancy, whereas cool colors may be more suitable for a tranquil landscape.
To effectively incorporate color into your line art, consider the following key principles of color theory:
- Contrast: Use contrasting colors to create visual interest and draw attention to specific areas of your artwork.
- Harmony: Select colors that complement each other to create a cohesive look.
- Balance: Ensure that your color distribution is even throughout your piece to maintain visual stability.
Finally, remember that experimentation is key in mastering color theory. Don't hesitate to play around with different combinations and see what resonates with you. The more you explore, the more you'll discover unique ways to integrate color into your line art, transforming simple outlines into captivating masterpieces.
Q: What are primary colors?
A: Primary colors are the fundamental colors from which all other colors are created. They include red, blue, and yellow.
Q: How do complementary colors work?
A: Complementary colors are opposite each other on the color wheel and create a striking contrast when used together, enhancing visual impact.
Q: Can I use warm and cool colors in the same artwork?
A: Absolutely! Combining warm and cool colors can create depth and interest, but be mindful of balance to avoid overwhelming the viewer.
Q: How can I improve my color choices in line art?
A: Study color theory, practice with the color wheel, and don't hesitate to experiment with different combinations to find what works best for your style.

Techniques for Color Application
When it comes to applying color to your line art, the methods you choose can dramatically influence the final outcome of your artwork. It's not just about slapping on some color; it's about creating a visual harmony that enhances your lines rather than overwhelms them. Let's dive into some effective techniques that can elevate your line art to new heights.
One of the most popular methods is layering. This technique involves building up color gradually in multiple layers, allowing for a more nuanced and rich appearance. By starting with lighter colors and gradually adding darker shades, you can achieve depth and dimension. Imagine painting a sunset; you wouldn't just use one color, right? You'd blend yellows, oranges, and reds to create that stunning gradient. Similarly, in your line art, layering can help create a smooth transition between colors.
Another technique is blending. This is where you take two or more colors and mix them together to create a seamless transition. Blending can be done using various tools, from brushes to blending stumps, depending on whether you’re working traditionally or digitally. For instance, if you’re using colored pencils, you might use a blending stump to soften the edges where two colors meet. In digital art, software like Photoshop or Procreate allows you to use brush tools that mimic this effect, giving you the flexibility to create soft gradients and smooth transitions.
Incorporating gradients is yet another powerful technique. Gradients can add a sense of movement and flow to your artwork. They can be linear, where the transition occurs in a straight line, or radial, where the color radiates from a central point. Think of a flower petal that transitions from deep purple at the base to a lighter lavender at the tip. This technique can be particularly effective in line art, as it draws the viewer's eye and adds a dynamic quality to your work.
Additionally, don’t underestimate the power of contrast. Using contrasting colors can make your line art pop. For example, if your lines are predominantly dark, consider using bright colors for the fill to create a striking visual impact. This technique not only highlights your line work but also adds an exciting element to your composition. It’s like wearing a bold accessory with a simple outfit; it draws attention and creates interest.
Finally, consider the emotional impact of color. Different colors evoke different feelings, so think about what you want your artwork to convey. Warm colors like reds and oranges can evoke energy and passion, while cool colors like blues and greens can create a sense of calm. By thoughtfully choosing your colors, you can enhance the narrative of your artwork, making it not just visually appealing but also emotionally resonant.
In summary, mastering color application techniques like layering, blending, gradients, contrast, and emotional color choices can significantly enhance your line art. Experiment with these methods to find the combination that works best for your unique style. Remember, the goal is to create a piece that not only showcases your line work but also tells a story through color.
- What is the best medium for applying color to line art? It really depends on your personal preference! Both traditional mediums like colored pencils and digital tools have their unique advantages.
- How can I avoid overpowering my line art with color? Focus on using lighter shades and layering colors gradually. Always keep your line work visible and let it guide your color choices.
- What tools do I need for blending colors effectively? For traditional art, blending stumps and soft brushes work well. In digital art, use software with blending options and customizable brushes.
Frequently Asked Questions
- What is line quality and why is it important?
Line quality refers to the thickness, texture, and smoothness of the lines in your artwork. It's essential because varying line qualities can evoke different emotions and create visual interest. Think of it like the difference between a soft whisper and a bold shout; both convey messages but in entirely different ways!
- What tools do I need for creating line art?
To create stunning line art, you’ll want to choose the right tools. This includes pens, pencils, and possibly digital software. Traditional tools like fine liners and brush pens work great for detailed work, while digital tools like tablets and software can offer flexibility and precision. It's like choosing the right paintbrush for a masterpiece!
- Should I use traditional or digital tools for line art?
It really depends on your personal style! Traditional tools offer a tactile experience and can produce unique textures, while digital tools provide endless options for editing and layering. If you love the feel of paper, go traditional; if you enjoy experimenting with colors and effects, digital might be your best bet!
- What are common mistakes to avoid in line art?
Some common pitfalls include overworking your lines, which can lead to a cluttered look, and ignoring composition, which can make your artwork feel unbalanced. It's crucial to know when to step back and appreciate your work, just like knowing when to stop seasoning a dish!
- How can I effectively incorporate color into my line art?
Integrating color into line art can enhance its appeal, but it’s vital to do so without overpowering the lines. Start by understanding basic color theory and experiment with techniques like layering and blending. It’s like adding icing to a cake; you want it to complement, not overshadow!


