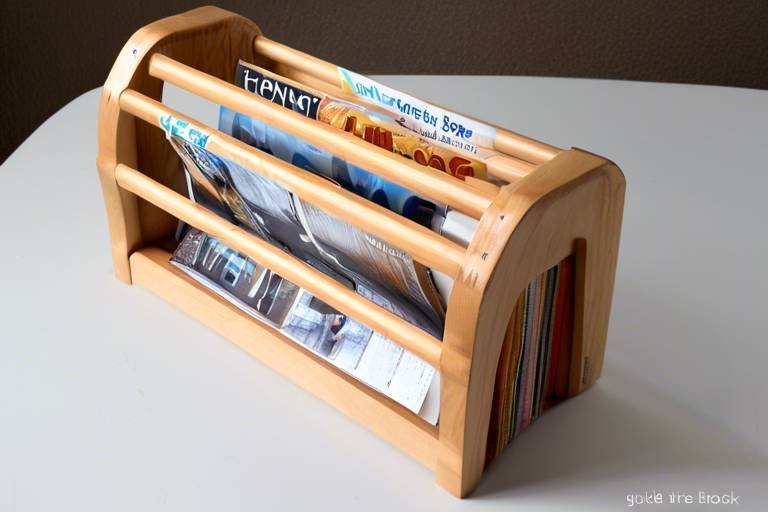
Crafting a Wooden Magazine Rack: A Guide
Are you tired of cluttered coffee tables and magazines strewn across your living room? A wooden magazine rack could be the perfect solution! Not only does it help organize your reading materials, but it also adds a touch of elegance to your decor. In this guide, we will walk you through the process of crafting your very own magazine rack from scratch. Whether you're a seasoned woodworker or a complete novice, this project is designed to be accessible and enjoyable. So, roll up your sleeves and let’s dive into the world of woodworking!
When it comes to crafting a magazine rack, selecting the right type of wood is crucial. Not all woods are created equal, and the choice you make can significantly affect both the durability and aesthetic appeal of your finished piece. For instance, hardwoods like oak and maple are known for their strength and longevity, making them excellent choices for furniture that sees regular use. On the other hand, softer woods such as pine are easier to work with and can provide a rustic charm, though they may not hold up as well over time.
Consider the following wood types when making your selection:
- Oak: Durable and aesthetically pleasing, oak is resistant to wear and tear.
- Pine: Lightweight and easy to work with, pine is great for beginners.
- Maple: Known for its fine grain and strength, maple offers a polished look.
- Cherry: This wood darkens beautifully with age, adding character to your rack.
Before you start building your magazine rack, it’s essential to gather all the necessary tools and materials. Having everything at your fingertips will streamline the process and enhance your overall experience. Here’s a list of essential tools you’ll need:
- Miter Saw: For precise cuts at various angles.
- Hand Saw: A reliable alternative for those without power tools.
- Drill: For making holes and driving screws.
- Sander: To smooth out rough edges and surfaces.
- Clamps: To hold pieces together during assembly.
In terms of materials, you’ll need quality wood, wood glue, screws, and finishing products like stain or varnish to complete your project. Having everything ready will not only save you time but also keep your creativity flowing!
Accurate measurements and cuts are fundamental to achieving a professional-looking finish. Begin by measuring the dimensions of your magazine rack. Think about how many magazines you want to store and the space you have available. Once you have your measurements, mark them clearly on the wood. A good tip is to double-check your measurements before cutting – it’s always better to be safe than sorry!
When it comes to cutting, using a miter saw will provide you with clean and precise cuts. If you’re using a hand saw instead, make sure to follow these techniques:
- Use a straightedge as a guide to ensure your cuts are straight.
- Take your time and let the saw do the work; don’t force it.
- Practice on scrap wood if you’re unsure about your technique.
A miter saw is invaluable for making precise cuts. To use it safely, always wear protective gear, including goggles and ear protection. Adjust the saw to the desired angle, typically 45 degrees for corners, and ensure the wood is securely clamped in place before cutting. This tool will allow you to achieve perfect angles and smooth edges, which are essential for a polished look.
If you find yourself without power tools, don’t fret! Hand saws can be just as effective. Start with a sharp blade and ensure your saw is appropriate for the thickness of the wood you’re cutting. Use long, steady strokes to maintain control and achieve a clean cut. Remember, patience is key here. It’s better to take your time and get it right than to rush and make mistakes!
Once all your pieces are cut, it’s time to assemble your magazine rack. Begin by laying out the pieces to visualize how they will fit together. Use wood glue to bond the edges, and then secure them with screws for added strength. Clamps can be incredibly helpful during this process, holding the pieces in place while the glue dries. Make sure everything is square and aligned before fastening everything together.
The final appearance of your magazine rack can be enhanced with proper finishing techniques. Start by sanding the entire piece to smooth out any rough edges. Once you’re satisfied with the texture, it’s time to choose a finish. Whether you opt for a natural stain to highlight the wood’s grain or a bold paint color to make a statement, the finish can dramatically alter the look of your rack. Don’t forget to seal it with a protective coat to ensure longevity!
Different finishes can dramatically alter the look of your magazine rack. Here are a few options to consider:
- Stain: Enhances the natural beauty of the wood while adding color.
- Paint: Allows for creativity and personalization; choose any color that fits your decor.
- Varnish: Provides a durable protective layer while showcasing the wood grain.
To keep your magazine rack looking great over time, regular maintenance is essential. Here’s how to care for your wooden masterpiece:
- Wipe down with a damp cloth regularly to remove dust.
- Avoid placing it in direct sunlight to prevent fading.
- Reapply finish as needed to maintain its luster.
With proper care, your magazine rack will not only serve its purpose but also become a cherished part of your home decor.
Q: How long does it take to build a magazine rack?
A: Depending on your skill level and the complexity of your design, it can take anywhere from a few hours to a couple of days.
Q: Can I customize the size of my magazine rack?
A: Absolutely! Adjust the dimensions to fit your space and needs.
Q: What type of wood is best for beginners?
A: Pine is a great option for beginners due to its softness and ease of handling.

Choosing the Right Wood
When it comes to crafting your very own wooden magazine rack, is not just a matter of preference; it's a decision that can significantly impact both the durability and the aesthetic appeal of your finished piece. Think of wood as the canvas for your creativity—different types bring unique textures, colors, and strengths to the table. So, how do you pick the perfect wood for your project?
First off, consider the characteristics of various wood types. Hardwoods like oak, maple, and walnut are renowned for their strength and beautiful grain patterns, making them ideal for furniture that will last for generations. On the other hand, softwoods such as pine and cedar are easier to work with and often more affordable, but they may not be as durable in the long run. Here’s a quick breakdown:
| Wood Type | Characteristics | Best Use |
|---|---|---|
| Oak | Durable, strong, and has a prominent grain | High-quality furniture |
| Maple | Hard, fine-grained, and resistant to scratches | Functional pieces like tables and racks |
| Pine | Lightweight, easy to work with, and cost-effective | Casual furniture and projects |
| Cedar | Resistant to moisture and insects, aromatic | Outdoor furniture and accents |
Next, think about how the wood will influence the final appearance of your magazine rack. The color and grain can either complement your home decor or stand out as a statement piece. For instance, a rich walnut finish can add a touch of elegance to a modern living room, while a light pine might lend a more rustic, cozy feel. Imagine your magazine rack nestled in your favorite reading nook—what vibe do you want it to convey?
Moreover, consider the environmental impact of your wood choice. Opting for sustainably sourced or reclaimed wood can be a fantastic way to reduce your carbon footprint while still creating something beautiful. Not only does this choice reflect your values, but it can also add a unique story to your magazine rack. After all, every piece of wood has its own history, and incorporating that into your project can make it even more special.
In summary, selecting the right wood for your magazine rack involves balancing aesthetics, functionality, and sustainability. Whether you lean towards a sturdy hardwood or a lighter softwood, the choice you make will shape not just the look of your rack, but also its longevity and the joy it brings to your space.
- What type of wood is best for outdoor magazine racks? Cedar is an excellent choice due to its natural resistance to moisture and insects.
- Can I mix different types of wood for my magazine rack? Absolutely! Mixing woods can create a unique look, but ensure that they complement each other in color and grain.
- How do I know if the wood is sustainably sourced? Look for certifications like FSC (Forest Stewardship Council) or ask your supplier about the sourcing practices.

Essential Tools and Materials
Before diving headfirst into the exciting world of woodworking, it's essential to gather all the necessary tools and materials for crafting your wooden magazine rack. Having the right equipment not only makes the process smoother but also enhances the quality of your final product. Imagine trying to bake a cake without the right ingredients; it just wouldn’t turn out as sweet! In this section, we’ll outline what you’ll need to get started on your project.
First up, let’s talk about the tools. At a minimum, you’ll need:
- Measuring Tape: Accurate measurements are key to a successful build.
- Miter Saw: This tool is invaluable for making precise cuts at various angles.
- Hand Saw: A great alternative if you don’t have access to power tools.
- Drill: Essential for making holes for screws and dowels.
- Screwdriver: To secure the joints of your magazine rack.
- Sander: For achieving a smooth finish on your wood.
- Clamps: To hold pieces together while the glue dries.
Now, let’s not forget about the materials. The type of wood you choose can significantly affect the durability and aesthetic appeal of your magazine rack. Here’s a quick breakdown of some popular wood options:
| Type of Wood | Characteristics | Best For |
|---|---|---|
| Oak | Strong and durable, with a beautiful grain. | Long-lasting furniture. |
| Pine | Lightweight and easy to work with; more affordable. | Beginner projects. |
| Walnut | Rich color and grain, luxurious feel. | High-end pieces. |
| Birch | Hardwood that is great for staining. | Versatile projects. |
In addition to wood, you’ll need some adhesives and fasteners to hold everything together. Wood glue is a must-have for creating strong joints, while screws or nails will provide additional support. The choice of finish—like varnish, stain, or paint—will also play a crucial role in the final look of your magazine rack. Think of it as the icing on the cake; it’s what makes your hard work shine!
By ensuring you have all the right tools and materials, you set yourself up for success. So grab your measuring tape, pick out that perfect piece of wood, and let’s get crafting! Your stylish wooden magazine rack is just a few steps away.

Measuring and Cutting Wood
When it comes to woodworking, measuring and cutting wood are fundamental skills that can make or break your project. Imagine trying to build a puzzle with pieces that don’t fit together; that’s what it feels like when your cuts are off. To avoid this frustration, it’s essential to take your time and ensure that every measurement is precise. Start by gathering your materials and tools, including a tape measure, square, and a pencil. A good rule of thumb is to measure twice and cut once—this will save you from making costly mistakes.
First, lay out your wood on a flat surface. Use your tape measure to determine the lengths needed for each piece of your magazine rack. It’s often helpful to create a simple sketch or diagram of your design, noting the dimensions. This visual aid will serve as a roadmap, guiding you through the cutting process. When measuring, always consider the thickness of the blade you’ll be using; this is known as the kerf, and it can affect the final length of your pieces. Mark your measurements clearly with a pencil, and don’t forget to label each piece if you’re cutting multiple parts.
Now, onto the cutting! If you’re using a miter saw, position the wood securely on the saw’s base and align your mark with the blade. Always wear safety goggles to protect your eyes from flying debris. As you cut, maintain a steady hand and let the saw do the work—don't force it through the wood. If you’re using a hand saw, it’s all about technique. Start with a few gentle strokes to create a groove, then apply more pressure as you cut deeper. Remember, patience is key here; rushing can lead to jagged edges and uneven cuts.
For those who prefer a visual representation of the cutting process, here’s a simple table summarizing the key steps:
| Step | Description |
|---|---|
| 1 | Measure your wood accurately and mark the dimensions. |
| 2 | Choose the right saw for your project (miter or hand saw). |
| 3 | Align your marks with the saw blade and cut steadily. |
| 4 | Check your cuts for accuracy before proceeding to assembly. |
After cutting, it’s crucial to inspect each piece. Look for any rough edges or splinters that may need sanding down before assembly. A clean edge not only enhances the visual appeal of your magazine rack but also ensures that the joints fit together snugly. Remember, the more effort you put into measuring and cutting, the smoother your assembly process will be. So, take a deep breath, focus, and let your creativity flow as you prepare to build a stunning wooden magazine rack!

Using a Miter Saw
When it comes to woodworking, precision is key, and that's where the miter saw truly shines. This powerful tool is designed specifically for making quick, accurate cuts at various angles, making it an essential part of your toolkit when crafting your wooden magazine rack. Imagine trying to piece together a beautiful puzzle, only to find that some pieces are jagged and uneven—frustrating, right? That's how your project might feel without the right cuts!
Before you dive in, it's important to familiarize yourself with the parts of the miter saw. Typically, you'll find a blade guard, a base plate, and a miter gauge. Each of these components plays a crucial role in ensuring your cuts are not only precise but also safe. Always remember to wear protective gear, such as safety goggles, to shield your eyes from any flying debris.
To get started, you'll want to set up your miter saw on a sturdy workbench. Ensure that it’s stable and that you have enough space around you to maneuver safely. Once it's in place, adjust the miter angle to suit your project needs. For your magazine rack, you might need to make both straight cuts and angled cuts, depending on your design. Typically, a 45-degree angle is popular for creating clean corners.
Here’s a simple step-by-step approach to using a miter saw:
- Measure Twice, Cut Once: Always double-check your measurements before making any cuts. This old adage holds true in woodworking.
- Secure Your Wood: Use clamps to hold your wood in place. This prevents any movement that could lead to inaccurate cuts.
- Align the Blade: Position the blade over your marked line before turning the saw on. This ensures that your cut will be exactly where you want it.
- Make the Cut: With a firm grip on the saw handle, press down smoothly and let the blade do the work. Avoid forcing it through the wood.
After making your cuts, take a moment to inspect them. You should have clean, straight edges that will fit together seamlessly during assembly. If you notice any rough edges, a quick pass with sandpaper can help smooth them out. Remember, the goal is to create a magazine rack that not only serves its purpose but also adds a touch of elegance to your space!
In conclusion, using a miter saw can significantly enhance your woodworking experience. With practice and patience, you’ll master the art of making precise cuts, bringing your creative vision to life. So, gear up, and let that miter saw work its magic!
Q: What is the difference between a miter saw and a table saw?
A: A miter saw is primarily used for making angled cuts, while a table saw is more versatile for straight cuts and larger pieces of wood.
Q: Can I use a miter saw for cutting plywood?
A: Yes, a miter saw can be used for plywood, but ensure you have a fine-tooth blade for cleaner cuts.
Q: Is it safe to use a miter saw without safety gear?
A: No, always wear safety goggles and ear protection when operating a miter saw to protect yourself from potential hazards.

Hand Saw Techniques
When it comes to woodworking, the hand saw is a classic tool that has stood the test of time. While power tools have their advantages, there's something incredibly rewarding about using a hand saw. It’s like having a direct connection to the wood itself, allowing you to feel every cut you make. But how do you ensure that your cuts are clean and precise? Let’s dive into some effective techniques that will elevate your hand sawing skills.
First and foremost, proper grip is essential. You want to hold the saw firmly but not too tightly. Imagine you’re shaking hands with an old friend; you want to be firm enough to show you mean business, but gentle enough not to crush their hand. Your dominant hand should grip the handle, while your other hand guides the saw along the cut line. This balance is crucial for maintaining control and accuracy.
Next, let’s talk about marking your cut line. Always use a pencil or a marking knife to draw a clear line where you want to cut. A well-defined line acts as a roadmap for your saw, helping you stay on track. If you're cutting along the grain, start your cut with a few gentle strokes to create a groove. This groove will help prevent the saw from wandering off course. Think of it like starting a race; you need a good launch to maintain speed and direction.
As you begin sawing, focus on using long, smooth strokes. The goal here is to let the saw do the work. Many beginners make the mistake of using short, choppy movements, which can lead to jagged edges and uneven cuts. Instead, imagine you’re slicing through butter; the smoother and more consistent your strokes, the better your results will be. You’ll want to apply a bit of pressure on the forward stroke, but let up on the backward stroke. This technique not only extends the life of your saw but also helps you maintain control.
Another tip is to pay attention to the angle of your saw. Ideally, you should hold the saw at a 45-degree angle to the wood. This angle allows for efficient cutting while minimizing the risk of binding. If you’re cutting thicker materials, consider using a saw with a larger tooth count to make the job easier. Remember, the right tool for the job can make all the difference!
Lastly, always prioritize safety. Wear protective eyewear to shield your eyes from sawdust and debris. Additionally, ensure your workpiece is securely clamped down to prevent movement while you cut. A stable work environment is key to achieving clean cuts and avoiding accidents.
In summary, mastering hand saw techniques involves a combination of grip, marking, stroke consistency, angle, and safety. With practice, you'll find that using a hand saw can be just as effective—if not more so—than using power tools. So grab your hand saw, and let the woodwork begin!
- What type of hand saw is best for beginners? A panel saw or a crosscut saw is often recommended for beginners due to their versatility and ease of use.
- How do I maintain my hand saw? Keep the blade clean and lubricated, and ensure the teeth are sharp. Regular maintenance will prolong the life of your saw.
- Can I use a hand saw for all types of wood? While hand saws can cut through various types of wood, harder woods may require a saw with more teeth for cleaner cuts.

Assembling the Rack
Now that you have all your pieces cut and ready to go, it’s time to dive into the exciting part: assembling your wooden magazine rack! This stage is where your vision starts to take shape, transforming raw materials into a functional piece of art. But before you get too carried away, let’s take a moment to ensure you have a solid plan in place.
First, gather your cut pieces and lay them out in the order they will be assembled. This will give you a clear idea of how everything fits together. Typically, your magazine rack will consist of a base, sides, shelves, and possibly a back panel. Having everything organized will not only streamline the process but also help you spot any potential issues before they become problems.
When it comes to joining your wood pieces, there are several methods you can use, each with its own advantages. Here are a few popular techniques:
- Wood Glue: This is a classic choice for woodworking. It creates a strong bond and is perfect for joints that won’t be under too much stress.
- Screws: For added strength, especially in load-bearing areas, screws are your best friend. They provide excellent structural integrity and are easy to work with.
- Dowel Joints: If you’re looking for a more refined look, dowel joints can be a great option. They require a bit more precision but can create a seamless appearance.
Once you’ve chosen your joining method, it’s time to start assembling. Begin with the base, as it will support the entire structure. Apply wood glue to the ends of the side pieces and attach them to the base. If you're using screws, pre-drill holes to prevent the wood from splitting. This is a crucial step—trust me, nothing is worse than a split piece of wood ruining your hard work!
After securing the sides to the base, it’s time to add the shelves. Measure and mark where you want each shelf to go, ensuring they are evenly spaced. Depending on your design, you may want to use shelf pins or brackets for adjustable shelves, or simply glue and screw them in place for a more permanent solution. Make sure everything is level; a crooked shelf can be a real eyesore!
Finally, if you're including a back panel, attach it last. This piece not only adds stability but also prevents your magazines from falling out the back. Use glue and screws for a solid hold, and double-check that everything is aligned properly before the glue sets.
Once all pieces are assembled, take a moment to inspect your work. Look for any gaps or misalignments and make adjustments as needed. It’s all about getting that professional finish! And remember, patience is key here. Rushing the assembly can lead to mistakes that could compromise the integrity of your beautiful magazine rack.
With everything securely in place, you’re just a few steps away from completing your project. Next up, we’ll focus on the finishing touches that will really make your rack shine!
Q: How long does it take to assemble a magazine rack?
A: Depending on your skill level and the complexity of the design, assembly can take anywhere from a couple of hours to a full day. Take your time to ensure everything is done correctly.
Q: Can I use different types of wood for my magazine rack?
A: Absolutely! Mixing different types of wood can create a unique look. Just be mindful of the weight and durability of each type, especially if you plan to load it with heavy magazines.
Q: Do I need special tools for assembly?
A: While basic tools like a screwdriver and a drill are essential, you can also use clamps to hold pieces together while the glue dries. This can make a significant difference in achieving a sturdy assembly.

Finishing Touches
Now that you've crafted your wooden magazine rack, it’s time to give it the that will elevate it from a simple DIY project to a stunning piece of furniture. The finishing process is where your creativity shines, allowing you to customize the look and feel of your rack to perfectly match your home decor. Think of it as the cherry on top of a delicious sundae; it’s what makes your creation truly special!
First things first, sanding is essential. This step ensures that your magazine rack has a smooth surface, free from any rough edges or splinters. Start with a coarse grit sandpaper to remove any major imperfections and then gradually move to finer grits for a silky finish. Remember, the smoother the surface, the better the final finish will adhere. If you’re feeling adventurous, consider using a sanding block or an electric sander for those larger areas. Just be careful not to over-sand, as you could alter the shape of your carefully cut pieces!
Once you’ve achieved that perfect smoothness, it’s time to think about staining or painting. The choice between the two depends on the look you’re aiming for. Stains can enhance the natural beauty of the wood, bringing out its grain and character, while paints allow for a pop of color that can be a real statement piece in your living room. If you opt for staining, test it on a scrap piece of wood first to see how it reacts with your chosen wood type. This way, you won’t be left with any unpleasant surprises!
After applying your stain or paint, don’t forget to seal the deal with a protective finish. This could be a clear polyurethane, varnish, or even a natural oil like tung oil. Sealing your magazine rack not only adds a beautiful sheen but also protects the wood from moisture and wear over time. Apply multiple coats for added durability, ensuring you follow the manufacturer’s instructions for drying times between coats. A well-sealed rack will stand the test of time, keeping it looking fresh and new!
Finally, let’s talk about maintenance. A little care goes a long way in preserving the beauty of your wooden magazine rack. Regular dusting with a soft cloth will help prevent any build-up that could scratch the surface. If you notice any water marks or stains, a gentle cleaner designed for wood can work wonders. Just remember to avoid harsh chemicals that could strip away your finish.
Q: How long should I wait for the stain to dry before applying a second coat?
A: Typically, you should wait about 4-6 hours, but always refer to the specific product instructions for the best results.
Q: Can I use a water-based finish over an oil-based stain?
A: It’s not recommended, as the two can react adversely. Stick to using finishes that match the stain type for optimal results.
Q: What type of wood is best for staining?
A: Hardwoods like oak, maple, and cherry tend to take stain beautifully, showcasing their natural grain. Softwoods can also be stained, but they might require more prep work to achieve an even finish.

Choosing the Right Finish
When it comes to crafting your own wooden magazine rack, the finish you choose can make all the difference between a piece that looks homemade and one that appears professionally crafted. The right finish not only enhances the natural beauty of the wood but also protects it from wear and tear. So, how do you decide which finish is best for your project? Let’s break it down!
First, consider the style you want to achieve. Are you aiming for a rustic charm, a sleek modern look, or perhaps something in between? The finish can dramatically alter the appearance of the wood. For instance, a clear varnish will showcase the wood grain beautifully, while a dark stain can give your rack a more dramatic and sophisticated feel. Think of it like choosing an outfit—different colors and styles can convey different moods and aesthetics!
Next, let’s talk about durability. If your magazine rack will be placed in a high-traffic area or exposed to moisture, you’ll want to opt for a finish that can withstand the test of time. Here are a few common options:
- Polyurethane: This is a popular choice for its durability and resistance to scratches and stains. It comes in both oil-based and water-based varieties. Oil-based finishes tend to be more durable but take longer to dry, while water-based finishes dry quickly and have less odor.
- Varnish: Similar to polyurethane, varnish provides a hard protective layer. It’s ideal for outdoor furniture, as it can withstand harsh weather conditions.
- Oil finishes: These penetrate the wood and enhance its natural beauty but may require more frequent reapplication. They are great for achieving a warm, natural look.
- Paint: If you want to add a splash of color to your magazine rack, paint is the way to go. Just make sure to use a primer first for better adhesion!
Another important factor to consider is the application method. Some finishes are easier to apply than others. For instance, spray finishes can provide an even coat with minimal effort, while brushing on a finish may require more skill and patience. If you’re new to woodworking, you might want to practice on a scrap piece of wood before applying your chosen finish to the magazine rack.
Finally, don’t forget about the environment. If you’re working in a small space or have sensitivities to strong odors, water-based finishes are typically less toxic and easier to clean up than their oil-based counterparts. Always ensure you’re working in a well-ventilated area, regardless of the finish you choose!
In summary, selecting the right finish for your wooden magazine rack involves a blend of personal taste, practical considerations, and environmental factors. By taking the time to choose wisely, you can create a stunning piece that not only serves its purpose but also adds charm and character to your living space. Happy crafting!
Q: How long should I wait between coats of finish?
A: It depends on the type of finish you’re using. Generally, oil-based finishes can take up to 24 hours to dry between coats, while water-based finishes may dry in just a few hours. Always check the manufacturer's instructions for the best results.
Q: Can I use a stain and then a polyurethane finish?
A: Absolutely! This is a common technique. Just make sure the stain is completely dry before applying the polyurethane. This combination can give you a beautiful, durable finish.
Q: What if I make a mistake while applying the finish?
A: Don’t worry! Mistakes can often be sanded out. If you notice drips or uneven areas, let the finish dry completely, then sand it down and reapply. Practice makes perfect!

Maintenance Tips
To keep your wooden magazine rack looking fantastic and prolong its lifespan, regular maintenance is key. Just like any piece of furniture, your magazine rack deserves a little TLC. First and foremost, dusting should become a part of your routine. Use a soft, dry cloth to wipe away dust and debris that can accumulate over time. This simple step will prevent scratches and keep the wood looking fresh and vibrant.
Next, consider applying a protective finish periodically. Depending on the type of finish you chose during the construction, you might want to reapply it every year or so. If you used a stain, a clear sealant can help protect against moisture and stains. For painted finishes, a light sanding followed by a fresh coat of paint can rejuvenate the look of your rack. It's much like giving your furniture a spa day!
Additionally, be mindful of where you place your magazine rack. Avoid direct sunlight and heat sources, as these can cause the wood to warp or fade. If your rack is near a window, consider using curtains or blinds to shield it from harsh rays. Think of your magazine rack as a delicate flower; it thrives best in the right environment.
In case of spills, act fast! Wipe up any liquid immediately with a soft cloth to prevent it from soaking into the wood. If you notice any scratches or dents, don't panic! A simple wood filler or a touch-up pen can work wonders. For deeper scratches, a little sanding followed by restaining can restore its former glory.
Lastly, don't forget about seasonal checks. Every few months, inspect the joints and screws to ensure everything is secure. Tighten any loose screws and check for any signs of wear or damage. This proactive approach will help you catch potential issues before they become bigger problems, ensuring your magazine rack remains a stunning focal point in your home.
Here are some common questions about maintaining your wooden magazine rack:
- How often should I dust my magazine rack? It's best to dust it weekly to prevent buildup.
- Can I use furniture polish on my wooden rack? Yes, but ensure it's suitable for the type of finish you used.
- What should I do if my rack gets wet? Wipe it dry immediately and allow it to air out to prevent warping.
- Is it necessary to reapply the finish? Yes, reapplying the finish every year can help maintain its appearance and durability.
Frequently Asked Questions
- What type of wood is best for a magazine rack?
Choosing the right wood is essential for both durability and aesthetics. Hardwoods like oak or maple are excellent choices as they provide strength and a beautiful finish. Softwoods such as pine are more affordable and easier to work with but may not be as durable in the long run.
- What tools do I need to build a wooden magazine rack?
To craft your magazine rack, you'll need some essential tools. A miter saw is great for precise cuts, while a hand saw can be used if you prefer manual tools. Additionally, having a drill, clamps, sandpaper, and a measuring tape will make the process smoother and more efficient.
- How do I ensure accurate measurements when cutting wood?
Accurate measurements are vital for a professional finish. Always double-check your measurements before cutting and consider using a square to mark your lines. Taking your time and measuring twice can save you from costly mistakes!
- Can I use a hand saw instead of a power saw?
Absolutely! Hand saws are effective alternatives, especially for those who prefer a more traditional approach. Just remember to use steady, even pressure while cutting to achieve clean edges.
- What is the best way to assemble the magazine rack?
When assembling your rack, use wood glue along with screws or dowels for a strong bond. Make sure to clamp the pieces together while the glue dries to ensure a secure fit. This will help maintain the structural integrity of your rack.
- How can I achieve a polished finish on my magazine rack?
To get that polished look, start by sanding the wood to remove any rough edges. Then, choose a stain or paint that complements your decor. After applying your finish, seal it with a protective coat to enhance durability and shine.
- What maintenance is required for a wooden magazine rack?
Regular maintenance is key to keeping your magazine rack looking great. Wipe it down with a soft, damp cloth to remove dust. If you notice any scratches or wear, consider reapplying the finish to restore its appearance.


