
Sketching 101: Mastering Shoal Drawing
Welcome to the fascinating world of shoal drawing! If you’ve ever gazed into the depths of a shimmering ocean or a tranquil lake and marveled at the swirling schools of fish, you’re not alone. Capturing the beauty and dynamism of these underwater communities on paper can be both a rewarding and challenging experience. In this comprehensive guide, we’ll explore essential techniques, tools, and tips that will elevate your shoal drawings from simple sketches to captivating works of art. Whether you’re a seasoned artist or just starting, we’ll help you navigate the waters of shoal drawing with ease and confidence.
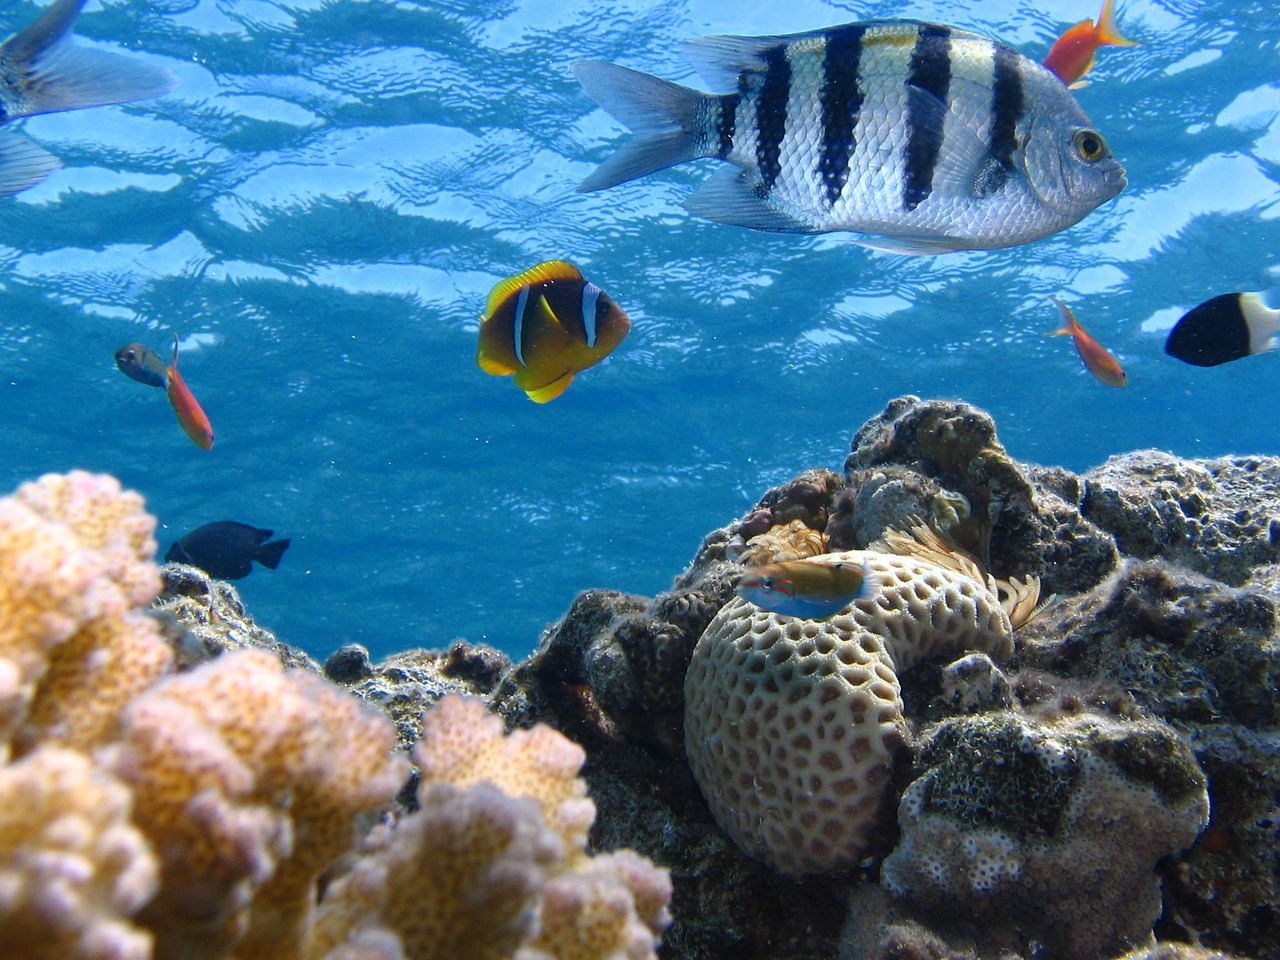
Before diving into the artistic techniques, it’s crucial to understand what a shoal is. Shoals are groups of fish that swim together in a coordinated manner, often for protection or hunting. These aquatic formations can be mesmerizing, showcasing a variety of species, colors, and movements. By grasping the characteristics of shoals—including their formation, types, and ecological significance—you’ll not only enhance your appreciation of these underwater wonders but also improve your ability to depict them accurately in your sketches. Think of it as learning the anatomy of a dance before attempting to choreograph your own performance!
Every artist knows that the right tools can make all the difference. When it comes to shoal drawing, having a well-chosen set of materials can significantly impact your artistic results. Whether you prefer traditional methods or digital platforms, let’s explore the various tools you might consider.
Traditional tools remain popular for many artists due to their tactile nature. Here are some essential items to consider:
- Graphite Pencils: Ideal for sketching fine details and creating depth.
- Charcoal: Perfect for adding texture and dramatic contrasts.
- Ink Pens: Great for bold lines and intricate patterns.
Utilizing these tools effectively can help you capture the essence of shoals, emphasizing texture and depth in your sketches. The way a pencil glides across paper can evoke the gentle sway of fish in water, making your artwork come alive!
The type of paper you use can dramatically influence the outcome of your drawing. Different textures and weights can enhance or detract from your work. For example, a smooth paper is excellent for detailed pencil work, while a textured paper can add a unique quality to charcoal drawings. Experimenting with various types can lead you to discover the best fit for your artistic vision.
In today’s digital age, many artists are turning to technology for their creative needs. Digital drawing tools offer flexibility and endless possibilities. Software like Adobe Photoshop or Procreate, combined with a good tablet, can allow you to create stunning shoal drawings with ease. The ability to undo mistakes, layer colors, and use various brushes can make your creative process more enjoyable and efficient.
Now that you have your tools ready, let’s dive into some sketching techniques that can help you capture the movement and dynamics of shoals. Techniques such as gestural drawing and layering methods can be particularly effective. Gestural drawing focuses on capturing the essence of movement quickly, allowing you to convey the fluidity of fish swimming together. Layering, on the other hand, helps build depth and richness in your artwork, much like the layers of an ecosystem.
Understanding how to depict movement is crucial in shoal drawing. The goal is to make your sketches feel alive, as if the fish could leap off the page! Techniques to convey fluidity and life within your sketches include using dynamic lines and shapes. For instance, curved lines can illustrate the graceful arcs of fish swimming, while varying line thickness can suggest speed and energy.
Lines and shapes are essential elements in any drawing. They can be used to illustrate the movement of fish and other aquatic creatures in a shoal. By experimenting with different line styles, you can enhance the sense of action in your artwork. Think about how a single line can represent a fish darting through the water, or how a series of overlapping shapes can depict a school’s mesmerizing dance.
Color plays a vital role in shoal drawing. Understanding color theory will help you choose and apply colors that reflect the vibrancy and diversity of underwater life. Consider the hues of the fish, the shimmering effects of sunlight on water, and the contrasts between light and shadow. By utilizing a color palette effectively, you can create a more engaging and dynamic representation of shoals.
Once your sketch is complete, the finishing touches are essential. Refining your work can elevate it from good to great. Consider adding highlights, adjusting contrasts, and ensuring that the composition flows well. Whether you plan to frame your artwork or share it digitally, taking the time to polish your piece will make a significant difference in how it’s perceived.
Q: What is the best way to start a shoal drawing?
A: Begin with a light sketch to outline the shapes and movements of the fish. Don’t worry about details initially; focus on capturing the overall flow.
Q: Can I use photographs as references for my drawings?
A: Absolutely! Photographs can provide valuable insights into the details and colors of shoals, helping you create more accurate representations.
Q: What if I struggle with colors?
A: Practice makes perfect! Experiment with different color combinations and study color theory to build your confidence.
Understanding Shoals
When we talk about shoals, we're diving into a mesmerizing world beneath the waves. Shoals are groups of fish that swim together, often for protection, social interaction, or hunting. Imagine a synchronized dance of shimmering scales, moving in unison, creating a spectacle that captivates the eye. But what exactly makes these underwater communities so fascinating? To truly appreciate shoals, we need to explore their characteristics, formation, and their vital role in aquatic ecosystems.
Shoals can be formed by various species of fish, and they can vary in size from a handful of fish to thousands. This collective behavior is not just about safety in numbers; it's a survival strategy. When fish swim together, they can confuse predators, making it harder for them to single out an individual. Furthermore, shoaling can enhance foraging efficiency, as fish can work together to locate and capture food more effectively.
There are different types of shoals, each with its own unique characteristics:
- Dynamic Shoals: These are constantly changing, with fish joining and leaving the group frequently. This type of shoal is often seen in open waters.
- Static Shoals: These groups are more stable, with a consistent membership. They often inhabit specific areas, such as coral reefs or kelp forests.
- Mixed Shoals: Comprised of different species, these shoals can benefit from the varied strengths of each species, enhancing their survival.
The significance of shoals extends beyond mere survival tactics. They play a crucial role in maintaining the balance of aquatic ecosystems. By forming large groups, fish can help regulate algae growth and promote the health of underwater vegetation. Moreover, shoals are a vital food source for larger predators, including birds and marine mammals. This interconnectedness illustrates the delicate balance of life in our oceans.
As an artist, understanding these dynamics can significantly enhance your ability to represent shoals in your drawings. By capturing the essence of shoaling behavior, you can create more engaging and lifelike sketches that resonate with viewers. The next time you sit down to draw, think about the movement and interaction within a shoal. How can you convey that energy and vibrancy on paper? This foundational knowledge will not only enrich your artwork but also deepen your appreciation for the underwater world.

Essential Tools for Shoal Drawing
When it comes to shoal drawing, having the right tools can make all the difference between a mediocre sketch and a stunning piece of art. The world of underwater life is rich and vibrant, and to capture that essence, you need to equip yourself with the essentials. Whether you're a seasoned artist or just dipping your toes into the world of drawing, understanding the tools at your disposal is crucial.
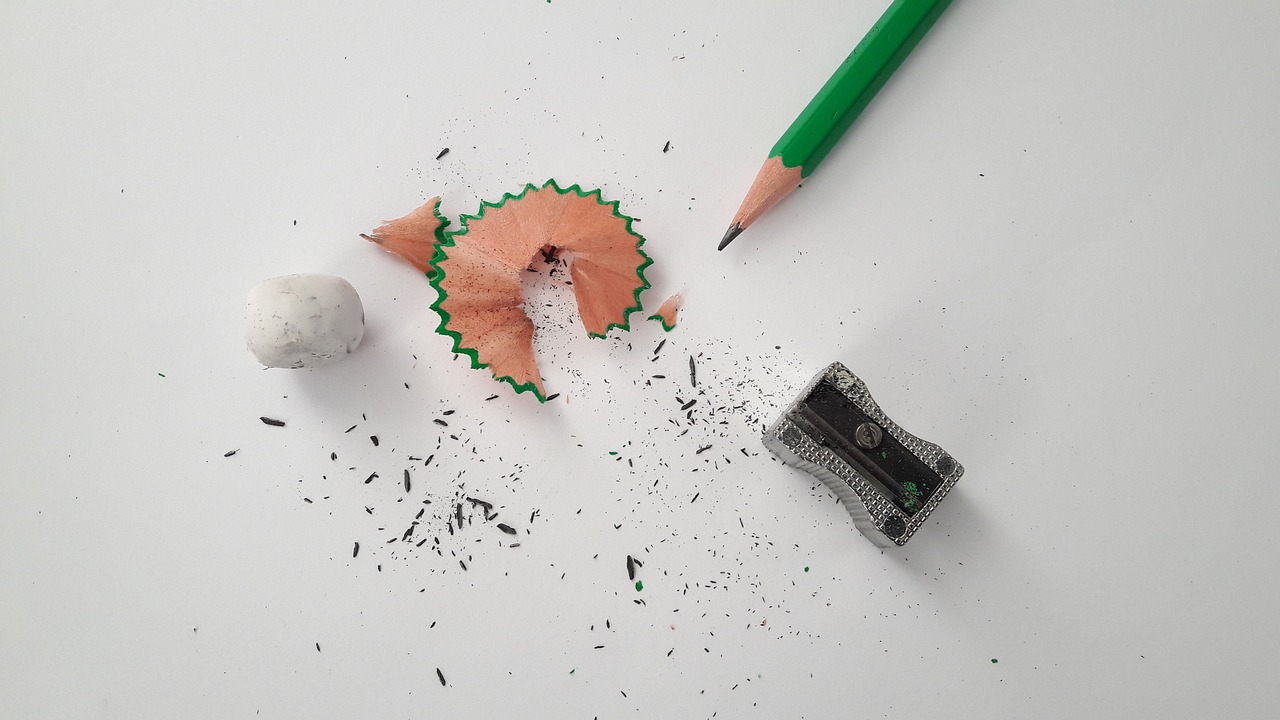
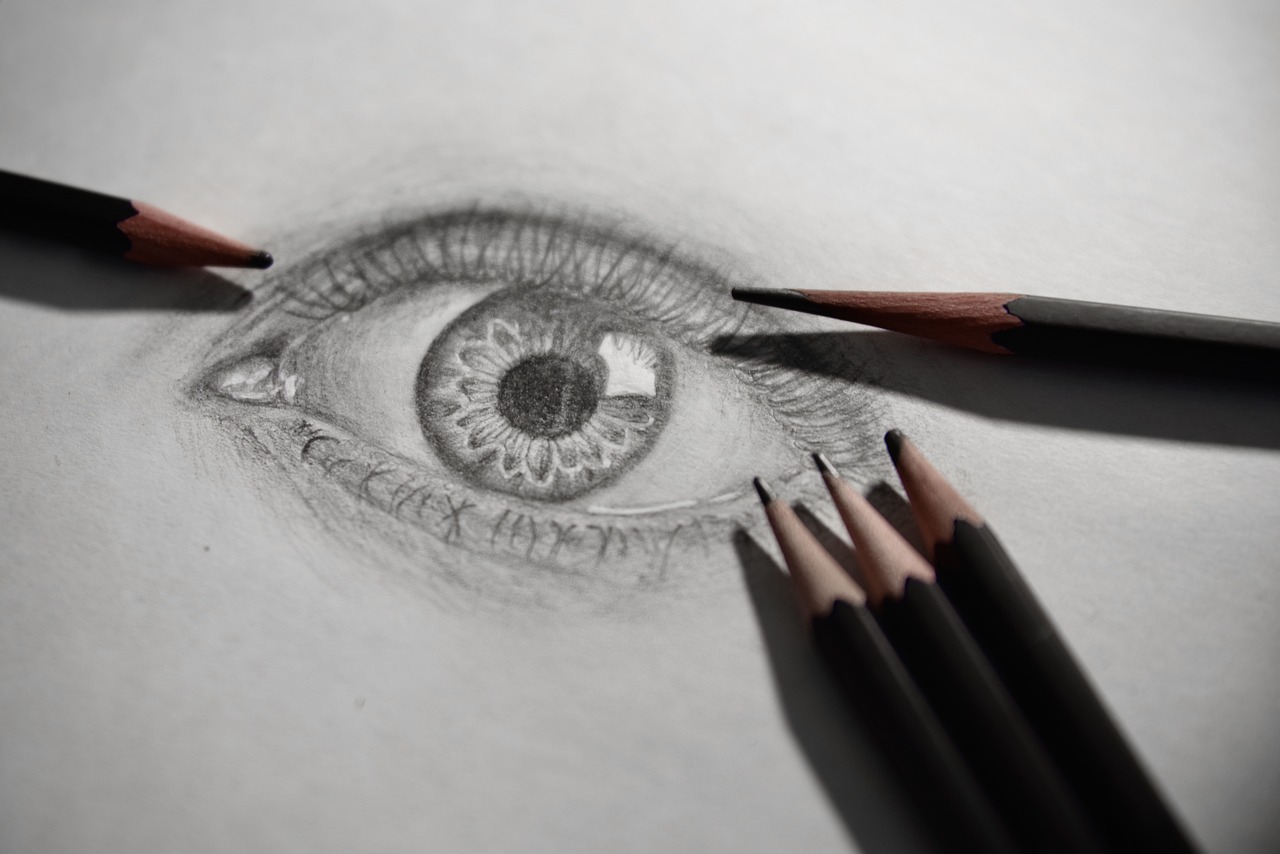
First and foremost, let's talk about traditional drawing tools. A good set of graphite pencils is fundamental. They come in various hardness levels, allowing you to create everything from fine details to bold strokes. For instance, softer pencils (like 2B or 4B) are perfect for shading and creating depth, while harder pencils (like H or 2H) are great for fine lines and details. Alongside pencils, you might want to explore charcoal for its rich, deep blacks and expressive quality. It allows for a more dramatic representation of the shoals, capturing the shadows and textures of underwater life beautifully.
Ink pens are another fantastic option. They provide clean lines and can be used for both outlining and detailed work. Experimenting with different pen sizes can yield exciting results, especially when you want to bring out the intricate patterns of fish scales or the delicate shapes of aquatic plants. Don't forget about erasers—both kneaded and vinyl types are essential for correcting mistakes and refining your sketches.
Now, let’s dive into the importance of paper. The choice of paper can significantly impact your drawing's outcome. For instance, a heavier weight paper (around 200 gsm) is excellent for wet mediums like ink or watercolor, while lighter paper is better suited for pencil and charcoal. Textured paper can add an interesting dimension to your sketches, especially when trying to capture the fluidity of shoals. If you’re not sure what to choose, consider experimenting with various textures to see which one resonates with your style.
In today's digital age, digital drawing tools have revolutionized the way we create art. Tablets and styluses like the iPad Pro with the Apple Pencil or Wacom tablets offer incredible flexibility and precision. Software such as Adobe Photoshop or Procreate allows artists to experiment with layers and colors without the mess of traditional mediums. The beauty of digital tools is that they often come with features that can help you simulate traditional techniques, making it easier to capture the lively essence of shoals.
Lastly, it’s worth mentioning that while having the right tools is important, what truly matters is your creativity and passion. Don’t hesitate to explore different tools and find what works best for you. Remember, the goal is to express the beauty of underwater life in your unique style. So grab your gear, get inspired, and let your imagination flow like the currents of the ocean!
- What type of paper is best for shoal drawing?
Heavier weight paper (200 gsm) is ideal for wet mediums, while lighter paper works well for pencil and charcoal. - Can I use digital tools for shoal drawing?
Absolutely! Digital tools offer flexibility and allow for easy experimentation with colors and layers. - What pencils should I use?
A range of graphite pencils, from hard (H) for fine lines to soft (B) for shading, will help you achieve different effects.

Traditional Drawing Tools
When it comes to shoal drawing, the right tools can make all the difference in bringing your underwater visions to life. Traditional drawing tools have stood the test of time for a reason—they offer a tactile experience that digital tools often can't replicate. Imagine the feeling of a graphite pencil gliding across the textured surface of your paper, or the rich, deep lines that a charcoal stick can produce. Each tool has its unique characteristics, and understanding how to utilize them effectively can elevate your artwork to new depths.
Let’s dive into some of the most essential traditional drawing tools that can help you capture the essence of shoals:
- Graphite Pencils: These are the backbone of any artist's toolkit. With a range of hardness levels from 2H (hard) to 8B (soft), you can create everything from fine lines to bold, dark strokes. For shoal drawings, a combination of softer pencils will help you achieve the depth and shading necessary to portray the shimmering scales of fish and the fluidity of their movements.
- Charcoal: This medium is fantastic for creating dramatic contrasts and rich textures. Charcoal can be smudged and blended easily, allowing you to depict the fluid motion of a shoal with a sense of realism that is hard to achieve with other tools. It’s perfect for capturing the dynamic nature of aquatic life.
- Ink Pens: If you want to add a crisp, defined quality to your sketches, ink pens are your go-to. Whether you prefer fine liners for delicate details or brush pens for expressive strokes, ink can help you outline the shapes of fish and the movement of water, giving your drawings a polished finish.
Each of these tools can be used in various ways to enhance your shoal drawings. For instance, you might start with a light sketch using a graphite pencil to outline the general shapes of the fish, then layer in depth and texture with charcoal, finishing with ink to define the details. This combination of techniques not only adds richness to your work but also helps convey the bustling life of a shoal.
Moreover, the choice of paper is just as crucial as the tools themselves. Different papers can absorb ink and graphite differently, affecting the overall look of your artwork. For example, a rough-textured paper can add an organic feel to your sketches, while a smooth paper can help achieve cleaner lines. Experimenting with various papers will help you find the perfect match for your artistic style.
In conclusion, mastering traditional drawing tools is an art form in itself. By understanding the unique qualities of each tool and how they interact with different surfaces, you can create stunning representations of shoal life that capture the imagination of your audience. So, grab your pencils, charcoal, and ink pens, and let your creativity flow like the currents of the ocean!
Q: What is the best type of pencil for shoal drawing?
A: A range of pencils is recommended, but softer pencils (like 4B to 8B) are ideal for shading and depth.
Q: Can I use colored pencils for shoal drawings?
A: Absolutely! Colored pencils can add vibrancy and life to your sketches, enhancing the underwater scene.
Q: Is it necessary to use expensive tools for good results?
A: Not at all! While quality tools can help, practice and technique are far more important in achieving great results.

Choosing the Right Paper
When it comes to shoal drawing, the paper you choose can make a world of difference in how your artwork turns out. Just like a painter selects the perfect canvas, an artist must consider the characteristics of the paper to truly capture the essence of underwater life. The right paper not only enhances the details but also affects the overall feel of your sketches. So, how do you choose the best paper for your shoal drawings?
First, consider the texture of the paper. Smooth paper is excellent for fine details and crisp lines, making it ideal for intricate sketches of fish and aquatic plants. On the other hand, textured paper can add depth and dimension to your work, allowing for more expressive strokes and a more organic look. This is especially true when working with mediums like charcoal or pastels, where the paper's surface can interact beautifully with the materials, creating a rich tapestry of colors and textures.
Next, the weight of the paper is crucial. Heavier paper, typically around 200 gsm (grams per square meter) or more, can handle various wet mediums without warping, making it suitable for mixed media works. Conversely, lighter paper is more suitable for pencil sketches and quick studies, but may not hold up well under heavy application of ink or watercolors. Always keep in mind the medium you plan to use, as this will guide your choice significantly.
Additionally, you might want to consider the color of the paper. While white paper is a classic choice, colored or toned paper can add an exciting element to your drawings. For instance, a light blue or green paper can mimic the underwater environment, providing a natural backdrop that enhances the colors of your fish and plants. This can create a harmonious and immersive experience for the viewer, drawing them into the aquatic world you are depicting.
To summarize, here are some key factors to consider when selecting the right paper for shoal drawing:
- Texture: Smooth for details, textured for depth.
- Weight: Heavier for wet mediums, lighter for pencil and quick sketches.
- Color: White for classic looks, colored for enhanced atmosphere.
Ultimately, experimenting with different types of paper can lead to surprising results and help you discover what works best for your artistic style. Don't hesitate to try out various options until you find the perfect fit for your shoal drawings. Remember, the right paper can elevate your artwork from good to extraordinary, allowing your creativity to flow freely and your skills to shine!
Q: What type of paper is best for beginners in shoal drawing?
A: For beginners, a smooth, heavyweight drawing paper (around 200 gsm) is ideal. It allows for easy erasing and is versatile for different mediums.
Q: Can I use watercolor paper for shoal drawing?
A: Absolutely! Watercolor paper is great for mixed media, especially if you plan to incorporate watercolors into your shoal drawings. Just ensure it's heavy enough to prevent warping.
Q: Should I choose bright white paper or toned paper for shoal drawings?
A: It depends on your artistic vision. Bright white paper is classic, while toned paper can create a unique atmosphere that enhances the colors of your drawings.
Digital Drawing Tools
In today's fast-paced digital age, have revolutionized the way artists create their masterpieces, especially when it comes to shoal drawing. If you're looking to capture the mesmerizing beauty of underwater life, these tools offer a myriad of advantages that traditional mediums simply can't match. From the convenience of portability to the vast array of features that enhance creativity, digital platforms are a game changer for both novice and seasoned artists.
One of the most popular tools among digital artists is the graphics tablet. These devices allow you to draw directly onto a screen, providing a natural feel that mimics traditional drawing. Brands like Wacom, Huion, and XP-Pen offer a range of options, catering to different budgets and skill levels. With pressure sensitivity and customizable buttons, a graphics tablet can significantly enhance your drawing experience. Imagine being able to adjust the thickness of your lines or the opacity of your colors with a mere touch! It's like having a whole toolbox at your fingertips.
Alongside graphics tablets, drawing software plays a crucial role in digital shoal drawing. Programs such as Adobe Photoshop, Corel Painter, and Procreate provide artists with a versatile canvas to explore their creativity. These applications come equipped with a plethora of brushes, textures, and effects that can replicate the fluidity and vibrancy of underwater life. For instance, you can use watercolor brushes to create soft, flowing backgrounds that mimic the gentle movement of water, or employ vibrant color palettes that reflect the dazzling hues of fish and corals.
Furthermore, the ability to layer your drawings in digital software allows for more complex compositions. You can easily add, remove, or modify layers without the fear of ruining your entire piece. This feature is particularly useful when trying to depict the intricate movements of fish within a shoal. You might start with a base layer of the background, then add layers for the shoal itself, adjusting each layer's opacity to create depth and realism. It's like building a three-dimensional world right on your screen!
For those who enjoy the convenience of working on the go, mobile drawing apps are a fantastic option. Apps like Procreate Pocket and Adobe Fresco allow you to sketch anytime and anywhere, turning your smartphone or tablet into a portable studio. This flexibility means you can capture inspiration whenever it strikes, whether you're at the beach, in a café, or lounging at home. Just imagine sitting by the ocean, sketching the vibrant shoals of fish swimming just beneath the surface, all from the comfort of your favorite spot!
In conclusion, embracing digital drawing tools can significantly enhance your shoal drawing experience. Whether you opt for a graphics tablet, powerful software, or mobile apps, the possibilities are endless. These tools not only streamline your workflow but also open up new avenues for creativity and expression. So, why not dive into the digital realm and see how it can elevate your underwater art to new heights?
Q: What is the best tablet for beginners in digital drawing?
A: For beginners, the Wacom Intuos series is highly recommended due to its affordability and user-friendly interface. It offers a great balance of features without overwhelming new users.
Q: Can I use my smartphone for digital drawing?
A: Absolutely! Many artists use their smartphones with drawing apps like Procreate Pocket or Adobe Fresco. These apps are designed to be intuitive and offer a range of tools for creating stunning artwork on the go.
Q: How do I choose the right drawing software?
A: When selecting drawing software, consider your budget, the features you need, and your level of expertise. Programs like Adobe Photoshop are great for advanced users, while Procreate is ideal for those looking for a more straightforward experience.
Q: Is it necessary to have a high-end computer for digital drawing?
A: Not necessarily. While a high-end computer can improve performance, many digital drawing applications run smoothly on mid-range devices. Just ensure your system meets the software's minimum requirements for optimal performance.
Sketching Techniques for Shoals
When it comes to capturing the mesmerizing beauty of shoals, mastering the right sketching techniques can make all the difference. Think of sketching as a dance where your pencil glides across the paper, mirroring the fluid movements of fish darting through water. To truly bring your shoal drawings to life, you need to embrace techniques that not only depict the creatures but also convey their energy and dynamism.
One of the most effective methods is gestural drawing. This technique involves making quick, expressive strokes that capture the essence of movement rather than focusing on minute details. Picture yourself watching a school of fish swim; they move in harmony, creating a beautiful ballet in the water. By employing gestural drawing, you can replicate this sense of motion on paper, allowing your sketches to breathe with life. Start by making loose, sweeping lines to represent the overall shape of the shoal, and then refine the details as you go.
Another powerful technique is layering. This method allows you to build depth and texture in your sketches, which is essential for representing the underwater world. Begin with a light sketch of the shoal, focusing on the placement and size of the fish. Once you have the foundational shapes down, gradually add layers of detail, using varying pressures on your pencil to create contrast. You might want to use a softer pencil for the shadows and a harder one for the highlights, giving your drawing a three-dimensional feel.
In addition to these techniques, it’s crucial to understand how to use lines and shapes effectively. The way you use lines can dramatically alter the perception of movement in your artwork. For instance, curved lines can suggest fluidity and grace, while sharp, angular lines may convey urgency or chaos. Think of it like the difference between a gentle wave and a crashing tide; each has its own rhythm and energy. Experiment with different types of lines to see how they can enhance the action in your shoal sketches.
Lastly, don’t underestimate the power of color theory in your shoal drawings. Color can evoke emotions and set the mood of your artwork. Consider using a palette that reflects the vibrant hues of underwater life, from the shimmering blues and greens to the bright yellows and reds of various fish species. When applying colors, think about how light interacts with water—colors might appear more muted or blended when submerged. Using a mix of wet and dry techniques can help you achieve this effect, allowing your sketches to pop with realism.
In summary, the art of shoal drawing is not just about replicating what you see; it's about capturing the essence of life beneath the waves. By employing gestural drawing, layering, and understanding the significance of lines and color, you can create stunning representations of shoals that resonate with viewers. So grab your tools, find a comfortable spot, and let the underwater world inspire your next masterpiece!
- What are the best tools for sketching shoals? The best tools include graphite pencils, charcoal, and high-quality sketchbooks. For digital artists, tablets and drawing software like Procreate or Adobe Fresco are excellent choices.
- How can I improve my gestural drawing skills? Practice by observing live movements, such as fish in an aquarium or dancers in motion. Focus on making quick sketches that capture the overall movement rather than the details.
- What colors should I use for underwater scenes? Use a mix of blues, greens, and vibrant colors found in fish. Understand how light affects color underwater to create depth and realism.
- How do I create depth in my shoal drawings? Use layering techniques and varying pencil pressures to create shadows and highlights. Experiment with different line weights to suggest depth.
Capturing Movement in Shoal Drawings
When it comes to shoal drawing, one of the most challenging yet rewarding aspects is capturing the essence of movement. Imagine standing on the shore, watching a school of fish darting through the water, their bodies glimmering as they twist and turn in perfect harmony. This dynamic display is what you want to replicate in your sketches. To effectively convey this fluidity, you need to embrace techniques that highlight the rhythm and energy of these aquatic creatures.
One of the key techniques in capturing movement is the use of lines and shapes. By employing various line styles—such as curved, wavy, or sharp—you can depict the direction and speed of the fish. For instance, a series of swift, flowing lines can suggest rapid movement, while more static, jagged lines might indicate a pause or hesitation. Additionally, the shapes you use can greatly influence the perception of motion. For example, elongated shapes can create an impression of speed, while rounded forms may evoke a sense of calmness. This interplay between line and shape is crucial in bringing your shoal drawings to life.
Moreover, understanding the anatomy of fish and their natural behaviors will enhance your drawings significantly. Take a moment to observe how fish move in their environment. They often swim in synchronized patterns, creating a mesmerizing display of unity. By studying these patterns, you can mimic their movements in your artwork. Consider sketching quick gestural drawings to capture the essence of their motion—these are less about perfection and more about the flow and energy. It’s like dancing; the more you practice, the more fluid your movements become.
Another essential aspect to consider is color theory. The colors you choose can also play a pivotal role in conveying movement. Bright, vibrant colors can suggest energy and liveliness, while softer, muted tones might evoke tranquility. When you apply color in your shoal drawings, think about how different hues can reflect the underwater light and the shimmering scales of the fish. For instance, using a gradient of blues and greens can create a sense of depth and fluidity, enhancing the overall movement in your piece.
To further illustrate these concepts, let’s look at a simple
| Technique | Description | Example |
|---|---|---|
| Line Variation | Using different line styles to represent speed and direction. | Curved lines for swift movements, jagged lines for pauses. |
| Gestural Drawing | Quick sketches that focus on the flow and energy rather than detail. | Rapid sketches of fish schools in motion. |
| Color Application | Choosing colors that reflect the vibrancy of underwater life. | Bright colors for energy, muted for calmness. |
In conclusion, capturing movement in shoal drawings is all about observation, practice, and experimentation. Don’t be afraid to make mistakes; every artist has been there. The more you immerse yourself in the world of aquatic life, the better you’ll become at translating that energy onto paper. Remember, the goal is not just to create a static image but to evoke the feeling of life and motion that exists beneath the waves. Happy drawing!
Q: How can I improve my ability to capture movement in my drawings?
A: Practice makes perfect! Spend time observing live fish or videos of shoals to understand their movement patterns. Try quick sketches to capture their essence without focusing too much on detail.
Q: What are the best colors to use for shoal drawings?
A: Bright blues, greens, and shimmering silvers can effectively reflect the vibrancy of underwater life. Experiment with different shades to see what best represents the mood you want to convey.
Q: Should I use traditional or digital tools for shoal drawing?
A: It depends on your personal preference! Traditional tools offer a tactile experience, while digital tools provide flexibility and ease of editing. Try both and see which one resonates more with your style.

Using Lines and Shapes
When it comes to shoal drawing, utilizing lines and shapes effectively can make a world of difference in how you portray the dynamic movements of fish and other aquatic creatures. Think of lines as the lifelines of your artwork; they guide the viewer's eye and create a sense of flow and rhythm. In shoal drawing, where movement is key, your choice of lines can either evoke a tranquil underwater scene or a bustling aquatic ballet.
To start, consider the type of lines you want to use. Curved lines can suggest fluidity and grace, mimicking the natural motions of fish swimming in unison. On the other hand, straight lines can convey tension and direction, which is particularly useful when depicting a sudden change in movement, like a shoal darting away from a predator. By varying the thickness and intensity of your lines, you can also create depth and dimension, adding a three-dimensional quality to your sketches.
Shapes play a crucial role as well. The silhouettes of fish can be simplified into basic geometric forms such as ovals and triangles. By breaking down these figures into shapes, you can capture their essence without getting bogged down in unnecessary details. This technique not only makes your drawing process quicker but also allows for a clearer representation of the shoal's overall structure. For instance:
- Oval shapes can represent the bodies of fish, while
- Triangles might depict fins and tails, enhancing the sense of movement.
One effective way to practice this is to sketch a shoal with a focus on the negative space around the fish. This approach helps you understand the relationship between the creatures and their environment. By observing how the shapes interact with the surrounding water, you can create a more cohesive and engaging composition. Remember, the goal is not just to replicate what you see but to convey the feeling of life and movement within your artwork.
As you refine your technique, don’t hesitate to experiment with various styles. For instance, try using gestural lines to capture the fleeting moments of a shoal swimming past, or employ layering techniques to build up textures that reflect the underwater world. Each approach will offer unique insights into how lines and shapes can transform your sketches from static images into lively scenes that resonate with viewers.
Ultimately, mastering the use of lines and shapes in shoal drawing is about practice and observation. Spend time watching real shoals, whether in aquariums or natural settings, and take note of how they move. The more you understand their behavior, the better you’ll be able to translate that energy onto paper. So grab your sketchbook, and let the lines and shapes guide your hand as you bring the vibrant world of shoals to life!
- What tools do I need for shoal drawing? You can start with basic tools like pencils, erasers, and sketchbooks. As you advance, consider adding charcoal, ink pens, or digital tools.
- How can I improve my drawing skills? Regular practice, studying real-life examples, and experimenting with different techniques will help enhance your skills over time.
- Is it necessary to use color in shoal drawings? While color can add vibrancy and depth, it's not essential. You can create stunning pieces using just black and white techniques.

Color Theory in Shoal Art
When it comes to shoal drawing, understanding color theory is essential for capturing the vibrancy and diversity of underwater life. Just like a painter chooses colors to evoke emotions or set a mood, you too can use color to bring your sketches to life. Think of color as the language of your art; it speaks volumes even when words fail. So, how do you choose the right colors for your shoal drawings? Let's dive into the basics!
The first thing to consider is the color wheel. It's a fundamental tool that helps artists understand color relationships. The primary colors—red, blue, and yellow—mix to form secondary colors like green, orange, and purple. When sketching shoals, you can use complementary colors (those opposite each other on the wheel) to create striking contrasts that draw the viewer's eye. For instance, pairing vibrant greens of underwater plants with the rich blues of fish can create a stunning visual effect.
Moreover, understanding color temperature can add another layer of depth to your art. Warm colors (reds, oranges, and yellows) tend to advance, making them seem closer, while cool colors (blues, greens, and purples) recede, giving a sense of depth. This knowledge can help you create a more dynamic composition. For example, using warm colors for the foreground elements of your shoal drawing can make them pop, while cooler shades in the background can create a sense of distance.
Another important aspect of color theory is harmony. When you create a harmonious color palette, the colors work together to create a cohesive look. You might want to consider using analogous colors—those that are next to each other on the color wheel—for a calming effect. Imagine a shoal of fish swimming through a coral reef where the colors transition smoothly from one to another, creating a serene underwater landscape. This technique can evoke feelings of tranquility and peace in your artwork.
To effectively apply these concepts, you might want to experiment with a color chart. Create a simple table to visualize how different colors interact with each other. Here's a basic example:
| Color | Complementary Color | Analogous Colors |
|---|---|---|
| Blue | Orange | Green, Purple |
| Red | Green | Orange, Purple |
| Yellow | Purple | Orange, Green |
Lastly, don't forget about the emotional impact of colors! Colors can evoke feelings and set the tone for your artwork. For example, bright, vibrant colors can convey energy and excitement, while muted tones can create a more subdued atmosphere. As you sketch, ask yourself: What mood do I want to convey? Are the fish in my shoal playful and lively, or are they calm and serene? Your choice of color will play a significant role in communicating that mood.
In conclusion, mastering color theory is not just about knowing which colors to use; it's about understanding how those colors interact, how they can create depth and emotion, and how they can bring your shoal drawings to life. So grab your sketchbook and start experimenting! The underwater world is waiting for you to capture its beauty.
- What colors should I use for shoal drawings? Start with a balanced palette that includes both warm and cool colors. Experiment with complementary and analogous colors for harmony.
- How can I create depth in my shoal drawings? Use color temperature to your advantage; warm colors can bring elements forward while cool colors can push them back.
- Is it important to follow color theory strictly? While it's beneficial to understand color theory, don't be afraid to break the rules and experiment with your own unique style!

Finalizing Your Shoal Sketch
Once you've poured your heart and soul into your shoal drawing, it's time to give it that final polish that transforms a good sketch into a **great** one. Think of this stage as the icing on the cake; it makes all the difference. First, take a step back and assess your artwork. Are there areas that need more depth? Perhaps some highlights to emphasize the shimmering scales of the fish? This is the moment to fine-tune those details that will breathe life into your sketch.
One of the most effective ways to enhance your drawing is by adding layers of shading. Use a softer pencil to create shadows in the areas where light doesn’t reach. This technique not only adds dimension but also helps convey the fluid movement of the shoal. Remember, the more you can mimic the natural world, the more captivating your artwork will be. Don't hesitate to experiment; art is all about exploration!
After you've added depth and texture, consider the presentation of your sketch. If you're planning to share it online or in a gallery, framing can elevate your artwork significantly. A well-chosen frame complements your sketch and draws attention to it, much like a beautiful frame highlights a priceless painting. Here are some tips for presenting your work:
- Choose a Frame: Select a frame that enhances the colors and theme of your drawing.
- Matting: Adding a mat can provide a professional finish and prevent the glass from touching your artwork.
- Lighting: Good lighting can make or break the presentation. Ensure your sketch is well-lit, but avoid direct sunlight to prevent fading.
Once your sketch is framed, don’t forget to sign it! Your signature is your personal touch, marking your creation as uniquely yours. It’s like putting your name on a masterpiece; it signifies ownership and pride in your work. After all, you’ve worked hard to capture the essence of those vibrant underwater communities!
Finally, consider sharing your artwork on social media or art platforms. Not only does this allow you to showcase your skills, but it also opens the door to feedback and connections with fellow artists. Engaging with an audience can be incredibly rewarding and can inspire you to keep creating. Remember, every great artist started somewhere, and sharing your journey can be just as important as the art itself.
As you finalize your shoal sketches, you might have some lingering questions. Here are a few frequently asked questions that can help guide you:
| Question | Answer |
|---|---|
| How do I know when my sketch is finished? | Trust your instincts! If you feel satisfied with the details and overall look, it's likely complete. You can always revisit it later. |
| What if I make a mistake? | Don't panic! Mistakes can often be corrected with shading or by incorporating them into the design. Embrace the imperfections! |
| Can I use digital tools for finalizing my sketch? | Absolutely! Digital tools can enhance your traditional sketches, allowing for easy adjustments and vibrant color application. |
| Should I keep my original sketches? | Yes! Your original sketches are valuable as they show your growth as an artist. Plus, they can serve as inspiration for future works. |
Frequently Asked Questions
- What is a shoal and why is it important in aquatic ecosystems?
A shoal refers to a group of fish or other aquatic creatures that swim together in a coordinated manner. These formations are crucial for various reasons, including protection from predators, efficient foraging, and enhancing reproductive success. Understanding shoals can greatly enhance your appreciation of underwater life and improve your drawing skills.
- What tools do I need to start shoal drawing?
To kick off your shoal drawing journey, you’ll need some basic tools. Traditional options include graphite pencils, charcoal, and ink pens, along with a good-quality sketchbook. If you prefer digital art, consider using drawing tablets and software like Procreate or Adobe Fresco. The right tools can make a world of difference in capturing the beauty of shoals!
- How do I choose the right paper for shoal drawing?
The type of paper you select can significantly influence the outcome of your sketches. For detailed work, consider using heavier weight paper that can handle various mediums without warping. Textured paper can also add depth and interest to your drawings, making them more vibrant and lifelike.
- What sketching techniques are best for capturing movement in shoals?
To effectively capture the dynamic movement of shoals, techniques like gestural drawing and layering can be incredibly helpful. Gestural drawing allows you to quickly sketch the flow and rhythm of the fish, while layering can add depth and detail, making your artwork feel alive and engaging.
- How can I use color theory in my shoal drawings?
Color theory plays a vital role in shoal drawing. By understanding complementary and analogous colors, you can create vibrant compositions that reflect the diversity of underwater life. Experiment with different color palettes to evoke emotions and bring your sketches to life!
- What are some tips for finalizing my shoal sketch?
Once your sketch is complete, take some time to refine it. Look for areas that may need more detail or contrast. Adding finishing touches like highlights or shadows can enhance the overall depth of your work. Don’t forget to present your art in a way that showcases its beauty, whether that’s framing it or sharing it online!


