
Draw Like a Pro: Mastering Facial Features
Welcome to the world of drawing, where every stroke of your pencil can bring a face to life! If you've ever gazed at a portrait and marveled at how an artist captured the essence of a person, you're not alone. Mastering facial features is not just about replicating what you see—it's about understanding the underlying structure, emotions, and nuances that make each face unique. In this article, we'll explore essential techniques and tips for drawing facial features that will elevate your artistry to new heights. Whether you're a beginner or looking to refine your skills, the journey to becoming a pro starts here!
Grasping the basic proportions of the human face is crucial for accurate representation. Think of the face as a complex puzzle made up of various pieces that fit together perfectly. Each feature has its own place, and understanding these relationships is key. A well-known guideline is the "rule of thirds," where the face can be divided into three equal horizontal sections: from the hairline to the eyebrows, from the eyebrows to the bottom of the nose, and from the nose to the chin. By using this framework, artists can establish a solid foundation for their drawings, ensuring that features are proportionate and harmonious.
Facial expressions are the heart of character portrayal. They convey emotions and personality in ways that words sometimes cannot. To truly bring your characters to life, you need to delve into the subtleties of expressions. A slight raise of an eyebrow can indicate surprise, while a downward tilt of the mouth can suggest sadness. Observing real-life expressions and practicing them in your sketches will help you understand how small changes in features can lead to significant emotional shifts. Remember, capturing the essence of an emotion is like telling a story without uttering a single word.
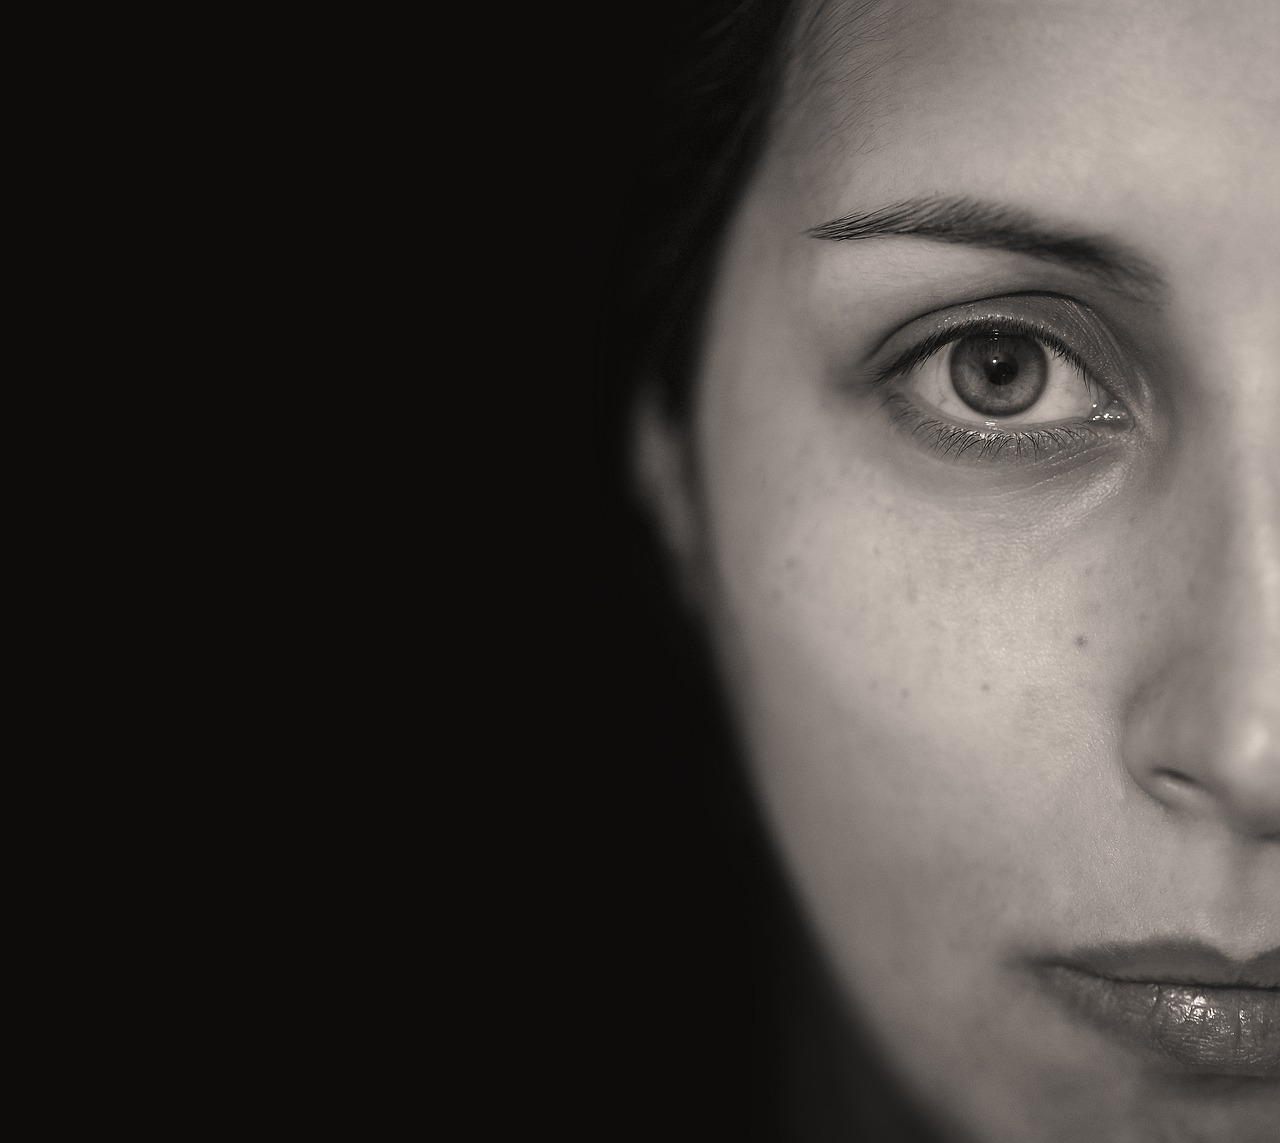
The eyes are often called the windows to the soul, and for good reason! They play a pivotal role in expressing feelings. Different eye shapes can convey different emotions—rounded eyes might express innocence, while almond-shaped eyes can suggest mystery. When drawing eyes, consider their shape, size, and placement on the face. Here’s a quick breakdown of common eye shapes:
- Round: Often associated with youth and surprise.
- Almond: Elegant and often linked to mystery.
- Hooded: Can express depth and intrigue.
To render realistic eyes, you need to focus on a few key techniques. Start with the basic shape, then add details like the iris, pupil, and eyelashes. Shading is crucial; use darker tones around the edges to create depth, and lighter tones in the center for highlights. Don't forget to add texture to the sclera (the white part of the eye) to give it a lifelike appearance. Remember, the goal is to make the eyes sparkle with life!
Even seasoned artists can fall into traps when drawing eyes. Here are some common pitfalls to be aware of:
- Neglecting the eyelids—these can dramatically change the expression.
- Overemphasizing the eyelashes—keep them natural and in proportion.
- Ignoring reflections—adding a small highlight can make eyes pop.
By being mindful of these mistakes, you can enhance the accuracy and expressiveness of your eye drawings.
Understanding the structure of the nose is essential for realistic drawing. The nose is a complex feature with various angles and shapes. Pay attention to the bridge, nostrils, and tip. A well-drawn nose can add character and dimension to your portraits. Use light and shadow to define its shape, and remember that the nose is often influenced by the surrounding features, so keep everything in harmony.
Lips are another vital element in expressing emotions. They can convey a wide range of feelings from joy to sadness. When drawing lips, focus on their shape and texture. Different lip shapes can tell different stories, so be observant. For instance, full lips might suggest sensuality, while thin lips can convey seriousness. Pay attention to the curvature and volume, and use shading to create depth and realism.
Color and shading are crucial for creating depth in lip drawings. Start with a base color that reflects the skin tone, then layer darker shades to create shadows and lighter shades for highlights. This technique will give your lips a three-dimensional appearance. Don’t forget to blend colors smoothly for a natural look!
Explore various lip shapes and their characteristics to diversify your portraits. Here’s a quick overview:
- Full Lips: Often seen as attractive and inviting.
- Thin Lips: Can represent a more serious demeanor.
- Heart-Shaped Lips: Convey a playful or youthful appearance.
By understanding these shapes, you can accurately represent different individuals and their unique traits.
Hair adds character and depth to a portrait, making it an essential feature to master. When drawing hair, consider its texture and flow. Use long, sweeping strokes for straight hair and shorter, jagged lines for curly hair. Pay attention to how hair frames the face and integrates with other features. Shading can add realism; darker tones can indicate shadow, while lighter tones can represent highlights. Remember, hair is not just an accessory—it’s an integral part of the character's identity!
Q: What materials do I need to start drawing facial features?
A: You can start with basic materials like pencils, erasers, and paper. As you advance, consider investing in colored pencils or markers for added depth.
Q: How can I improve my drawing skills?
A: Practice is key! Try drawing from reference photos and real-life models. Also, consider taking online courses or watching tutorials to learn new techniques.
Q: Is it necessary to study anatomy to draw faces?
A: While it's not mandatory, understanding facial anatomy can significantly improve your accuracy and realism in drawings.
Q: How do I develop my own style?
A: Experiment with different techniques and subjects. Over time, you'll naturally develop a style that feels authentic to you.
Understanding Facial Proportions
Grasping the basic proportions of the human face is crucial for accurate representation. The human face is a complex structure, and understanding its proportions can significantly enhance your drawing skills. Think of the face as a canvas divided into sections; each section has its own measurements that contribute to the overall likeness of the subject. Generally, the face can be divided into three equal sections: the forehead to the eyebrows, the eyebrows to the bottom of the nose, and the bottom of the nose to the chin. This foundational knowledge allows artists to create a more realistic portrayal of their subjects.
To break it down further, here are some essential guidelines to keep in mind:
- Width of the Face: The width of the face is typically five eyes wide. This means that if you were to measure the distance from one ear to the other, it would span approximately five times the width of one eye.
- Placement of the Eyes: The eyes are usually located halfway down the head. This is a crucial reference point that helps in positioning other facial features accurately.
- Nose and Mouth Alignment: The bottom of the nose is generally located about one-third of the way down from the eyes to the chin, while the mouth sits about one-third of the way down from the nose to the chin.
When you start drawing, it's beneficial to create a light sketch of these proportions before diving into details. Use simple shapes to outline the head, eyes, nose, and mouth. This approach not only simplifies the process but also serves as a guide to maintain proportion throughout your drawing. Remember, practice makes perfect! Don't be discouraged if your first attempts don't look exactly right; keep refining your technique, and you'll see improvement over time.
Additionally, consider the unique characteristics of your subject. While these proportions work as a general guideline, every individual has unique features that may slightly deviate from the norm. Pay attention to the specific proportions of the face you are drawing, as this will help you capture the essence of your subject more accurately.
In summary, mastering facial proportions is a foundational skill for any artist aiming to create realistic portraits. By understanding the basic measurements and practicing these techniques, you will build a solid foundation that will serve you well in your artistic journey. Keep your sketchbook handy, and don't hesitate to experiment with different proportions as you develop your style!
Q: How do I know if my facial proportions are correct?
A: One way to check is to step back from your drawing and view it from a distance. Additionally, using a mirror or comparing with reference photos can help you spot any discrepancies.
Q: Can I use these proportions for stylized drawings?
A: Absolutely! While these guidelines provide a realistic foundation, feel free to exaggerate or modify proportions to suit your artistic style.
Q: How can I improve my understanding of facial proportions?
A: Regular practice with different subjects, studying anatomy, and using reference materials can greatly enhance your understanding and skill in drawing facial proportions.
Capturing Expressions
Facial expressions are like the language of emotions, speaking volumes without uttering a single word. When you master the art of capturing these expressions, your portraits will not only resemble your subjects but also resonate with their unique personalities. Think of a smile; it's not just about the curve of the lips, but the twinkle in the eyes and the subtle lift of the cheeks. So, how do you translate these emotional nuances onto paper? Let's dive into some essential techniques!
First, it's crucial to understand the muscle movements that create different expressions. The human face is a complex canvas, where every tiny shift can alter the mood entirely. For example, a frown involves the contraction of the corrugator muscles, while a smile engages the zygomaticus major. By studying these muscle groups, you can create more authentic expressions in your artwork. Keep a sketchbook handy and practice drawing these muscle movements from different angles to really get a feel for how they work.
Next, consider the role of eyebrows and their positioning. Did you know that eyebrows can change the entire expression? A raised eyebrow can indicate surprise or curiosity, while furrowed brows often signal anger or confusion. When drawing, pay attention to the shape and angle of the eyebrows. This small detail can dramatically shift the emotional tone of your character. For instance, a character with arched eyebrows may appear more approachable or friendly, while downward sloping brows can give off a more serious or intimidating vibe.
Another vital element is the eyes. Often referred to as the windows to the soul, eyes can convey a vast array of emotions. To effectively capture this, focus on the shape, size, and direction of the gaze. A direct gaze can express confidence or determination, while a downward glance may suggest sadness or introspection. Don’t forget to include the eyelids and how they play into the overall expression. For instance, slightly closed eyelids can indicate relaxation or sleepiness, while wide-open eyes can convey shock or excitement.
To further enhance your ability to capture expressions, consider using a reference table that outlines common facial expressions and their corresponding emotional states. This can serve as a quick guide while you practice:
| Expression | Emotion |
|---|---|
| Smile | Happiness |
| Frown | Sadness |
| Raised Eyebrows | Surprise |
| Furrowed Brows | Anger/Confusion |
| Wide Eyes | Fear/Excitement |
Lastly, remember that practice makes perfect! Spend time observing people in everyday settings. Notice how their expressions change during conversations or while reacting to different situations. You might even want to take quick snapshots or sketch them on the spot. This real-world observation will enrich your understanding and help you replicate those expressions in your drawings.
In conclusion, capturing expressions is not just about the physical features but also about conveying the underlying emotions that make each character unique. By focusing on the intricate details of facial movements, practicing regularly, and studying real-life references, you’ll soon find that your portraits are not only lifelike but also filled with personality and emotion.
- How can I improve my ability to draw facial expressions? Practice regularly by sketching from life and studying different expressions in photographs or videos.
- What are some common mistakes to avoid when drawing expressions? Avoid making expressions too exaggerated or unrealistic; subtlety often conveys emotion better.
- Is it necessary to understand anatomy to draw expressions effectively? Yes, understanding facial anatomy helps you depict expressions more accurately and realistically.
Analyzing Eye Shapes
When it comes to drawing, the eyes are often referred to as the windows to the soul. They hold the power to convey a myriad of emotions, from joy and surprise to sadness and anger. Understanding the different eye shapes is essential for any artist aiming to create realistic and expressive portraits. Each eye shape carries its own unique characteristics that can significantly impact the overall appearance of the face.
Let’s dive deeper into the fascinating world of eye shapes. Generally, eyes can be categorized into several types based on their form and structure. Here are a few common shapes you might encounter:
- Almond: These eyes are elongated and have a tapered end, resembling the shape of an almond. They are often associated with a mysterious and alluring look.
- Round: Round eyes are wide and circular, giving a youthful and innocent appearance. They are often seen in characters that are meant to evoke sympathy.
- Hooded: Hooded eyes have a fold of skin that partially covers the eyelid, creating a more intense and dramatic look. This shape can add depth and intrigue to your portraits.
- Monolid: This shape lacks a visible crease, making the eyes appear flat. Monolid eyes are unique and can convey a range of emotions with subtle changes in expression.
In addition to shape, the placement and size of the eyes play a vital role in defining a character's personality. For example, larger eyes tend to suggest innocence or naivety, while smaller eyes can imply shrewdness or cunning. The distance between the eyes is also crucial; ideally, the space between the eyes should be approximately the width of one eye. This guideline helps maintain balance and symmetry in your portraits.
To further illustrate the differences in eye shapes, let's take a closer look at a few examples in the table below:
| Eye Shape | Characteristics | Emotional Conveyance |
|---|---|---|
| Almond | Elongated with tapered ends | Mysterious, alluring |
| Round | Wide and circular | Youthful, innocent |
| Hooded | Fold of skin covers eyelid | Intense, dramatic |
| Monolid | No visible crease | Unique, expressive |
When drawing eyes, it's crucial to not only focus on the shape but also on the details. The iris, pupil, and eyelashes all contribute to the overall look. Pay attention to the way light interacts with these features; highlights can make the eyes appear more lifelike. Don't forget to consider the surrounding areas, such as the eyelids and brow, as they frame the eyes and influence their expression.
In conclusion, mastering the art of drawing eye shapes is a journey that requires practice and observation. By studying different shapes and their emotional implications, you can enhance your ability to create characters that resonate with viewers. So, grab your sketchbook, observe the world around you, and start experimenting with various eye shapes to discover the unique expressions they can convey!
Techniques for Realistic Eyes
Drawing realistic eyes can be one of the most rewarding yet challenging aspects of portraiture. The eyes are often referred to as the windows to the soul, and capturing their essence is vital for conveying emotion and personality in your artwork. To achieve this, you need to master several techniques that focus on shading, highlighting, and texturing. Let's dive into these essential methods to bring your eye drawings to life.
First and foremost, understanding the basic structure of the eye is crucial. The eye is not just a flat surface; it has depth and curvature. Begin by sketching the basic shape of the eye, which resembles an almond. Pay attention to the eyelid folds, as they play a significant role in the eye's expression. Once you have the outline, start adding details such as the iris and pupil. Remember, the iris can vary in size and color, and it’s essential to capture these variations to create realism.
Next, let’s talk about shading. Shading is your best friend when it comes to adding depth. Use a range of pencils from hard to soft to create different tones. Start with a light touch to outline the shadows beneath the eyelids and the corners of the eyes. Gradually build up the layers, using a blending stump or your finger to smooth out harsh lines. This technique helps create a three-dimensional effect that makes the eyes pop. Don't forget to add highlights! A small white dot or a subtle shine can make the eyes appear more lifelike, reflecting light as they do in reality.
Texture is another critical element. The surface of the eye is not smooth; it has tiny details that need to be represented. Use short, delicate strokes to mimic the fine lines of the iris and the subtle variations in color. You can also introduce a bit of color to the sclera (the white part of the eye) to give it a more realistic appearance. Remember, the sclera is not purely white; it often has hints of blue or gray, depending on the lighting and the individual.
Here’s a quick summary of the techniques you should keep in mind:
- Understand the structure: Familiarize yourself with the anatomy of the eye.
- Shading: Use various pencil grades to create depth and dimension.
- Highlight: Add a small white dot to simulate light reflection.
- Texture: Use fine strokes for iris details and subtle color variations.
Finally, practice makes perfect! Don't be afraid to experiment with different styles and techniques. Study real-life references or photographs to understand how light interacts with the eye. Over time, you will develop your unique approach that resonates with your artistic vision. Remember, the goal is not just to replicate what you see but to infuse your personality into your artwork.
Q: What materials should I use for drawing realistic eyes?
A: Use a range of graphite pencils (HB to 8B), blending stumps, and quality paper. Colored pencils can also be helpful for adding color to the iris.
Q: How can I improve my eye-drawing skills?
A: Practice regularly, study anatomical references, and try to draw eyes from different angles and expressions to enhance your understanding.
Q: Should I focus on one eye at a time?
A: It's often easier to draw both eyes simultaneously to ensure they are proportionate and aligned correctly.

Common Mistakes to Avoid
When it comes to drawing eyes, even seasoned artists can fall prey to a few common pitfalls that can detract from the overall realism of their work. One of the biggest mistakes is neglecting the unique shapes and sizes of different eye types. Just like fingerprints, no two eyes are exactly alike, and failing to account for these variations can lead to generic and unconvincing portraits. Think about how you perceive people; their eyes often tell a story. If you draw them without considering their individuality, you might miss the essence of the character you’re trying to portray.
Another frequent error is overlooking the importance of light and shadow. Eyes are not flat surfaces; they have depth, and this is created through careful shading. A common mistake is to simply outline the eye without adding the necessary highlights and shadows that give it life. Remember, light reflects off the surface of the eye, creating highlights, while the contours of the eyelids and the surrounding skin create shadows. To illustrate this, consider the following table:
| Aspect | Common Mistake | Solution |
|---|---|---|
| Shape | Generic eye shapes | Study different eye shapes and practice drawing them |
| Shading | Flat, unshaded eyes | Incorporate highlights and shadows for depth |
| Proportions | Ignoring proportions | Use guidelines to maintain accurate proportions |
Moreover, many artists tend to forget about the surrounding features. The eyes don’t exist in isolation; they are part of a complex structure that includes the eyebrows, eyelids, and even the nose. Failing to consider how these elements interact can result in eyes that look out of place or unnatural. So, take a step back and observe how the features work together to form a cohesive whole. It’s like assembling a puzzle; each piece must fit perfectly for the picture to make sense.
Lastly, one of the most damaging mistakes is rushing the process. Drawing is an art that requires patience and practice. If you hurry through the drawing, you may overlook the finer details that breathe life into your work. Take your time to refine each aspect, from the iris to the eyelashes, and don’t hesitate to revisit areas that don’t feel quite right. It’s all part of the artistic journey!
In summary, by being aware of these common mistakes and actively working to avoid them, you can significantly enhance the realism and emotional impact of your eye drawings. Remember, the eyes are often the focal point of any portrait, so investing the time and effort into mastering them is well worth it.
- What are the best resources for learning to draw eyes? There are numerous online tutorials, books, and courses dedicated to eye drawing techniques. Consider checking platforms like YouTube or art-specific websites.
- How can I practice drawing eyes effectively? Regular practice is key! Try drawing eyes from photographs, studying different shapes and expressions, and experimenting with various shading techniques.
- Are there specific tools recommended for drawing eyes? Pencils of varying hardness, blending tools, and good quality paper can make a significant difference in the quality of your drawings.

Mastering Nose Anatomy
When it comes to drawing the human face, the nose is often overlooked, yet it plays a pivotal role in the overall likeness and character of a portrait. Understanding the anatomy of the nose is essential for any artist aiming to create realistic and expressive facial features. The nose is a complex structure made up of various parts, each contributing to its unique shape and form. By mastering these components, artists can depict the nose from different angles and perspectives with confidence.
The nose consists of several key parts: the bridge, tip, nostrils, and the columella. Each of these elements has its own characteristics and can vary significantly from person to person. For instance, the bridge can be straight, curved, or even flat, while the nostrils can be wide, narrow, flared, or subtle. To effectively capture the essence of a nose, artists must observe these variations closely and understand how they relate to the overall shape of the face.
To help visualize the anatomy of the nose, consider the following breakdown:
| Part of the Nose | Description |
|---|---|
| Bridge | The upper part of the nose that connects to the forehead. |
| Tip | The rounded end of the nose, which can vary in size and shape. |
| Nostrils | The openings at the base of the nose, which can be wide or narrow. |
| Columella | The tissue that separates the nostrils; it can be pronounced or subtle. |
When drawing the nose, start by sketching a basic outline of its shape. Use light strokes to create a framework that captures the proportions and angles. Pay attention to how the nose interacts with the surrounding facial features, such as the eyes and mouth. This interaction is crucial for achieving a harmonious composition.
Next, focus on shading techniques to add depth and dimension. The nose has various planes that catch light differently, so understanding light and shadow is vital. For example, the bridge of the nose typically reflects light, while the nostrils may appear darker due to their concave shape. Use gentle gradients and soft lines to create a realistic effect, and don’t forget to blend your colors smoothly for a more natural appearance.
As you practice, remember that every nose is unique. Take the time to study photographs or real-life references to gain insight into the diverse shapes and structures. This observation will not only enhance your skills but also enrich your artistic vocabulary, allowing you to express individuality in your portraits.
In conclusion, mastering nose anatomy is a fundamental skill for any artist looking to create lifelike portraits. By understanding the various components and practicing different techniques, you can bring your drawings to life, capturing the essence of each subject you portray. So grab your sketchbook, observe closely, and let your creativity flow!
- What are the common mistakes to avoid when drawing noses? Many artists tend to make the nose too flat or overly simplistic. It's important to capture the three-dimensionality of the nose by paying attention to its various angles and shadows.
- How can I improve my nose drawing skills? Practice by drawing noses from different angles and using references. Study how light interacts with the nose and try to replicate that in your artwork.
- Is it necessary to learn nose anatomy before drawing? While it's not mandatory, having a good understanding of nose anatomy can significantly improve the accuracy and realism of your portraits.
Shaping the Lips
When it comes to drawing portraits, lips are not just mere features; they are a vital part of expressing emotions and personality. The shape, texture, and color of lips can convey a wide range of feelings, from joy to sadness, confidence to shyness. Understanding how to effectively draw lips can elevate your artwork from good to stunning. So, let’s dive into some techniques that will help you master the art of lip drawing.
First and foremost, it’s essential to recognize the different shapes of lips. Just like how every person has a unique smile, their lips come in various forms. Here are some common lip shapes you might encounter:
- Full Lips: These lips are plump and often convey a sense of warmth and approachability.
- Thin Lips: Typically associated with a more serious demeanor, thin lips can exude elegance and sophistication.
- Heart-Shaped Lips: With a pronounced Cupid's bow, these lips are often seen as youthful and charming.
- Wide Lips: These can create a sense of openness and friendliness, often seen in cheerful expressions.
When drawing lips, it’s crucial to pay attention to their texture and volume. Lips are not flat; they have curves and contours that need to be captured to create a realistic appearance. Start by sketching the outline of the lips lightly, focusing on the natural curves. The top lip usually has a more defined shape, while the bottom lip tends to be fuller. Once you have the basic shape, you can start adding details.
To effectively depict the texture of the lips, consider using shading techniques. Light and shadow play a significant role in making lips appear three-dimensional. The light source in your drawing will determine where the highlights and shadows fall. Typically, the center of the bottom lip catches the most light, while the edges can be shaded darker to create depth.
Another essential aspect is the color of the lips. When choosing colors, think about the overall mood of your portrait. For a natural look, use colors that resemble the subject's actual lip color, often a mix of pinks, reds, and browns. You can also incorporate a subtle gradient effect, transitioning from darker shades on the edges to lighter shades in the center. This technique enhances realism and gives the lips a more lifelike appearance.
Finally, practice makes perfect! Drawing lips can be tricky, but with consistent practice, you’ll develop a keen eye for detail and improve your skills. Don’t hesitate to use references or study photographs of different lip shapes to understand their unique characteristics better. Remember, every artist has their style, so don’t be afraid to experiment and find what works best for you!
Q: What materials are best for drawing lips?
A: You can use a variety of materials, including pencils, colored pencils, or even digital tools. The choice depends on your personal preference and the style you want to achieve.
Q: How can I make my lip drawings look more realistic?
A: Focus on capturing the texture, volume, and color gradients. Use shading to create depth and highlight the natural curves of the lips.
Q: Is it important to study different lip shapes?
A: Absolutely! Understanding the variety of lip shapes will help you represent different characters authentically and enhance your overall portrait skills.

Color and Shading Techniques
When it comes to drawing lips, color and shading are your best friends. They are the magic ingredients that transform a flat drawing into a three-dimensional masterpiece. Think of color as the soul of your artwork, while shading adds depth and dimension, much like how a sculptor chisels away at marble to reveal a stunning figure. To truly master the art of lip drawing, you need to understand how to blend these elements effectively.
First, let's talk about color choices. The color of lips can vary widely among individuals, influenced by factors like skin tone, lighting, and even mood. For instance, a vibrant red might convey passion, while a soft pink can evoke tenderness. As an artist, your job is to observe and replicate these subtleties. A good rule of thumb is to use a base color for the lips and then layer additional shades to create highlights and shadows. Consider using a color wheel to help you choose complementary colors that will enhance the overall look.
Next up is shading. Shading is not just about making things darker; it’s about creating a sense of volume and shape. When shading lips, think about where the light source is coming from. Typically, the center of the lips will catch the most light, while the edges will be darker. You can achieve this by using a gradient technique, gradually transitioning from light to dark. A soft blending tool, like a tortillon or your fingertip, can help you achieve that smooth gradient.
Here’s a quick rundown of some shading techniques you can apply:
- Hatching: This involves drawing parallel lines close together. The closer the lines, the darker the area appears.
- Cross-hatching: This technique uses intersecting lines to create texture and depth.
- Stippling: Using dots to create shading can add a unique texture to your lips.
To visualize how these techniques work together, consider this simple table that summarizes the effects of different shading methods:
| Technique | Effect |
|---|---|
| Hatching | Creates a linear texture that can be controlled for lightness or darkness. |
| Cross-hatching | Adds depth through layers, allowing for rich textures. |
| Stippling | Provides a unique texture, great for creating soft shadows. |
Lastly, don’t forget about the importance of blending. Blending can make or break your lip drawing. It’s the final touch that pulls everything together, ensuring that your colors and shades transition seamlessly. Whether you’re using colored pencils, markers, or digital tools, a good blending technique will enhance the overall realism of your artwork.
In summary, mastering color and shading techniques is crucial for drawing realistic lips. By experimenting with different colors, applying effective shading methods, and blending your work carefully, you can create lips that not only look realistic but also express a wide range of emotions. Remember, practice makes perfect, so keep drawing and don’t be afraid to make mistakes along the way!
Q: What colors should I use for realistic lips?
A: Start with a base color that matches the skin tone and layer additional shades to create depth. Use reds, pinks, and even purples depending on the mood you want to convey.
Q: How can I improve my shading techniques?
A: Practice different shading methods like hatching, cross-hatching, and stippling. Experiment with light sources and observe how they affect the shading on lips.
Q: What tools are best for blending?
A: Blending can be done with tools like tortillons, blending stumps, or even your fingers. For digital art, use soft brushes to achieve smooth transitions.
Common Lip Shapes
When it comes to drawing, understanding the variety of lip shapes is essential for creating realistic and expressive portraits. Lips are not just simple lines; they come in a plethora of forms that can convey a multitude of emotions. From full and luscious to thin and delicate, each lip shape has its own unique characteristics that contribute to the overall expression of the face.
Let’s explore some of the most common lip shapes that artists encounter:
- Full Lips: These lips are characterized by their plumpness and volume. They often suggest warmth and sensuality. When drawing full lips, pay attention to the curves and the way light reflects off the surface.
- Thin Lips: Thin lips can convey a sense of seriousness or sophistication. They are often less pronounced and may require careful shading to add depth and dimension.
- Heart-Shaped Lips: This shape features a pronounced cupid's bow at the top, resembling a heart. They are often seen as youthful and playful, making them a favorite among artists.
- Downturned Lips: Lips that turn down at the corners can express sadness or discontent. Capturing this subtle detail can significantly impact the overall emotion of your portrait.
- Wide Lips: These lips extend further than average, often giving a cheerful or open expression. They can be challenging to draw due to their length, but they add character to any face.
In addition to these shapes, it's important to consider the texture and volume of the lips. Lips are not flat; they have a natural curvature and often display variations in color. When shading, use a combination of light and dark tones to create the illusion of depth. For instance, the area in the center of the lips is usually lighter, while the edges tend to be darker. This technique can help in making the lips appear more three-dimensional.
Moreover, remember that lips can vary greatly depending on the individual. Factors such as ethnicity, age, and even personal style can influence lip shape. Therefore, taking the time to observe different lip shapes in real life or through reference images can greatly enhance your drawing skills.
To wrap it up, mastering the drawing of various lip shapes is not just about replicating what you see; it’s about understanding the emotions and stories that each shape can convey. So next time you pick up your pencil, consider how the lips can enhance the character and expression of your portrait!
Q: How can I practice drawing different lip shapes?
A: A great way to practice is by using reference photos. Try to sketch lips from various angles and in different expressions. You can also use a mirror to observe your own lips or those of friends and family.
Q: What tools are best for drawing realistic lips?
A: Pencils with varying hardness can help create different textures. Soft pencils are great for shading, while harder pencils are excellent for fine details. Additionally, colored pencils or markers can be used to add color and depth.
Q: Should I focus on symmetry when drawing lips?
A: While symmetry is important, it’s also essential to capture the unique characteristics of each person’s lips. Many people have slight asymmetries, so be sure to observe and replicate these details for a more realistic portrayal.

Hair Drawing Techniques
Drawing hair can often feel like trying to catch smoke with your bare hands; it’s fluid, dynamic, and can be incredibly tricky to master. However, with the right techniques, you can create hair that not only looks realistic but also adds character and depth to your portraits. First, it’s essential to understand the basic structure of hair. Hair is made up of strands that can vary in thickness, length, and texture, depending on the individual. To start, consider the overall shape of the hairstyle you want to depict. Is it flowing, curly, or straight? Each style requires a different approach.
One effective method is to begin with a simple sketch of the hair’s outline. This serves as your framework. Think of it like drawing the skeleton of a creature before adding the flesh. Once you have the outline, you can begin to fill in the details. Use long, sweeping strokes for straight hair and curved lines for curls. Remember, hair doesn’t just sit flat on the head; it has volume and movement. Adding layers can create the illusion of depth and realism. For instance, when drawing long hair, consider how the strands fall and overlap, creating shadows and highlights.
Speaking of shadows and highlights, these are crucial for giving hair texture. Use a range of pencils or digital brushes to create varying degrees of darkness and lightness. Start with a base color and gradually build up layers. A common technique is to use a blending tool or your finger to smooth out the transitions between light and dark areas. This technique mimics the natural shine and flow of hair, making it appear more lifelike. Additionally, don’t forget to incorporate the light source in your drawing. Where is the light hitting the hair? This will guide you in placing highlights effectively.
Another important aspect is to consider the hair's texture. Different hair types—be it straight, wavy, or curly—require different rendering techniques. For example, curly hair often involves drawing tight spirals and loops, while straight hair might involve long, smooth lines. It can be helpful to study real-life references or even use photographs to understand how light interacts with different hair textures. You can also break down the drawing process into manageable sections. Focus on one part of the hair at a time, whether it’s the bangs, the back, or the sides. This method prevents you from feeling overwhelmed and allows you to concentrate on getting the details right.
To further enhance your skills, consider practicing with a variety of hair colors. Each color reacts differently to light, so experimenting with different shades can improve your understanding of how to depict hair accurately. For instance, darker hair may require more contrast in shading, while lighter hair can often be rendered with softer strokes. Don't shy away from using color pencils or watercolors if you’re working traditionally, as they can add a beautiful richness to your work.
Lastly, don’t forget that hair is an extension of the character’s personality. Think about how the hairstyle reflects their mood or lifestyle. A wild, tousled mane might indicate a carefree spirit, while neatly combed hair could suggest a more meticulous individual. By understanding the emotional context of hair, you can create more compelling portraits that resonate with viewers.
Q1: What are the best tools for drawing hair?
A1: The best tools depend on your medium. For pencil drawing, a range of graphite pencils (from H to B) along with blending stumps can be effective. If you’re working digitally, various brush settings can mimic hair textures.
Q2: How can I make my hair drawings look more realistic?
A2: Focus on the light source, use a variety of strokes for different textures, and pay attention to the flow and volume of the hair. Practice with references to understand how hair behaves.
Q3: Should I draw hair before or after the face?
A3: It’s often beneficial to sketch the face first, as it provides a guideline for how the hair should fall and frame the features.
Q4: Can I use digital tools to improve my hair drawing?
A4: Absolutely! Digital art programs often have brushes specifically designed for hair, allowing for more flexibility and experimentation.
Frequently Asked Questions
-
What are the basic proportions of the human face?
Understanding the basic proportions of the human face is essential for any artist. Generally, the face can be divided into three equal sections: from the hairline to the eyebrows, from the eyebrows to the bottom of the nose, and from the bottom of the nose to the chin. This simple guideline helps create a balanced and realistic representation.
-
How can I effectively capture facial expressions?
Capturing facial expressions is all about observing subtle changes in features. Pay attention to the position of the eyebrows, the curvature of the mouth, and the openness of the eyes. Practicing with reference photos or real-life subjects can enhance your ability to depict emotions accurately.
-
What techniques can I use to draw realistic eyes?
To draw realistic eyes, focus on shading, highlighting, and adding texture. Start with a basic shape, then layer in shadows to create depth. Highlights can be added to the iris and cornea to give the eyes a lifelike quality. Remember, the eyes are crucial for conveying emotion, so take your time to get them right!
-
What are common mistakes to avoid when drawing eyes?
Many artists struggle with proportion and symmetry when drawing eyes. A common mistake is making the eyes too large or too small in relation to the face. Additionally, neglecting to include highlights or shadows can make eyes look flat. Always refer to your guidelines and practice regularly to improve accuracy.
-
How do I understand nose anatomy for drawing?
Understanding nose anatomy involves studying its structure and how it changes with different angles. The nose consists of the bridge, nostrils, and tip, each having unique shapes. Observing real-life noses or using reference images can help you grasp how to depict them realistically in your drawings.
-
What techniques can I use for drawing lips?
When drawing lips, focus on their shape, texture, and volume. Start with the overall outline, then add details like the cupid's bow and the fullness of the lower lip. Use shading to create depth and highlights to suggest moisture, making them appear more lifelike.
-
How do color and shading enhance lip drawings?
Color and shading are vital for adding realism to lip drawings. Choose colors that reflect the natural tone of the lips and use a gradient effect to show light and shadow. This technique can create the illusion of plumpness and texture, making your artwork stand out.
-
What are some common lip shapes to consider?
There are various lip shapes, including full, thin, heart-shaped, and wide. Each shape has its own characteristics and can convey different emotions. By studying these shapes, you can diversify your portraits and accurately represent different individuals.
-
What techniques are best for drawing hair?
When drawing hair, focus on texture and flow. Use a combination of lines and shading to create depth and movement. Remember to consider the direction of hair growth and how it interacts with the shape of the head. Practice different hairstyles to find what works best for your style.


