
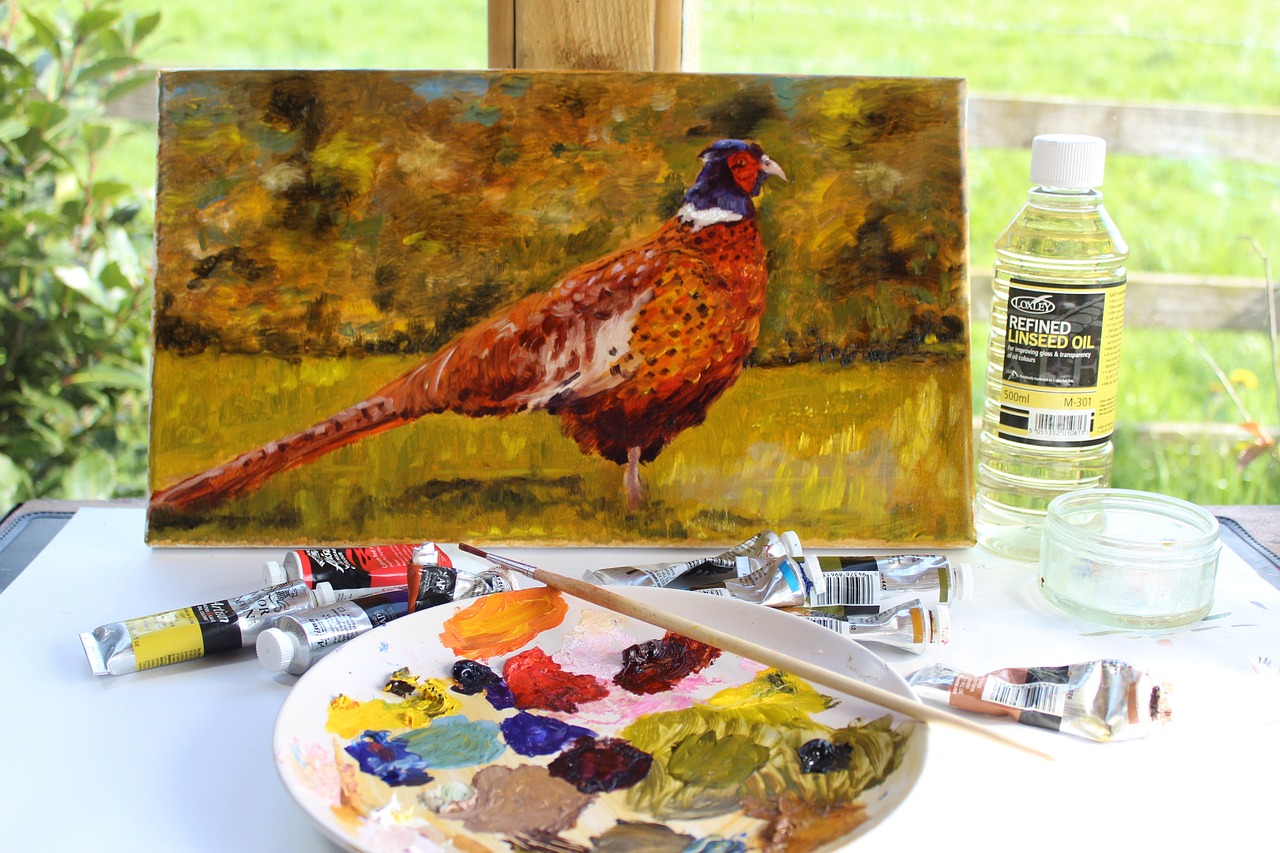
Glazing Techniques for Oil Paintings
Oil painting is a captivating art form that allows artists to express their creativity through vibrant colors and intricate details. One of the most powerful techniques in an oil painter's arsenal is glazing. This method involves applying transparent layers of paint over dried layers, creating a stunning depth and luminosity that can transform a flat painting into a mesmerizing visual experience. In this article, we will explore various glazing techniques, their significance in enhancing color depth, and practical tips that artists can use to achieve their desired effects.
To truly master glazing, it's essential to grasp its foundational principles. So, what exactly is glazing? In simple terms, glazing is the process of layering transparent or semi-transparent paint over a dried layer of paint. This technique is not just about adding color; it's about manipulating light and shadow to create a sense of depth and dimension. Historically, glazing has been employed by renowned artists such as Rembrandt and Vermeer, who used it to achieve their signature luminous effects. Understanding the purpose of glazing can elevate your artwork from ordinary to extraordinary, allowing for a rich interplay of colors that can evoke emotion and intrigue.
When it comes to glazing, the medium you choose can significantly impact the final outcome of your piece. Different mediums have unique properties that can alter the way your glazes behave on the canvas. For oil painters, the two most common mediums are oil and acrylic. Each medium offers distinct advantages and challenges, making it crucial to select the right one for your glazing techniques.
Let's break down the differences between oil and acrylic mediums. One of the most notable contrasts is their drying times. Oil mediums can take days or even weeks to dry completely, allowing for a more extended working time, while acrylics dry much faster, often within minutes. This difference can affect how you apply glazes and how much time you have to work with them. Additionally, oil paints typically offer a richer, more vibrant finish, while acrylics provide a matte finish that can be desirable for certain styles. Ultimately, the choice between oil and acrylic will depend on your personal preferences and the effects you wish to achieve.
Oil mediums are favored by many artists for their ability to create a rich, deep finish that enhances color vibrancy. When glazing with oil, the paint tends to retain its luminosity, allowing light to penetrate through the layers, resulting in a glowing effect. This quality is especially beneficial for capturing the subtleties of skin tones or the intricate details of a landscape. Furthermore, oil mediums allow for smooth blending, making it easier to achieve seamless transitions between colors.
On the other hand, acrylic mediums come with their own set of advantages. One of the most significant benefits is their quick drying time, which can be a game-changer for artists who prefer to work quickly or in layers. Acrylics also offer a wide range of mediums and additives that can modify their texture and finish, providing versatility that is particularly appealing to both beginners and experienced artists. Additionally, acrylics can be thinned with water, making cleanup a breeze compared to oils, which require solvents.
Layering is a crucial aspect of glazing that can dramatically influence the depth and transparency of your artwork. To build depth, artists often start with a base layer of opaque paint, allowing it to dry completely before applying transparent glazes. This technique not only enhances the vibrancy of the colors but also creates a sense of three-dimensionality. The key to successful layering lies in the transparency of the glazes; the more transparent the layer, the more depth you can achieve. Experimenting with different layering techniques can lead to stunning results, so don't hesitate to play around with your approach!
Effective color mixing is vital for successful glazing. When preparing glazes, it’s essential to consider the colors you want to achieve and how they will interact with the underlying layers. For instance, mixing complementary colors can create a sense of vibrancy and contrast, while analogous colors can result in a harmonious blend. Understanding color theory is crucial in this process, as it helps you predict how different colors will behave when layered.
A solid grasp of color theory enhances the effectiveness of glazing. Concepts such as complementary colors and color temperature can significantly influence your glazing outcomes. For example, placing a warm glaze over a cool base can create an inviting glow, while a cool glaze over a warm base can add depth and complexity. By understanding these principles, you can manipulate color interactions to your advantage.
Custom glazes allow artists to achieve unique effects tailored to their vision. To formulate personalized glazes, consider your pigment selection and mixing ratios carefully. Experimenting with different combinations can lead to exciting discoveries. For example, mixing a small amount of a transparent color with a medium can yield a unique glaze that adds depth without overpowering the underlying layers. The beauty of glazing lies in its ability to create something truly individual, so embrace the process!
As with any technique, there are common pitfalls that artists may encounter when glazing. Recognizing these mistakes can save you time and frustration in your artistic journey.
One of the biggest mistakes is overworking the glaze. This can lead to muddy colors and a loss of transparency. To avoid this, apply glazes in thin layers and allow each layer to dry before adding more. This practice helps maintain the freshness of your work and prevents unwanted blending.
Surface preparation is critical for successful glazing. If the surface is not adequately prepared, glazes may not adhere properly, leading to uneven application. Always ensure your canvas is primed and smooth before beginning your glazing process. A well-prepared surface allows for a more even application and better overall results.
- What is glazing in oil painting? Glazing is the technique of applying transparent layers of paint over dried layers to create depth and luminosity.
- Can I use acrylics for glazing? Yes, acrylics can be used for glazing, offering quick drying times and versatility.
- How can I avoid overworking my glaze? Apply glazes in thin layers and allow each layer to dry before adding more.
- What are the benefits of oil mediums for glazing? Oil mediums provide a rich finish and enhance color vibrancy, allowing for smooth blending and depth.

The Basics of Glazing
Glazing is a fascinating technique in oil painting that can transform a mundane artwork into a mesmerizing visual experience. At its core, glazing involves applying a thin, transparent layer of paint over a dried layer, allowing the underlying colors to shine through. This method not only enhances the depth of color but also adds a luminous quality that can be quite striking. Imagine a beautiful stained glass window where light passes through layers of color, creating a vibrant spectacle—that's the magic of glazing!
Historically, glazing has been a staple in the artist's toolkit, dating back to the Renaissance. Artists like Rembrandt and Vermeer mastered this technique, using it to achieve incredible realism and depth in their portraits and landscapes. The purpose of glazing extends beyond mere aesthetics; it also allows for corrections and adjustments in color without the need for complete repainting. This flexibility is invaluable for artists at any level.
When you think about glazing, consider it as a way to build a rich tapestry of colors. Each layer adds to the complexity and vibrancy of the final piece. The key here is transparency. The glazes must be thin enough to let the colors beneath them shine through, yet rich enough to add their own hue and character. As you embark on your glazing journey, remember that patience is crucial. Building layers takes time, but the results are well worth the effort.
In summary, glazing is not just a technique; it's an art form that requires understanding and practice. By mastering the basics, you can unlock a new dimension in your oil paintings, allowing your creativity to flourish. So, grab your brushes and prepare to dive into the world of glazing, where every stroke can lead to a new discovery!

Choosing the Right Medium
When it comes to oil painting, selecting the right medium for glazing can be the difference between a masterpiece and a muddled mess. The medium you choose not only affects the texture and finish of your painting but also influences how colors interact with each other. Think of it as choosing the right pair of shoes for a big event; the wrong choice can lead to discomfort and an overall less-than-stellar performance. So, let’s dive into the various mediums available and how they can elevate your glazing game.
There are several mediums that artists can use for glazing, each with its unique properties and effects. The most common ones include linseed oil, stand oil, and alkyd mediums. These mediums can enhance the transparency of your colors, allowing layers beneath to shine through, creating a depth that is often sought after in oil paintings. For instance, linseed oil is known for its ability to create a rich, glossy finish, while stand oil offers a thicker consistency that can help maintain the integrity of your glazes over time.
Here’s a quick comparison of some popular glazing mediums:
| Medium | Drying Time | Finish | Application |
|---|---|---|---|
| Linseed Oil | Slow | Glossy | Brush or Palette Knife |
| Stand Oil | Medium | Very Glossy | Brush |
| Alkyd Mediums | Fast | Satin to Glossy | Brush |
As you can see, the choice of medium can significantly affect your painting's outcome. If you're looking for a quick-drying option, alkyd mediums might be your best bet. They allow for faster layering and can be a lifesaver for artists who want to work efficiently without sacrificing quality. On the other hand, if you prefer a more traditional approach and don’t mind waiting for your work to dry, linseed oil or stand oil could be the way to go.
Moreover, the choice of medium also comes down to personal preference and the specific effects you wish to achieve. Some artists enjoy experimenting with different mediums to discover what works best for their style. It’s akin to a chef trying out various spices to find the perfect flavor for a dish. So, don’t be afraid to mix and match, and see what combinations yield the most satisfying results.
Remember that glazing is all about layering and transparency, so the medium you choose should facilitate these aspects. Always test your medium on a small canvas or a scrap piece of paper to see how it behaves with your selected colors. This trial-and-error approach will help you build confidence in your glazing techniques and ultimately refine your artistic voice.
In conclusion, choosing the right medium for glazing is crucial for achieving the desired effects in your oil paintings. Whether you opt for the rich, slow-drying properties of linseed oil or the quick-drying versatility of alkyd mediums, understanding how each medium interacts with your colors will empower you to create stunning, luminous artworks that truly stand out.
Oil vs. Acrylic Mediums
When it comes to choosing between oil and acrylic mediums for glazing in oil paintings, artists often find themselves at a crossroads. Each medium has its unique characteristics, and the choice can significantly impact your artwork's final appearance. Let's dive into the differences that can help you make an informed decision.
First off, one of the most noticeable differences lies in the drying times. Oil mediums are known for their slow drying process, which can take days or even weeks to fully cure. This allows artists ample time to manipulate the glaze, blend colors, and achieve desired effects without the pressure of drying too quickly. On the other hand, acrylic mediums dry rapidly, often within minutes. This quick drying time can be advantageous for artists who prefer to work swiftly or are looking to layer glazes in a shorter time frame.
Next, let’s talk about the finish. Oil mediums typically provide a rich, deep finish that enhances the vibrancy and luminosity of colors. The glossy surface created by oil glazes can create stunning depth in your artwork, making colors appear more vivid and alive. In contrast, acrylics tend to dry to a more matte finish, which can sometimes dull the vibrancy of the colors. However, acrylic mediums can be mixed with gloss mediums to achieve a similar sheen as oils.
Another key factor is the application method. Oil mediums allow for a more forgiving application process. Artists can easily rework areas, blend seamlessly, and create intricate details due to the extended open time. Acrylics, while versatile, require a different approach. Once applied, they set quickly, which means that artists need to be more decisive in their application. This can lead to a more immediate style of painting, which some artists may find liberating, while others may feel restricted.
To summarize, here’s a quick comparison of the two mediums:
| Feature | Oil Mediums | Acrylic Mediums |
|---|---|---|
| Drying Time | Slow (days to weeks) | Fast (minutes) |
| Finish | Rich and glossy | Matte (can be modified) |
| Application | Forgiving, allows reworking | Quick, requires decisiveness |
Ultimately, the choice between oil and acrylic mediums for glazing comes down to personal preference and the specific effects you wish to achieve in your artwork. Whether you lean towards the luscious depth of oils or the speedy versatility of acrylics, each medium offers unique possibilities that can enhance your artistic expression.
Benefits of Oil Mediums
When it comes to oil painting, the choice of medium can dramatically influence the final outcome of your artwork. Oil mediums are particularly revered for their ability to create a rich, deep finish that elevates the vibrancy of colors, making them a favorite among many artists. One of the most significant advantages of using oil mediums is their slow drying time. This allows artists to manipulate the paint longer, enabling subtle blending and layering techniques that are crucial for achieving depth in color.
Moreover, oil mediums facilitate a smooth application, providing a buttery texture that glides onto the canvas. This is especially beneficial when working with glazes, as it allows for a more controlled and even distribution of color. Imagine spreading warm butter on toast; the way it melts and covers the surface is akin to how oil mediums behave on canvas. This characteristic not only enhances the application process but also contributes to the luminosity of the final piece.
Additionally, oil mediums offer a wide range of options for artists looking to customize their work. From linseed oil to poppy oil, each type brings its unique properties to the table. For instance, linseed oil is known for its excellent drying properties and durability, while poppy oil is favored for its lighter color and slower drying time, making it ideal for delicate glazes. Choosing the right oil medium can significantly impact the transparency and richness of the glazes you create, allowing for a more tailored approach to your art.
Another remarkable benefit of oil mediums is their ability to enhance color saturation. When you apply a glaze made with oil medium over a dried layer of paint, it can intensify the underlying colors, creating a stunning visual effect. This is particularly effective for creating depth and dimension in landscapes or portraits, where the interplay of light and shadow can be accentuated. The result? A painting that not only captivates the viewer but also tells a story through its layers.
In summary, oil mediums are an invaluable tool in the oil painter's arsenal. They allow for an extended working time, smooth application, customization, and enhanced color saturation. Whether you are a seasoned artist or a beginner, understanding the benefits of oil mediums can open up a world of possibilities in your glazing techniques, helping you achieve those breathtaking effects that make your artwork truly stand out.
- What is the best oil medium for glazing? The best oil medium for glazing often depends on the desired effect, but linseed oil is a popular choice due to its balance of drying time and durability.
- Can I mix oil mediums with acrylics? It's generally not recommended to mix oil mediums with acrylics, as they have different drying times and properties, which can lead to issues in adhesion and longevity.
- How can I make my oil glazes more transparent? To enhance transparency, consider using a higher ratio of medium to paint and choose pigments that are naturally more transparent.
Benefits of Acrylic Mediums
Acrylic mediums have gained significant popularity among artists for a multitude of reasons. One of the most notable benefits is their quick drying time. Unlike oil paints, which can take days or even weeks to dry, acrylics typically dry in a matter of minutes. This allows artists to work more efficiently, layering colors and glazes without having to wait long periods. Imagine being able to make adjustments to your artwork in real-time, rather than twiddling your thumbs while waiting for paint to set!
Another advantage is the versatility of acrylic mediums. They can be used in various ways, from thick impasto applications to thin washes, making them suitable for a wide range of techniques. This adaptability means that artists can experiment freely, using acrylics for glazing, pouring, or even as a base for mixed media projects. The ability to manipulate the paint to achieve different textures and effects is a game-changer for many.
Additionally, acrylic mediums are often water-soluble when wet, allowing for easy cleanup. This property makes them particularly appealing for beginners who may not yet have a dedicated workspace or for artists who prefer a less messy approach. Simply using soap and water, you can clean brushes and palettes, making the process of creating art much more enjoyable.
Furthermore, acrylic mediums offer a vibrant color palette. The pigments used in acrylic paints are often more intense than those in oil paints, resulting in brighter, more luminous glazes. This quality enables artists to create stunning visual effects that can make their work truly stand out. When layering glazes, the richness of the colors can create a depth that captivates viewers, drawing them into the artwork.
Lastly, acrylics are generally more affordable than oil mediums. For artists who are just starting or those on a budget, acrylics provide a cost-effective option without sacrificing quality. This affordability allows artists to purchase a wider range of colors and mediums, encouraging experimentation and creativity.
In summary, the benefits of using acrylic mediums for glazing include:
- Quick drying times for efficient layering and adjustments.
- Versatility in application techniques, making them suitable for various styles.
- Easy cleanup with water, ideal for artists who want a less messy experience.
- Vibrant colors that enhance the luminosity of glazes.
- Affordability that makes acrylics accessible to a wider audience.
Layering Techniques
Layering techniques are at the heart of effective glazing in oil painting, allowing artists to create stunning visual depth and richness. By applying thin layers of transparent paint over a dry base layer, you can achieve a luminosity that simply isn’t possible with opaque paint alone. Imagine the way light filters through leaves in a forest; that’s the kind of ethereal quality you can evoke through careful layering. Each layer builds upon the last, creating a complex interplay of colors that can transform a flat canvas into a vibrant, three-dimensional masterpiece.
When it comes to layering, the key is to start with a solid foundation. Begin by establishing an underpainting, which serves as the groundwork for your subsequent layers. This initial layer can be monochromatic or a full-color base, depending on your desired outcome. Once this layer is dry, you can begin the glazing process. A good rule of thumb is to remember that less is more. Applying thin, transparent layers will allow the colors beneath to shine through, creating a sense of depth that thicker applications simply cannot replicate.
As you layer, it’s essential to consider the transparency of your glazes. Different pigments and mediums will have varying levels of transparency, which can significantly affect the final result. For instance, using a glazing medium mixed with your oil paint can enhance transparency while maintaining a rich color saturation. This combination allows for a more controlled application, enabling you to build depth gradually. Here’s a quick look at some effective layering techniques:
- Fat over Lean: Always apply thicker layers (fat) over thinner layers (lean) to avoid cracking.
- Color Glazing: Use glazes to modify the color of your underpainting, enhancing shadows or highlights.
- Textured Layering: Incorporate texture in your underpainting to influence how the glaze interacts with the surface.
Another important aspect of layering is the drying time between applications. Patience is your best friend here! Allow each layer to dry completely before adding the next one. This not only prevents unwanted mixing of colors but also ensures that the integrity of your layers is maintained. On average, oil paints can take anywhere from a few days to a week to dry, depending on the thickness and the medium used. Keeping a drying schedule can help you manage your workflow effectively.
Furthermore, don’t hesitate to experiment with different tools and techniques for applying your glazes. Brushes, palette knives, and even fingers can create different effects. The texture of your brushwork will contribute to the overall feel of the painting, so feel free to play around. Remember, art is as much about exploration as it is about technique!
Ultimately, mastering layering techniques in glazing is about practice and experimentation. As you become more comfortable with the process, you’ll find your unique style emerging. Just like a musician learns to play their instrument, painters refine their skills over time, discovering new ways to express their creativity. So grab your brushes, experiment with layers, and let your artistry shine through!
Q: What is the best medium for glazing?
A: The best medium for glazing depends on your personal preference and the effect you want to achieve. Oil mediums provide rich, deep finishes, while acrylic mediums offer quick drying times and versatility.
Q: How long should I wait between layers when glazing?
A: It's advisable to wait until each layer is completely dry, which can take from a few days to a week depending on the thickness of the paint and the medium used.
Q: Can I use a brush for glazing?
A: Absolutely! Different brushes can create various effects, so feel free to experiment with different tools to find what works best for your style.
Q: What are some common mistakes to avoid when glazing?
A: Common mistakes include overworking the glaze and poor surface preparation. Always ensure that your surface is well-prepared and allow each layer to dry before applying the next.

Color Mixing for Glazing
Effective color mixing is vital for successful glazing in oil painting. When artists glaze, they often seek to enhance the depth and luminosity of their work, and achieving the right colors is a crucial part of that process. Think of color mixing as the secret sauce that elevates your painting from flat to fabulous! The right mixture can transform a dull canvas into a vibrant masterpiece, while the wrong one can lead to muddy, unappealing hues. So, how do you ensure your glazes shine with brilliance?
First, it's essential to understand the concept of transparency and opacity in colors. Transparent colors allow the underlying layers to show through, creating a sense of depth and richness. On the other hand, opaque colors can cover previous layers completely. When mixing colors for glazing, you want to focus on transparent pigments, as they will allow you to build layers without losing the vibrancy of the colors beneath. For instance, colors like Alizarin Crimson or Cadmium Yellow are excellent choices for glazing due to their transparency.
Another important aspect of color mixing for glazing is the balance between warm and cool tones. Understanding color temperature can significantly influence the mood and atmosphere of your painting. Warm colors, such as reds and yellows, tend to advance and create a sense of warmth, while cool colors, like blues and greens, recede and offer a calming effect. By mixing these tones thoughtfully, you can achieve a harmonious balance in your artwork. For example, if you're creating a sunset scene, you might mix warm oranges with cool purples to create depth and interest.
When mixing colors, always start with small amounts. It's easier to add more pigment than to take it away! A good practice is to use a palette knife to blend your colors thoroughly. This ensures that you achieve a smooth consistency, which is crucial for glazing. Remember, the goal is to create a glaze that enhances your painting without overpowering it. If you're unsure about a mixture, test it on a scrap piece of canvas first. This way, you can see how the color behaves once applied, and make adjustments as necessary.
Lastly, consider creating custom glazes tailored to your specific needs. This involves selecting pigments that resonate with your artistic vision and experimenting with different ratios to find the perfect mix. You can keep a record of your successful combinations in a notebook or on your palette for future reference. Think of it as building your own color library—one that reflects your unique style and preferences.
In summary, mastering color mixing for glazing is not just about knowing which colors to use; it’s about understanding how they interact, how they can create depth, and how they can transform your artwork. So, grab your palette, start mixing, and let your creativity flow!
- What is the best way to create a transparent glaze? - Use transparent pigments and mix them with a suitable medium to achieve the desired consistency.
- How do I avoid muddy colors when glazing? - Start with clean, transparent colors and mix small amounts gradually, testing on a separate surface.
- Can I use acrylics for glazing techniques? - Yes, acrylics can be used for glazing, but they dry quickly, so work fast and keep your mixtures thin.
Understanding Color Theory
When it comes to glazing in oil painting, having a solid grasp of color theory is not just beneficial; it's essential. Color theory serves as the backbone of any artistic endeavor, providing artists with the knowledge to create harmonious and visually appealing compositions. At its core, color theory encompasses the relationships between colors, their properties, and how they interact with one another. Understanding these principles can elevate your glazing techniques, leading to stunning results that captivate viewers.
One of the fundamental concepts in color theory is the idea of complementary colors. These are colors that are located opposite each other on the color wheel, such as blue and orange or red and green. When used in glazing, complementary colors can create a sense of depth and vibrancy. For instance, if you glaze a blue hue over a warm orange base, the interaction can produce a luminous effect that adds complexity to your painting. This principle can be likened to a dance between colors, where each one enhances the other, creating a dynamic visual experience.
Another critical aspect of color theory is color temperature. Colors are often categorized as warm (reds, oranges, yellows) or cool (blues, greens, purples). Warm colors tend to advance in a composition, drawing the viewer's eye, while cool colors recede, creating a sense of depth. When glazing, being mindful of color temperature can help you achieve the desired mood or atmosphere in your artwork. For example, if you're aiming for a serene landscape, using cool glazes can evoke tranquility, while warm glazes can imbue a sense of warmth and vibrancy.
To effectively mix colors for glazing, artists should consider the transparency and opacity of the pigments they are using. Transparent colors are ideal for glazing since they allow underlying layers to shine through, enhancing the overall luminosity of the painting. On the other hand, opaque colors can be used sparingly in glazing to create highlights or to modify the underlying colors without completely obscuring them. Understanding how to balance these properties can lead to more refined and sophisticated glazing techniques.
In summary, mastering color theory is a game-changer for artists looking to enhance their glazing techniques. By understanding concepts such as complementary colors and color temperature, along with the transparency and opacity of pigments, you can create artworks that are not only visually stunning but also rich in depth and emotion. So, the next time you pick up your brush, remember that color theory is your ally in achieving that perfect glaze!
- What is the best way to start learning color theory? Begin by studying the color wheel and experimenting with mixing colors to see how they interact.
- Can I use color theory in mediums other than oil paint? Absolutely! Color theory applies to all forms of visual art, including acrylics, watercolors, and digital art.
- How can I practice my glazing techniques effectively? Start with small studies, using different colors and layering techniques to see how they affect your final piece.

Creating Custom Glazes
When it comes to oil painting, one of the most exciting aspects is the ability to create your own custom glazes. This not only allows for a unique touch in your artwork but also gives you the freedom to experiment with colors and effects that suit your personal style. Custom glazes can transform your painting from ordinary to extraordinary, adding layers of depth and luminosity that are simply breathtaking.
To start, you’ll want to consider the pigments you’ll be using. Not all pigments are created equal, and their transparency levels can vary significantly. For effective glazing, opt for transparent or semi-transparent pigments, as they allow the underlying layers to shine through. Some popular choices include Cadmium Yellow, Alizarin Crimson, and Ultramarine Blue. When mixing, aim for a balance that maintains the vibrancy of your colors while ensuring they remain translucent.
Next, the medium you choose plays a crucial role in the outcome of your glazes. A good medium can enhance the flow and transparency of your paint. You might want to experiment with different mediums, such as linseed oil, stand oil, or even commercial glazing mediums, to find what works best for your desired effect. Each medium can alter the drying time and finish of your glaze, so it’s worth doing a bit of research or even some test swatches.
Don't forget about the mixing ratios. A general rule of thumb is to start with a small amount of pigment and gradually add your medium until you achieve the desired consistency. This process can be a bit like cooking; you want to taste as you go. Too much medium can dilute your color, while too little can make it difficult to apply smoothly. Aim for a creamy, fluid texture that can be easily manipulated on your canvas.
Finally, the application of your custom glazes is where the magic happens. Using a soft brush or even a sponge can yield different results, so don’t hesitate to try various tools. Apply your glaze in thin layers, allowing each layer to dry before adding another. This layering technique not only builds depth but also allows you to adjust the intensity of your colors gradually. If you find a layer is too strong, you can always lighten it with a gentle wipe of a clean brush or cloth.
In conclusion, creating custom glazes is an art form in itself. It requires a bit of practice, experimentation, and a willingness to make mistakes. But the rewards are well worth it! Your paintings will gain a richness that is uniquely yours, and you’ll develop a deeper understanding of color and light in the process. So grab your brushes and start mixing; your masterpiece awaits!
- What is the best medium for glazing? The best medium for glazing often depends on your personal preference. Many artists prefer linseed oil for its slow drying time and rich finish, but acrylic mediums can also be effective for quicker projects.
- Can I use any pigment for glazing? Not all pigments are suitable for glazing. It's best to use transparent or semi-transparent pigments to allow the underlying layers to show through.
- How do I know if I’ve overworked my glaze? Overworking a glaze can lead to a muddy appearance. If you notice that the colors are becoming dull or losing their vibrancy, it’s a sign that you may have overworked the layer.

Common Mistakes to Avoid
When it comes to glazing in oil painting, even seasoned artists can stumble upon pitfalls that can derail their creative vision. One of the most common mistakes is overworking the glaze. This often happens when an artist is too eager to achieve the perfect effect, leading to excessive brushing or manipulation of the glaze. The result? A muddy appearance that dulls the vibrancy of your colors. To avoid this, it's crucial to recognize the signs of overworking. If your glaze starts to lose its transparent quality or if the colors begin to blend into an unappealing mess, it’s a clear indication that it’s time to step back. Embrace the beauty of layering; sometimes, less is more, and allowing each layer to dry before applying the next can yield stunning results.
Another significant mistake is poor surface preparation. Imagine trying to paint a masterpiece on a bumpy, uneven canvas; it just won't work! Properly preparing your surface is essential for achieving a smooth application of glazes. This includes ensuring that the base layer is completely dry and free from dust or debris. A well-prepared surface allows the glaze to adhere evenly, enhancing the overall finish of your artwork. So, take the time to sand, prime, and clean your canvas before diving into the glazing process. It will save you headaches down the line and ensure your artwork has the professional look you desire.
Additionally, many artists overlook the importance of color harmony when mixing their glazes. It’s easy to get caught up in the excitement of creating a unique color but neglecting how it interacts with the underlying layers can lead to dissonance in your artwork. Always keep in mind the principles of color theory. For instance, using complementary colors can create vibrancy, while analogous colors can provide a more harmonious feel. Before committing to a glaze, test it on a scrap piece or a small area of your painting to see how it interacts with the layers beneath.
Lastly, don’t forget about the drying times of your glazes. Each medium has its unique drying characteristics, and failing to account for this can result in unforeseen complications. For example, if you're using oil mediums, the drying time can vary significantly based on the thickness of the application and the environmental conditions. Always allow sufficient drying time between layers to prevent smudging or unwanted blending. This patience can be the difference between a chaotic canvas and a beautifully layered work of art.
- What is the best medium for glazing? The choice between oil and acrylic mediums depends on your desired effect. Oil mediums offer rich depth, while acrylics provide quick drying times.
- How many layers should I apply when glazing? There’s no one-size-fits-all answer, but generally, 2-3 layers can create beautiful depth without overwhelming the underlying colors.
- Can I use glazing techniques on a canvas that has not been primed? It’s not recommended, as unprimed canvases can absorb the glaze unevenly, leading to unwanted results.
- What should I do if I accidentally overwork my glaze? If you notice your glaze becoming muddy, allow it to dry completely and then apply a new layer over it, or consider scraping it off gently.
Overworking the Glaze
When it comes to oil painting, can be a silent enemy lurking in the shadows of your creative process. Imagine you're sculpting a delicate masterpiece from clay; too much pressure, and you risk ruining the form. The same principle applies to glazing. Overworking occurs when you continuously manipulate the glaze after it's been applied, leading to a muddled appearance and a loss of the intended depth and luminosity.
One of the most common signs of overworking is a cloudy finish. Instead of the vibrant, translucent layers you aimed for, you may end up with a dull, lifeless surface. This happens because the pigments in the glaze can become overly mixed with the underlayers, losing their individual character. To avoid this, it's crucial to recognize when to step back. A good rule of thumb is to apply your glaze with confidence and, once it's on the canvas, resist the urge to fuss over it. Think of it like a fine wine; sometimes, it’s best to let it breathe without interference.
Another factor to consider is the drying time of your glaze. Oil paints can take a while to dry, and if you attempt to manipulate a glaze that hasn’t set, you risk disturbing the underlying layers. To maintain the integrity of your work, allow adequate drying time between layers. A well-timed pause can make all the difference in achieving that stunning, luminous effect that glazing is known for.
So, how can you ensure that you’re not overworking your glaze? Here are some practical tips:
- Use a light touch: Apply the glaze with a soft brush and gentle strokes to minimize disturbance to the underlying paint.
- Trust the process: Once the glaze is applied, step away and assess the work from a distance. This can help you see the overall effect without getting bogged down in details.
- Practice patience: Allow each layer to dry completely before applying the next. This not only prevents overworking but also enhances the depth of your painting.
By keeping these strategies in mind, you can avoid the pitfalls of overworking your glaze and instead create a painting that radiates with depth and vibrancy. Remember, glazing is about layering and building up effects, not about constant manipulation. With a little practice and patience, you’ll find that the beauty of glazing lies in its subtlety and nuance.
- What is the best way to apply a glaze? - Use a soft brush and apply it in thin layers, allowing each layer to dry before adding more.
- How can I tell if my glaze is overworked? - Look for a cloudy or muddy appearance; if the vibrancy is lost, you may have overworked it.
- Can I fix a painting that has been overworked? - It can be challenging, but sometimes you can add a new layer of glaze or paint to refresh the look.
Poor Surface Preparation
When it comes to oil painting, the importance of proper surface preparation cannot be overstated. Imagine trying to build a house on a shaky foundation; it simply won’t hold up. Similarly, if you don't prepare your canvas or panel adequately, your glazing efforts could go awry, leading to unsatisfactory results. Poor surface preparation can manifest in several ways, including uneven application of glazes, paint peeling, or even cracking over time. To avoid these pitfalls, it’s crucial to understand the steps involved in preparing your surface properly.
First and foremost, the choice of surface is pivotal. Whether you opt for canvas, wood, or paper, each material has its unique characteristics that affect how the paint adheres and behaves. For example, a raw canvas might absorb too much paint, making it difficult to achieve the desired transparency in your glazes. On the other hand, a pre-primed canvas provides a smoother surface that is more conducive to glazing techniques. Therefore, always consider your material and its readiness for painting.
Next, let's talk about the priming process. Priming your surface is akin to laying a solid groundwork for a masterpiece. A good primer not only seals the surface but also creates a barrier that helps the paint adhere better. Use a high-quality gesso to ensure that the surface is not only ready for oil paint but also allows for smooth application of glazes. If you skip this step or use a poor-quality primer, you're setting yourself up for a frustrating painting experience.
Additionally, after priming, you should always allow your surface to dry completely. Rushing this step can result in a tacky surface that disrupts your glazing process. If you find yourself in a hurry, remember that patience is a virtue in art. Give your primed surface adequate time to dry before you start applying your first layer of paint. A well-prepared surface will help your glazes to glide on effortlessly, allowing for the rich depth and luminosity that glazing is known for.
Another common mistake related to surface preparation is neglecting to sand the surface before you begin painting. Sanding helps to smooth out any imperfections and creates a more uniform texture. If you skip this step, you may end up with an uneven surface that can ruin the overall look of your painting. A light sanding with fine-grit sandpaper can work wonders, ensuring that your glazes sit beautifully on the surface without any unwanted bumps or ridges.
In summary, poor surface preparation can lead to a host of issues that compromise the integrity of your oil painting. To ensure the best results, always choose the right surface, prime it adequately, allow for complete drying, and consider sanding it for a smoother finish. By taking these steps, you set the stage for successful glazing, allowing your artwork to shine with vibrancy and depth.
- What is the best surface for oil painting? The best surface often depends on your personal preference, but pre-primed canvases and wooden panels are popular choices for their durability and smoothness.
- How long should I let my primer dry? It's recommended to let your primer dry for at least 24 hours to ensure it is fully cured before applying any paint.
- Can I use regular acrylic gesso for oil painting? While acrylic gesso can be used, it's best to use an oil-based primer for oil paints to ensure proper adhesion and longevity.
- Is sanding necessary before painting? Sanding is not strictly necessary but can significantly improve the smoothness of your surface, leading to better glazing results.
Frequently Asked Questions
- What is glazing in oil painting?
Glazing is a technique used in oil painting where transparent layers of paint are applied over dried layers to enhance color depth and luminosity. It allows artists to create a sense of light and depth that is hard to achieve with opaque colors alone.
- What mediums are best for glazing?
The choice of medium can greatly affect your glazing results. Oil mediums provide a rich finish, while acrylic mediums offer quick drying times. Selecting the right medium depends on your desired effect and working style.
- Can I use acrylics for glazing?
Absolutely! Acrylics can be used for glazing, and they dry much faster than oils. This quick drying time allows for layering techniques that can be very effective, especially for beginners or artists looking for versatility.
- How do I mix colors for glazing?
Mixing colors for glazing requires understanding color theory. Focus on creating transparent hues that complement each other. Start with a small amount of pigment and gradually add a medium to achieve the desired transparency.
- What are common mistakes to avoid when glazing?
Some common mistakes include overworking the glaze, which can muddy your colors, and poor surface preparation that leads to uneven application. Always ensure your surface is clean and ready for the glaze to achieve the best results.
- How can I create custom glazes?
Creating custom glazes involves experimenting with different pigments and mediums. Start by mixing a small amount of pigment with a glazing medium, and adjust the ratios until you achieve the desired effect. Don’t be afraid to play around!


