
How to Make Your Quilt Binding Look Professional
Creating a quilt is not just about stitching together beautiful pieces of fabric; it’s about telling a story, expressing creativity, and adding a personal touch to your home. One of the most crucial elements that can elevate your quilt from good to **great** is the binding. If you’ve ever looked at a quilt and admired its **professional finish**, you know that the binding plays a significant role in that aesthetic. In this article, we’ll dive into essential techniques and tips for achieving a polished and professional finish on your quilt bindings, ensuring your quilts stand out beautifully.
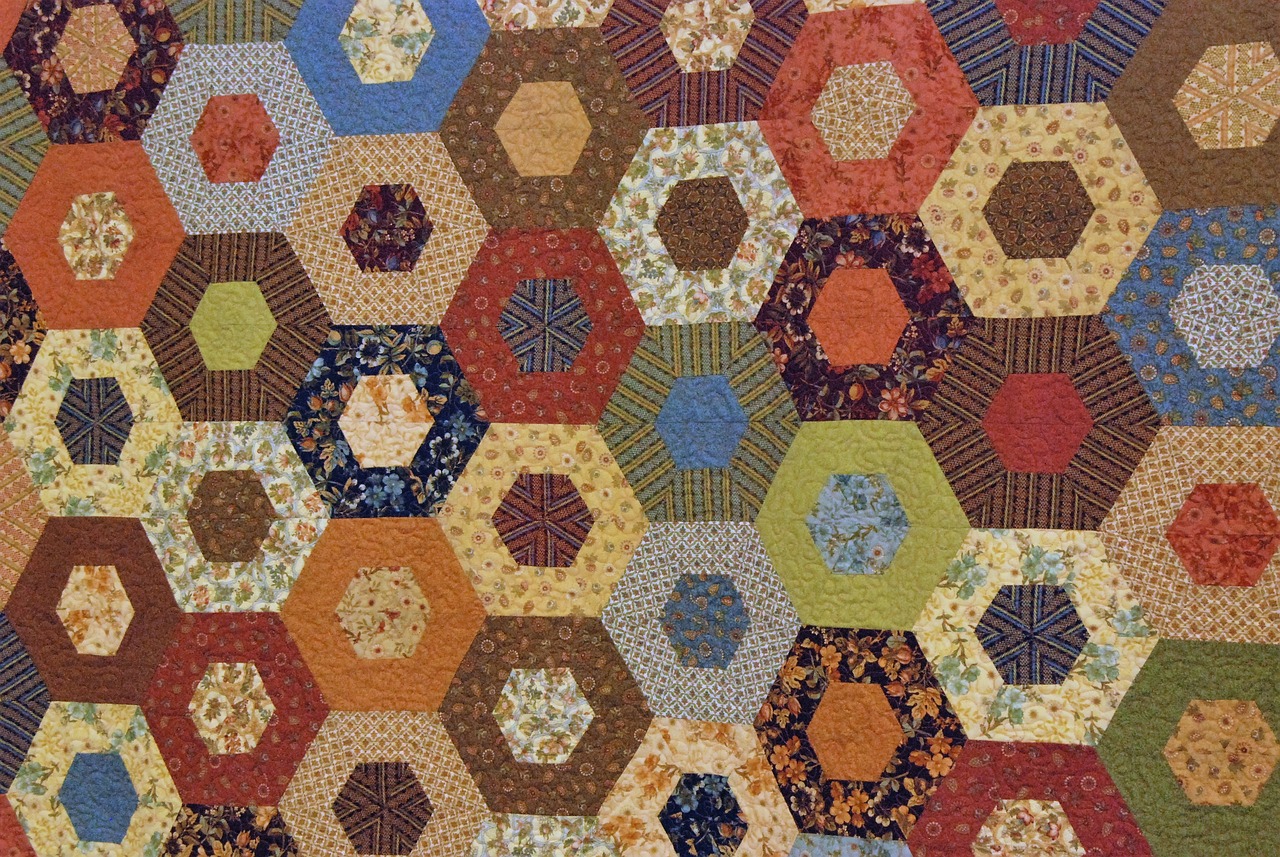
When it comes to quilt binding, selecting the appropriate fabric is crucial. Not only does the right choice enhance the overall aesthetic, but it also contributes to the durability of your quilt. Imagine wrapping yourself in a quilt that not only looks stunning but also withstands the test of time! Here are a few things to consider when choosing your binding fabric:
- Color Coordination: Make sure the binding complements the quilt top. A contrasting color can create a striking frame, while a matching color can provide a seamless look.
- Fabric Type: Cotton is a popular choice due to its durability and ease of handling. However, consider using a fabric that matches the texture of your quilt.
- Width Matters: The width of your binding can affect the overall look. A wider binding can give a modern feel, while a narrower one might evoke a more traditional vibe.
Before you even think about attaching the binding, you need to properly prepare the edges of your quilt. This step is essential for a clean binding application and can make all the difference in the final appearance of your quilt. Take your time to trim and even out the edges to create a perfect base for binding. It’s like preparing a canvas before painting; a smooth, even surface will yield better results.
Effective trimming techniques are your best friends when it comes to achieving straight edges. You want to ensure that your binding fits perfectly, and accurate trimming is foundational for a professional finish on your quilt. One method you can use is to lay your quilt flat on a cutting mat and use a rotary cutter for precision.
A rotary cutter can provide the precision you need when trimming quilt edges. This tool is excellent for making clean, straight cuts. Here are a couple of tips for using a rotary cutter effectively:
- Always use a cutting mat to protect your surfaces.
- Keep your cutter sharp; a dull blade can lead to jagged edges.
- Use a ruler to guide your cuts for accuracy.
Accurate measurements are vital when trimming quilt edges. To ensure that your measurements are precise, consider using a quilting ruler, which often has grid lines to help you align your fabric correctly. Double-check your measurements before making any cuts—this is one area where it pays to be meticulous!
Once your quilt edges are trimmed, aligning the binding correctly with the quilt edges is critical for a neat finish. If your binding is misaligned, it can lead to puckering and unevenness, which can detract from the overall look of your quilt. Take your time to pin the binding in place before sewing; this step can save you a lot of headaches later on.
The method of attaching binding can significantly influence the final appearance of your quilt. Whether you choose to hand stitch or machine stitch, each method has its own unique benefits. Think of it like choosing between two different paintbrushes; each can create a beautiful finish, but the technique will vary.
Choosing between machine and hand stitching for binding attachment can impact your quilt's look. Machine stitching is quicker and can be more durable, while hand stitching offers a more traditional and meticulous finish. Consider your time constraints and the look you want to achieve when making your choice.
Finishing techniques are essential to ensure your binding looks polished. This includes closing the binding seams neatly and securely. A well-finished binding not only looks good but also helps keep your quilt intact for years to come. Remember, the last step is just as important as the first!
Q: What type of fabric is best for quilt binding?
A: Cotton is often the best choice due to its durability and ease of handling. However, you can also use other fabrics as long as they match the quilt's texture.
Q: How wide should my binding be?
A: The width of your binding can vary depending on your personal preference, but a common width is between 2.5 to 3 inches.
Q: Can I use a rotary cutter for trimming?
A: Absolutely! A rotary cutter is an excellent tool for making precise, straight cuts when trimming quilt edges.
Q: Is hand stitching better than machine stitching?
A: It depends on the look you want to achieve. Hand stitching can provide a more traditional finish, while machine stitching is quicker and often more durable.
Choosing the Right Fabric
This article will guide you through essential techniques and tips for achieving a polished and professional finish on your quilt bindings, ensuring your quilts stand out beautifully.
When it comes to quilt binding, is not just a matter of aesthetics; it’s a crucial decision that can influence the durability and overall appeal of your quilt. Imagine your quilt as a beautiful painting, where the binding acts as the frame. A well-chosen fabric can enhance the beauty of the entire piece, while the wrong choice can detract from it. So, how do you pick the perfect fabric for your quilt binding?
First and foremost, consider the weight of the fabric. Binding typically requires a fabric that is both sturdy and flexible. Cotton is often the go-to choice because it offers a great balance of strength and softness. However, don’t shy away from exploring blends or even specialty fabrics like bamboo or linen. Each material brings its own unique texture and visual appeal, which can elevate your quilt's design. For example:
| Fabric Type | Characteristics | Best Use |
|---|---|---|
| Cotton | Durable, easy to sew, and available in various prints | General quilting and binding |
| Bamboo | Soft, eco-friendly, and moisture-wicking | Baby quilts or sensitive skin |
| Linen | Textured and breathable, but can fray | Art quilts or decorative pieces |
Next, think about the color and pattern. The binding fabric should complement the main quilt fabric. If your quilt is vibrant and colorful, a solid or subtly patterned binding can create a nice contrast. Conversely, if your quilt is more subdued, a bold binding can add a pop of interest. Don't be afraid to experiment! After all, quilting is an art form, and your creativity should shine through.
Additionally, consider the scale of the print. Large prints can overwhelm smaller quilts, while tiny prints may get lost on larger pieces. It’s all about finding the right balance that enhances the quilt's overall design. A good rule of thumb is to choose a binding fabric that is either a solid color or a print that is significantly smaller than the main quilt pattern.
Finally, always remember to pre-wash your fabrics. This step is crucial to prevent any shrinkage or color bleeding after your quilt is completed. Pre-washing allows you to see how the fabric behaves when washed, ensuring that your quilt maintains its beauty over time. It’s like giving your quilt a little practice run before it takes center stage!
In conclusion, the right fabric for your quilt binding can make all the difference in achieving a professional look. By considering weight, color, pattern, and scale, you can create a binding that not only looks fantastic but also enhances the overall durability and appeal of your quilt. So, take your time, explore your options, and let your creativity flow!
Properly preparing the edges of your quilt is essential for a clean binding application. This section discusses techniques for trimming and evening out edges to create a perfect base for binding.
Learn effective trimming techniques that will help you achieve straight edges, ensuring your binding fits perfectly. Accurate trimming is foundational for a professional finish on your quilt.
A rotary cutter can provide precision when trimming quilt edges. This subsection explores tips for using this tool effectively to achieve clean, straight cuts.
Accurate measurements are vital when trimming quilt edges. This section highlights methods to ensure that your measurements are precise for a seamless binding process.
Aligning the binding correctly with the quilt edges is critical for a neat finish. This part will cover techniques for proper alignment to avoid puckering and unevenness.
The method of attaching binding can significantly influence the final appearance of your quilt. This section delves into various techniques for securely attaching the binding to your quilt.
Choosing between machine and hand stitching for binding attachment can impact your quilt's look. This subsection evaluates the pros and cons of each method to help you decide.
Finishing techniques are essential to ensure your binding looks polished. This section covers tips for achieving a flawless finish, including closing the binding seams neatly and securely.
- What fabric is best for quilt binding? Cotton is the most popular choice due to its durability and ease of use.
- Should I pre-wash my binding fabric? Yes, pre-washing prevents shrinkage and color bleeding.
- Can I use different fabrics for the binding? Absolutely! Just ensure they complement your quilt’s design.
Preparing Your Quilt Edges
When it comes to achieving that professional finish on your quilt, preparing your quilt edges is a crucial step that cannot be overlooked. Think of your quilt edges as the frame of a masterpiece; if they’re not right, the whole quilt can lose its charm. To start, you’ll want to ensure that your quilt edges are as clean and even as possible. This not only provides a solid foundation for your binding but also enhances the overall aesthetic of the quilt.
Before you dive into the binding process, take a moment to assess your quilt edges. Are they frayed or uneven? If so, it’s time to grab your tools and get to work! A well-prepared edge is like a blank canvas waiting for the perfect touch. You want to make sure that everything is trimmed to perfection, which leads us to the next essential point: trimming techniques.
To achieve those straight edges that every quilter dreams of, you have to master the art of trimming. This is where precision comes into play. Using a rotary cutter can make this task much easier, allowing you to glide through the fabric with ease. Remember, the goal is to create edges that are not just straight, but also consistent in width. Inconsistent edges can lead to puckering and an overall unprofessional look.
Here are some tips for effective trimming:
- Use a Cutting Mat: This will protect your surfaces and help you get those straight lines.
- Keep Your Blade Sharp: A dull blade can cause jagged cuts, which is the last thing you want.
- Trim in Sections: Work on small sections at a time to maintain control and accuracy.
A rotary cutter is one of the best tools to have in your quilting arsenal. When using it, make sure to apply even pressure and move the cutter in a smooth, continuous motion. This technique not only ensures a clean cut but also minimizes the risk of accidents. If you're new to rotary cutting, practice on scrap fabric to build your confidence.
Accurate measurements are vital when trimming quilt edges. Use a reliable ruler and make sure it’s aligned correctly with your fabric. Double-check your measurements before making any cuts; it's always better to measure twice and cut once! This attention to detail will pay off when you begin the binding process.
Once your quilt edges are trimmed to perfection, the next step is aligning the binding. Proper alignment is critical for avoiding puckering and ensuring that the binding lays flat against the quilt. Take your time here; rushing through this step can lead to uneven edges that will be noticeable once the quilt is finished. Lay your binding strip along the edge of the quilt, ensuring that it overlaps slightly. Pin or clip it in place to keep it secure while you sew.
In summary, preparing your quilt edges is an essential step in the quilting process that sets the stage for a beautiful finish. By focusing on trimming techniques, using the right tools, and measuring accurately, you can ensure that your quilt will look professionally finished. So, roll up your sleeves and get ready to create a quilt you’ll be proud to show off!
Q: What tools do I need for trimming quilt edges?
A: The essential tools include a rotary cutter, cutting mat, quilting ruler, and sharp scissors for any delicate areas.
Q: How can I prevent my quilt edges from fraying?
A: Using a fabric sealant or zigzag stitch on the edges before binding can help prevent fraying.
Q: Is it necessary to press the quilt edges before binding?
A: Yes, pressing the edges will help them lay flat and make the binding application much easier.
Trimming Techniques
When it comes to achieving that professional finish on your quilt, mastering the art of trimming is absolutely essential. Think of trimming as the foundation of a house; without a solid base, everything that follows can become unstable. First, you need to ensure that your quilt edges are not just straight, but also perfectly aligned. This is where effective trimming techniques come into play. The goal is to create edges that are clean and uniform, allowing your binding to fit seamlessly around the quilt.
One of the most effective tools for trimming is the rotary cutter. This handy device can slice through fabric with precision, making it easier to achieve those razor-sharp edges we all strive for. To use a rotary cutter effectively, make sure you’re working on a self-healing cutting mat, which protects both your cutter and your work surface. Position your ruler carefully along the edge of the quilt, ensuring it’s straight. Then, with a firm grip, roll the cutter along the edge of the ruler. You’ll be amazed at how clean the cuts can be!
However, precision isn’t just about the tool; it’s also about measurement. Accurate measurements are the backbone of successful trimming. Always measure twice and cut once—this old adage holds true in quilting. Use a clear acrylic ruler for the most reliable results. Lay it flat against the quilt edge, ensuring it’s aligned properly, and take note of the measurements. If your quilt is larger, consider dividing it into sections to make the measuring process more manageable. This way, you’ll avoid any mishaps that could lead to uneven edges.
Don’t forget about the importance of evenness. If your quilt has any puckering or distortion, now is the time to address it. Gently stretch the fabric as you trim, aligning it with the ruler. This will help you achieve a more uniform edge. If you find any particularly stubborn areas that refuse to lay flat, don’t hesitate to use your iron to press them out. The heat will help relax the fabric fibers, making it easier to achieve that straight edge you’re aiming for.
In summary, trimming is not just a step in the quilting process; it’s an art form that can make or break your project. By using the right tools, taking accurate measurements, and ensuring your edges are even, you set the stage for a quilt that looks absolutely stunning. So grab your rotary cutter, measure carefully, and get ready to create those flawless edges that will make your quilt truly shine!
- What tools do I need for trimming quilt edges? A rotary cutter, a cutting mat, and a clear acrylic ruler are essential tools for trimming quilt edges.
- How can I prevent my quilt edges from puckering? Gently stretch the fabric while trimming and use an iron to press out any stubborn areas.
- Is it necessary to measure multiple times? Yes, measuring twice and cutting once is a good practice to ensure accuracy in your trimming.
- Can I use scissors instead of a rotary cutter? While scissors can be used, a rotary cutter provides more precision and cleaner cuts.
Using a Rotary Cutter
When it comes to achieving those crisp, clean edges that make your quilt stand out, using a rotary cutter is a game changer. This handy tool is not just for cutting fabric; it’s your best friend in the quest for precision. Imagine trying to slice a cake with a dull knife—frustrating, right? That’s how it feels when you attempt to cut quilt edges with scissors instead of a rotary cutter. With a rotary cutter, you can glide through multiple layers of fabric effortlessly, making it an essential tool for any quilter aiming for a professional finish.
To get the most out of your rotary cutter, there are a few techniques and tips to keep in mind. First, always use a cutting mat. This not only protects your surfaces but also provides a grid that helps you measure accurately. When you place your fabric on the mat, ensure it’s flat and wrinkle-free. Any bumps or folds can lead to uneven cuts, which can throw off your entire quilt. Think of your cutting mat as the runway for your fabric—everything needs to be smooth and aligned for a successful takeoff!
Next, let's talk about the actual cutting technique. Hold the rotary cutter comfortably in your dominant hand, and use your other hand to guide the fabric. It's important to apply even pressure while cutting. If you press too hard, you might end up with jagged edges; too soft, and you won’t cut through the fabric completely. A good rule of thumb is to let the blade do the work. Just like a good chef uses a sharp knife to slice through vegetables effortlessly, you should let your rotary cutter glide through the fabric.
Additionally, consider the blade's sharpness. A dull blade is akin to trying to write with a broken pencil—it just doesn’t work well! Regularly check and replace your blade as needed. Most rotary cutters allow for easy blade changes, so don’t hesitate to swap out a dull one. A fresh blade will make your cutting experience smoother and yield much cleaner edges.
Lastly, practice makes perfect! Don’t be disheartened if your first few cuts aren’t as straight as you’d like. Just like learning to ride a bike, it takes time to develop your skills. Set aside some scrap fabric and practice cutting straight lines and curves. The more you use your rotary cutter, the more comfortable you’ll become with it, and soon, you’ll be cutting like a pro!
In summary, using a rotary cutter is essential for achieving professional quilt edges. By utilizing a cutting mat, maintaining sharp blades, and practicing your technique, you can ensure that your quilt binding looks not just good, but exceptional. So grab that rotary cutter and start creating those stunning quilt edges!
- What is the best rotary cutter for beginners? A 45mm rotary cutter is ideal for most quilting projects and is easy to handle.
- How often should I change my rotary cutter blade? It’s best to change your blade every 5-10 projects, or whenever you notice it’s not cutting cleanly.
- Can I use a rotary cutter on thick fabrics? Yes, but you might want to consider a larger blade size, like 60mm, for thicker materials.

Measuring for Accuracy
When it comes to quilt binding, measurement accuracy is not just a suggestion; it’s a necessity. Think of it like building a house: if the foundation is off, everything else will be too! To achieve a flawless binding, you need to ensure that every cut and seam is precise. Start by gathering your tools: a reliable ruler, a rotary cutter, and a cutting mat. These will be your best friends in this journey towards perfection.
First, always measure twice and cut once. This old adage holds especially true in quilting. When measuring the edges of your quilt, ensure that you are using a clear and straight ruler. Place the ruler along the edge of the quilt, making sure it aligns perfectly with the fabric. This will help you avoid any unwanted angles or curves that could throw off your binding. If you notice any discrepancies, don't hesitate to trim the fabric to achieve a straight edge.
Another important aspect of measuring is to account for the width of your binding. Typically, quilt bindings are cut at 2.5 inches wide, but this can vary based on personal preference or the specific quilt design. Make sure to adjust your measurements accordingly. For instance, if you're using a wider binding, you'll need to measure out additional fabric to ensure that it covers the quilt edge adequately.
Additionally, consider using a cutting guide for added precision. A cutting guide can help you visualize where to cut, especially for intricate designs. Here’s a simple table to illustrate the common binding widths and their corresponding fabric requirements:
| Binding Width | Fabric Requirement (per side) |
|---|---|
| 2.5 inches | 2.5 inches of fabric |
| 3 inches | 3 inches of fabric |
| 2 inches | 2 inches of fabric |
Once you’ve measured and cut, it’s a good practice to double-check your work. Lay the binding strip against the quilt edges to ensure it fits perfectly. If you find any areas that seem off, don’t be afraid to make adjustments before moving on to the next step. Remember, rushing through this part can lead to a less than stellar finish, and no one wants that!
In summary, measuring for accuracy in quilt binding is all about patience and precision. By taking the time to measure correctly, you’ll set the stage for a beautifully finished quilt that showcases your hard work and creativity. So, grab your tools, take a deep breath, and let’s get those measurements just right!
- What is the best way to measure for quilt binding? Always use a clear ruler and measure twice before cutting. Ensure your ruler is aligned straight with the fabric edge.
- How wide should I cut my binding strips? A common width is 2.5 inches, but you can adjust based on your quilt design.
- Can I use different fabrics for my binding? Yes! Mixing fabrics can add a unique touch to your quilt, just ensure they complement the quilt top.
Aligning the Binding
Aligning the binding correctly with the quilt edges is critical for achieving a neat and professional finish. Imagine trying to put a frame around a picture that isn't straight; it just doesn't look right! The same principle applies to quilt binding. If your binding is misaligned, it can lead to puckering, uneven edges, and an overall sloppy appearance that can detract from the beauty of your quilt. So, how do we ensure that our binding aligns perfectly? Let's dive into some essential techniques.
First and foremost, it's vital to pin the binding in place before you start sewing. Using pins helps to hold the binding securely against the quilt edges, preventing any shifts that could lead to misalignment. When pinning, make sure to place the pins perpendicular to the binding strip, which makes it easier to remove them as you sew. You want to create a smooth, even line that follows the quilt's edge. If you notice any puckering as you pin, gently adjust the fabric until it lies flat.
Another technique to consider is the use of a walking foot on your sewing machine. A walking foot is designed to grip the top layer of fabric as you sew, which helps to feed it through the machine evenly alongside the quilt's layers. This can be particularly helpful when working with thicker quilts or multiple layers, as it minimizes the risk of shifting that can occur during sewing. If you don’t have a walking foot, don’t worry! Just go slow and steady, guiding the fabric gently through the machine.
Additionally, always take the time to measure and cut your binding strips accurately. If your binding is cut too short or too long, it can cause major alignment issues. A good rule of thumb is to cut your binding strips at least 2.5 inches wide and to use a consistent seam allowance when attaching them. This consistency will help your binding to lay flat and look uniform all around the quilt.
Lastly, after attaching the binding, it's crucial to press it properly. Use an iron to press the binding away from the quilt, which helps to set the stitches and ensures that the binding lays flat against the quilt edges. This step might seem minor, but it can make a significant difference in the overall appearance of your quilt binding. A well-pressed binding not only looks better but also helps to prevent future puckering.
In summary, aligning the binding is an essential step in achieving a professional finish on your quilt. By pinning securely, using the right tools, measuring accurately, and pressing properly, you can ensure that your quilt binding looks polished and neat. Remember, a little attention to detail goes a long way, and soon you'll be showing off your beautifully bound quilts with pride!
- What is the best fabric to use for quilt binding? - Cotton fabric is typically the best choice for quilt binding due to its durability and ease of handling.
- How wide should my binding strips be? - A common width for binding strips is 2.5 inches, which provides a good balance between ease of sewing and a neat finish.
- Can I use a sewing machine for binding? - Yes! Many quilters use a sewing machine to attach binding, as it can be faster and provides a strong hold.
- Is it necessary to press the binding? - Yes, pressing the binding helps it lay flat and sets the stitches, contributing to a more professional look.
Attaching the Binding
When it comes to to your quilt, the method you choose can dramatically influence the final look and feel of your masterpiece. It's like the icing on a cake; you want it to be just right! There are two primary methods for attaching quilt binding: machine stitching and hand stitching. Each has its own set of advantages and disadvantages, so let’s dive into what makes each method unique.
Machine stitching is often favored for its speed and efficiency. If you're looking to finish your quilt quickly, this method might be your best bet. It allows you to cover more ground in less time, making it ideal for larger quilts or when you're in a time crunch. However, while machine stitching can be quick, it may not always provide the same level of precision and care that hand stitching does. The stitches can sometimes appear more prominent, which might not suit every quilt's aesthetic.
On the other hand, hand stitching is often considered the gold standard for a polished finish. This method allows for greater control and can produce a more delicate, refined look. When you're hand stitching, you have the opportunity to ensure that every stitch is perfectly placed, which can be especially beneficial for intricate designs or quilts that will be displayed prominently. The downside? It can be time-consuming, requiring patience and a steady hand. But remember, good things come to those who wait!
To help you decide between these two methods, here’s a quick comparison:
| Method | Pros | Cons |
|---|---|---|
| Machine Stitching |
|
|
| Hand Stitching |
|
|
Once you've decided on your stitching method, it's crucial to securely attach the binding to the quilt. Start by aligning the binding with the edge of the quilt, making sure to leave a little overhang at the corners for a neat finish. If you're machine stitching, use a walking foot to help feed the layers evenly. For hand stitching, take your time to ensure each stitch is even and secure.
After you've attached the binding, it's time for the finishing touches. This is where the magic happens! Make sure to press the binding away from the quilt to give it a crisp and professional look. Don’t forget to check your corners; they should be neatly mitered to create a polished appearance. A little attention to detail here can make all the difference.
Q: Can I use any fabric for binding?
A: While you can technically use any fabric, it's best to choose one that complements your quilt and is durable enough to withstand wear and tear.
Q: How do I know if my binding is even?
A: A good rule of thumb is to measure the binding width at several points along the quilt. If it varies significantly, you may need to adjust your technique.
Q: What if I make a mistake while stitching?
A: Don’t panic! Most mistakes can be fixed by carefully unpicking the stitches and redoing the section. Just take your time!
In conclusion, attaching the binding is a crucial step in the quilting process that can elevate your quilt from good to truly stunning. Whether you choose to machine stitch or hand stitch, the key is to pay attention to detail and enjoy the process. Happy quilting!

Machine vs. Hand Stitching
When it comes to attaching binding to your quilt, the debate between machine stitching and hand stitching is as vibrant as the fabrics themselves. Each method has its own unique advantages and challenges, and the choice often comes down to personal preference and the specific look you want to achieve. So, let’s dive into the pros and cons of each technique!
Machine stitching is often favored for its speed and efficiency. If you're looking to finish your quilt quickly, this method allows you to attach the binding in a fraction of the time it would take to do it by hand. With a sewing machine, you can achieve a consistent stitch length, which can contribute to a polished and professional appearance. Additionally, machine stitching is great for quilts that will be frequently washed or used, as the stitches tend to be more durable and less prone to unraveling.
However, there are some downsides to consider. Machine stitching can sometimes lack the personal touch that hand stitching offers. If you’re aiming for a traditional or heirloom-quality finish, machine stitches may not provide the same aesthetic appeal. Plus, if you’re not careful, machine stitching can lead to puckering or uneven edges, which can detract from the overall look of your quilt.
On the other hand, hand stitching is often seen as the gold standard for quilt binding. It allows for greater control and precision, enabling you to tuck the binding under neatly and secure it in a way that feels satisfying and intentional. Many quilters appreciate the meditative quality of hand stitching, finding it a relaxing way to engage with their craft. Moreover, hand-stitched bindings can create a beautiful, almost invisible finish that truly elevates the quilt’s design.
That said, hand stitching does require significantly more time and patience. If you’re working on a large quilt, the hours can add up quickly, and it might feel daunting to commit to such a labor-intensive process. Additionally, achieving uniformity in stitch length and spacing can be challenging for beginners, which may lead to a less polished appearance compared to machine stitching.
Ultimately, the decision between machine and hand stitching comes down to your personal style and the specific needs of your quilt. To help you weigh your options, here’s a quick comparison:
| Feature | Machine Stitching | Hand Stitching |
|---|---|---|
| Speed | Fast and efficient | Time-consuming |
| Durability | Strong and long-lasting | Can be less durable |
| Aesthetic | Uniform but may lack charm | Beautiful and personal |
| Control | Less control over detail | High control and precision |
In conclusion, whether you choose to machine stitch or hand stitch your quilt binding, the important thing is to enjoy the process and create a quilt that you love. Both methods have their merits, and with practice, you’ll find the technique that suits your style best. So grab your fabric, and let’s get stitching!
- Can I mix machine and hand stitching for my quilt binding? Yes, many quilters choose to sew the binding to the quilt by machine and then finish it off with hand stitches for a polished look.
- What type of thread should I use for binding? It's best to use a high-quality thread that matches your fabric. Cotton thread is a popular choice for both machine and hand stitching.
- How do I prevent puckering when machine stitching? Make sure to use a walking foot and adjust your tension settings. Also, take your time and sew slowly around corners.

Finishing Techniques
When it comes to quilt binding, the you employ can make a world of difference in the overall appearance of your quilt. A well-finished binding not only enhances the quilt's aesthetic but also ensures durability. After all, what's the point of pouring your heart and soul into a quilt if the binding looks sloppy? So, let’s dive into some effective strategies to achieve that flawless finish you’ve been dreaming of!
One of the first things to consider is how to properly close your binding seams. You want to avoid any bulky areas or unsightly bumps that can detract from your quilt’s beauty. To do this, ensure that you fold the binding over the quilt edge evenly and pin it in place before you start stitching. This will help keep everything aligned and prevent any shifting as you sew.
Next, let’s talk about the actual stitching. Whether you choose to hand stitch or machine stitch, the key is to keep your stitches consistent. If you’re machine stitching, use a quarter-inch seam allowance to maintain a uniform look. For hand stitching, aim for small, even stitches that are barely visible from the front of the quilt. This not only looks professional but also ensures that your binding will hold up over time.
Another important aspect to consider is the corners. Corners can be tricky, but with a little practice, you can make them look sharp and clean. When you reach a corner, stop stitching about a quarter-inch from the edge, then pivot your quilt and continue stitching down the next side. This technique creates a nice mitered corner that adds a polished touch to your binding.
Finally, don’t forget to trim any excess fabric from your binding. This step is crucial for preventing bulk, especially in the corners. Use sharp scissors or a rotary cutter for this task, and be careful not to cut too close to your stitches. A little bit of fabric can go a long way in ensuring your binding lays flat and looks neat.
In summary, achieving a professional finish on your quilt binding is all about attention to detail. From closing seams neatly to managing those tricky corners, each step contributes to the overall beauty of your quilt. Remember, practice makes perfect! So, don’t be afraid to experiment with different techniques until you find what works best for you.
- What is the best fabric for quilt binding? - Cotton is generally the best choice for quilt binding due to its durability and ease of handling.
- Can I use a different fabric for binding than my quilt? - Absolutely! Using a contrasting fabric can add a unique touch to your quilt.
- Is it necessary to pre-wash my binding fabric? - While it's not mandatory, pre-washing can prevent future shrinkage and color bleeding.
- How do I fix puckered binding? - If you notice puckering, try gently steaming the area to relax the fabric, then re-stitch if necessary.
Frequently Asked Questions
- What fabric should I choose for my quilt binding?
Choosing the right fabric for your quilt binding is essential! Look for materials that complement your quilt's design and are durable enough to withstand wear. Cotton is a popular choice due to its strength and versatility, but you can also consider blends that offer a bit of stretch for easier handling.
- How do I prepare the edges of my quilt for binding?
Preparing your quilt edges involves trimming them to ensure they are even and straight. Use a rotary cutter for precision and make sure to measure accurately. This step is crucial because it sets the stage for a clean and professional-looking binding.
- What are the best trimming techniques for quilt edges?
To achieve straight edges, always use a cutting mat and a ruler alongside your rotary cutter. Make multiple passes if needed, and don't rush the process. Remember, a well-trimmed edge is the foundation of a stunning quilt binding!
- Should I use machine or hand stitching for attaching binding?
This depends on your preference and the look you want to achieve! Machine stitching is faster and provides a strong hold, while hand stitching offers a more traditional and polished finish. Consider your quilt's style and your available time when making this choice.
- How can I align my binding correctly with the quilt edges?
To align your binding, start by pinning it in place and ensuring it follows the quilt edges without any puckering. Take your time to adjust as needed, and use clips if pins are difficult to manage. Proper alignment is key to a neat and professional finish!
- What finishing techniques can I use to ensure a polished look?
For a flawless finish, focus on closing the binding seams neatly. Press the binding flat after attaching it, and take care to secure any loose threads. A little attention to detail here can make a big difference in the overall appearance of your quilt!


