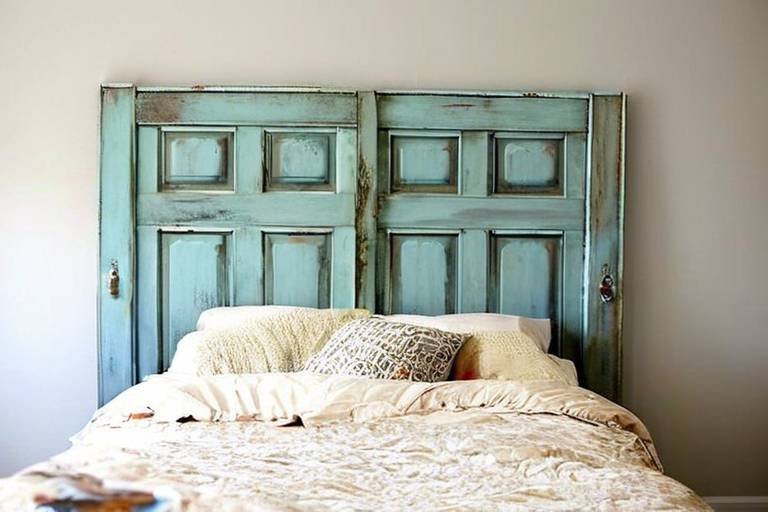
DIY Upcycling: Turn an Old Door into a Headboard
Have you ever looked at an old door sitting in your garage or at a thrift store and thought, "What can I do with that?" Well, you're in for a treat! Upcycling an old door into a headboard is not just a fantastic way to breathe new life into something that might otherwise end up in a landfill, but it also adds a unique touch to your bedroom. Imagine transforming a simple door into a stunning focal point that reflects your personality and style! In this guide, we’ll take you through every step of the process, from choosing the right door to adding those final finishing touches that will make your headboard truly one-of-a-kind. So, roll up your sleeves, grab your tools, and let’s get started on this exciting DIY adventure!
Now, before you dive in headfirst, it’s essential to choose the right door for your project. Not all doors are created equal, and selecting the perfect one is crucial for achieving the look you want. Here are some factors to consider:
- Size: Measure your bed and the space available in your bedroom. The door should be wide enough to match the width of your bed, and its height should complement the overall aesthetic.
- Style: Think about the style of your bedroom. Do you prefer rustic charm, vintage elegance, or modern minimalism? Choose a door that aligns with your vision.
- Material: Consider the material of the door. Wood is a popular choice for its durability and versatility, but metal or even glass doors can offer a striking look.
By keeping these factors in mind, you’ll ensure that your upcycled headboard not only fits perfectly but also enhances the overall vibe of your bedroom.
Once you've found the ideal door, it’s time to prepare it for its new role as a headboard. Proper preparation is key to achieving a polished final product. Start by giving the door a good cleaning to remove any dust, dirt, or grime that may have accumulated over the years. A simple solution of warm water and mild soap will do the trick.
Next, you’ll want to sand the door to create a smooth surface, especially if you're planning to paint or stain it. Use a medium-grit sandpaper followed by a finer grit for a flawless finish. If the door has any old paint or varnish, consider using a paint stripper to remove it. After sanding, wipe down the door with a damp cloth to remove any dust particles.
Now, think about how you want your headboard to look. Are you going for a bold color or a natural wood finish? You might want to paint or stain the door to achieve your desired aesthetic. Remember, this is your chance to express your creativity!
Feeling stuck on how to personalize your headboard? No worries! There are endless design possibilities when it comes to upcycling an old door. Here are a couple of styles to inspire you:
If you love the cozy, lived-in look, consider going for a rustic design. This style often incorporates natural elements and distressed finishes, giving your headboard a warm and inviting feel. You can achieve this by:
- Leaving the door in its natural state with a few scrapes and dents.
- Applying a weathered stain to enhance the wood grain.
- Adding decorative elements like reclaimed wood accents or metal brackets.
On the flip side, if sleek and contemporary is more your vibe, a minimalist design with bold colors can make a striking statement. Think about:
- Painting the door a solid, vibrant color.
- Using clean lines and geometric shapes to create a modern look.
- Incorporating metallic finishes or glass accents for added flair.
Understanding how to assemble your headboard is crucial for ensuring it’s sturdy and secure. There are a couple of methods to attach the door, depending on whether you want it wall-mounted or attached to a bed frame.
If you choose to mount your headboard to the wall, ensure you use proper anchors and screws to secure it. This not only creates a stylish focal point but also saves space in your bedroom. Make sure to measure and level the door before drilling any holes to avoid a lopsided look!
For those who prefer attaching the headboard to their bed frame, you’ll need to use brackets or bolts designed for this purpose. Ensure that the door is securely fastened to prevent any wobbling or shifting during use. The goal is to create a headboard that feels like a natural extension of your bed.
Once your headboard is assembled, it’s time for the fun part – adding those finishing touches! You can enhance the overall design by incorporating decorative molding, fabric accents, or even integrated lighting. For instance, a simple piece of trim can add a touch of elegance, while fairy lights can create a cozy atmosphere perfect for bedtime reading.
To keep your upcycled headboard looking fresh and beautiful for years to come, proper maintenance is essential. Depending on the material and finish, you may need to dust it regularly or apply a protective coat of sealant. For painted finishes, touch-ups may be necessary to prevent chipping. Always refer to specific care instructions based on the materials used to ensure longevity.
1. Can I use any type of door for this project?
Yes, you can use various types of doors, but wooden doors are the most popular due to their versatility and ease of customization.
2. How do I ensure the headboard is securely mounted?
Use appropriate wall anchors and screws if wall-mounted, or sturdy brackets if attached to a bed frame. Always double-check for stability.
3. What if I don't want to paint the door?
You can leave the door in its natural state or apply a clear sealant to protect the wood while showcasing its original beauty.
4. Is this project beginner-friendly?
Absolutely! With basic tools and a little patience, anyone can successfully upcycle an old door into a stunning headboard.

Choosing the Right Door
When it comes to transforming an old door into a stunning headboard, the first step is selecting the right door for your project. This decision is more than just a matter of aesthetics; it sets the foundation for the entire look and feel of your bedroom. You want a door that not only complements your existing decor but also reflects your personal style. So, what should you look for in your perfect door?
First, consider the size. The dimensions of your door should align with the size of your bed. A door that is too small may look out of place, while one that is too large can overwhelm the room. Ideally, the headboard should extend a few inches beyond the width of your bed to create a balanced appearance. For example, if you have a queen-sized bed, a standard door measuring 30-36 inches wide is a good choice.
Next, think about the style of the door. Do you prefer a classic, vintage look or something more modern? Here are a few styles to consider:
- Panel Doors: These are versatile and can fit into various design themes.
- Sliding Barn Doors: Perfect for a rustic or farmhouse aesthetic.
- French Doors: Great for adding a touch of elegance and charm.
Additionally, the material of the door is crucial. Wooden doors offer a warm, inviting feel, while metal doors can provide a sleek, contemporary look. If you’re aiming for a rustic vibe, look for doors with natural wood grains or distressed finishes. On the other hand, if modern is your style, consider a door with a smooth finish and bold colors. Remember, the material will also affect how you treat and maintain your headboard, so choose wisely!
Lastly, don't forget to check the condition of the door. Look for any signs of damage, such as cracks or significant wear. While a little wear can add character, deep flaws may compromise the structural integrity of your headboard. If the door needs repairs, be prepared to invest some time and effort into fixing it before you start the transformation process.
In summary, choosing the right door for your headboard project involves careful consideration of size, style, material, and condition. By selecting a door that resonates with your personal taste and fits your bedroom's aesthetic, you’ll set the stage for a beautiful DIY project that not only enhances your space but also showcases your creativity.

Preparing the Door
Before diving headfirst into your exciting DIY project of transforming an old door into a stunning headboard, it's crucial to give that door some love and care. Think of it as the foundation of your new masterpiece; a little preparation goes a long way in ensuring that your headboard not only looks fantastic but also stands the test of time. So, what do you need to do? Let’s break it down step by step!
First and foremost, cleaning is key. You wouldn't want dust and grime to spoil your beautiful creation, right? Grab a bucket of warm, soapy water and a sponge, and give your door a thorough wash. Make sure to get into all the nooks and crannies. If your door has any stubborn stains or old paint, a bit of elbow grease with a scrubbing brush will do wonders. Once cleaned, rinse it off and let it dry completely. This ensures that any paint or stain you apply later will adhere properly.
Next up is sanding. This step is essential, especially if your door has a rough finish or any old paint that you want to remove. Using medium-grit sandpaper, gently sand the surface of the door. This not only helps to smooth out imperfections but also creates a better surface for painting or staining. After the initial sanding, switch to fine-grit sandpaper for a silky-smooth finish. Remember, the goal here is to make your door feel as good as it looks!
Now, let’s talk about painting or staining. This is where you can really let your creativity shine! If you’re aiming for a rustic vibe, consider a natural wood stain that enhances the grain of the wood. For a modern look, bold colors or a sleek finish can make a statement. Before you dive into painting, it’s wise to test your chosen color on a small, inconspicuous area of the door. This way, you can see how it looks once dried. Once you’re satisfied with your choice, apply your paint or stain evenly, and don’t forget to let it dry completely between coats. A good rule of thumb is to apply at least two coats for a rich, vibrant finish.
Lastly, if your door has any hardware, like hinges or doorknobs, you might want to consider whether to keep them or remove them for a cleaner look. If you choose to keep them, a little bit of polishing can really make them pop! Alternatively, you can replace old hardware with something that complements your new headboard style. The finishing touches can make all the difference!
In summary, preparing your door involves cleaning, sanding, and painting or staining to achieve the desired look. Each step is vital in ensuring that your headboard not only looks great but also lasts for years to come. So, roll up your sleeves, put on some music, and enjoy the transformation process!

Design Inspiration
When it comes to designing your new headboard from an old door, the possibilities are as vast as your imagination! Whether you're drawn to the warmth of rustic styles or the sleekness of modern aesthetics, your headboard can become a stunning focal point in your bedroom. Let's dive into some design inspirations that can help you personalize your headboard and truly make it your own.
If you're leaning towards a rustic charm, consider embracing the natural beauty of the wood. You might want to keep the door's original finish, allowing the character of the wood to shine through. Adding a few coats of clear varnish can enhance its grain and provide protection. Alternatively, you can opt for a distressed look by lightly sanding the edges and using a whitewash technique to give it that cozy, farmhouse feel. Imagine curling up in your bed, surrounded by the inviting warmth of nature!
On the flip side, if modern elegance is more your style, think about how a bold color can transform your headboard. A sleek black or vibrant teal can make a powerful statement and create a beautiful contrast against your bedding. Minimalist designs often work best, so consider leaving the door unembellished, allowing its clean lines to speak for themselves. You could even paint geometric patterns for a touch of contemporary flair. The beauty of modern design is in its simplicity—less is often more!
To further ignite your creativity, here are a few design ideas you might consider:
- Mixed Materials: Combine your upcycled door with metal accents or even fabric to create a unique texture contrast.
- Integrated Lighting: Incorporate LED strip lights along the top edge of the headboard to create a soft glow, enhancing the ambiance of your bedroom.
- Artwork Display: Use the door as a canvas by attaching small shelves or hooks to display your favorite art pieces or decorative items.
Remember, your headboard should reflect your personal style and complement your bedroom decor. Don't shy away from experimenting with different ideas until you find what resonates with you. This is your chance to create a piece that not only serves a functional purpose but also tells a story—your story!
As you plan your design, consider how your headboard will interact with the rest of your room. Think about color schemes, furniture styles, and even the mood you want to cultivate. A well-thought-out headboard can effortlessly tie your entire bedroom together, making it a sanctuary that feels uniquely yours.
Q: Can I use any type of door for my headboard?
A: Yes! You can use any door that fits your style and size requirements. Just ensure it's sturdy enough to support the design you have in mind.
Q: How do I secure the headboard to the wall or bed frame?
A: You can use brackets or screws for a wall-mounted headboard. For bed frames, consider using L-brackets or specific headboard attachment kits available at hardware stores.
Q: What finish should I use on my upcycled headboard?
A: It depends on your desired look. A clear varnish will protect the wood while enhancing its natural beauty, while paint can add a pop of color and personality.
Q: How can I maintain my upcycled headboard?
A: Regular dusting and occasional touch-ups with the appropriate cleaning products for the finish will keep your headboard looking fresh for years to come.

Rustic Styles
When you think of rustic styles, what comes to mind? Perhaps the warmth of a cozy cabin in the woods or the charm of a countryside farmhouse? Transforming an old door into a rustic headboard is not just about aesthetics; it’s about bringing a piece of nature into your bedroom. By embracing the beauty of imperfections and natural materials, you can create a headboard that tells a story.
To achieve that inviting rustic look, start by selecting a door that has character. Look for doors with unique textures, such as weathered wood or peeling paint. These elements add depth and history to your headboard. Once you've chosen your door, it's time to enhance its natural beauty. Here are some tips to consider:
- Sanding: Gently sand the surface to remove any rough edges while preserving the door’s original charm.
- Staining: Opt for a wood stain that highlights the grain. Darker stains can evoke a more traditional feel, while lighter stains can create a fresh, airy look.
- Distressing: If your door is too pristine, consider distressing it further. You can use techniques like hammering, scratching, or even applying a vinegar solution to age the wood.
Another great way to embrace rustic styles is by incorporating natural elements. Think about adding some decorative touches, such as:
- Branches or Twigs: Attach small branches to the sides of your headboard for a whimsical touch.
- Fabric Accents: Use burlap or linen for a soft contrast against the hard surface of the door.
- Lighting: Consider adding rustic-style sconces or fairy lights to create a warm glow at night.
Don't forget about the overall color palette of your bedroom. Rustic styles often favor earthy tones, so pair your headboard with warm hues like deep greens, browns, and creams. This will not only enhance the rustic feel but also create a harmonious atmosphere in your space.
In conclusion, creating a rustic headboard from an old door is a fantastic way to infuse your bedroom with personality and warmth. By focusing on the natural beauty of the wood and incorporating thoughtful design elements, you can craft a stunning focal point that reflects your unique style. So, roll up your sleeves and get ready to transform that old door into a cozy retreat that you’ll love for years to come!
1. Can any type of door be used for a rustic headboard?
Yes! While wooden doors are the most popular choice, you can also use metal or composite doors. Just ensure they fit your desired rustic style.
2. How do I ensure my headboard is stable?
Stability can be achieved by securely attaching the door to the wall or bed frame. Use appropriate hardware and follow safety guidelines during installation.
3. What if I want to change the style later?
One of the beauties of DIY projects is their versatility. You can easily repaint or restain your headboard to fit a new style whenever you desire!

Modern Aesthetics
When it comes to embracing , your upcycled door can become a stunning centerpiece in your bedroom. The beauty of modern design lies in its simplicity and functionality, which means you can transform your old door into a sleek headboard that exudes contemporary charm. Think about clean lines, minimal ornamentation, and a color palette that speaks to the modern era. You might want to consider a bold color or a chic, monochromatic scheme that complements your existing decor.
One effective way to achieve a modern look is by opting for a minimalist design. This means stripping away any unnecessary embellishments and focusing on the door's natural beauty. Sanding down the surface to a smooth finish and applying a fresh coat of paint can make a world of difference. For instance, a crisp white or deep charcoal can provide that striking contrast against your bedroom walls, creating a sophisticated backdrop for your bed.
Additionally, you can incorporate elements like geometric shapes or subtle textures to enhance the headboard's visual appeal. Consider adding a matte finish or a high-gloss coat to give your headboard a sleek and polished look. If you're feeling adventurous, you might even experiment with a two-tone design, where the top half of the door is one color and the bottom half another. This not only adds depth but also a touch of creativity that resonates with modern design principles.
To make your upcycled door even more functional, think about integrating built-in lighting. A pair of wall sconces or LED strips can illuminate the headboard, providing both ambiance and practicality. Imagine reading in bed with a soft glow emanating from your stylish headboard—it’s the perfect blend of form and function!
For those who appreciate a touch of nature, consider using natural materials alongside your door. You could add a few floating shelves made from reclaimed wood above the headboard to display your favorite books or decorative items. This not only enhances the modern aesthetic but also adds a personal touch that reflects your style.
In summary, transforming your old door into a modern headboard is all about embracing simplicity, functionality, and creativity. With the right colors, finishes, and additional elements, your upcycled door can become a stunning focal point that elevates your bedroom's overall design. So, gather your tools, unleash your creativity, and let your imagination run wild!
- Can any type of door be used for a headboard? Yes, virtually any door can be repurposed, but consider the size and style to ensure it fits your space.
- What tools do I need for this DIY project? Basic tools like a sander, paintbrush, screws, and a drill will help you transform your door.
- How do I secure the headboard to the wall? Use wall anchors and screws for a stable installation, ensuring it’s level and secure.
- What maintenance is required for a painted headboard? Regular dusting and occasional touch-ups will keep your headboard looking fresh.

Assembly Techniques
When it comes to assembling your stunning new headboard, understanding the right techniques is essential for both aesthetics and functionality. You want your upcycled door to not only look fantastic but also stand the test of time. So, how do you ensure that your headboard is securely attached to either your bed frame or the wall? Let's break it down!
First off, choosing the right location for your headboard is crucial. If you opt for a wall-mounted design, you'll need to find the studs in your wall to provide a strong anchor point. Using a stud finder is a quick and easy way to locate these sturdy supports. Once you've marked where the studs are, you can then proceed to drill pilot holes in your door to align with these points. This ensures that the weight of the headboard is evenly distributed and prevents it from wobbling or falling over time.
On the other hand, if you're leaning towards attaching your headboard directly to your bed frame, there are a few methods to consider. The most common approach is to use L-brackets or metal brackets that can be easily secured to both the door and the frame. This method provides a clean look while ensuring that your headboard remains stable. Just remember to measure twice and drill once! You don't want to end up with misaligned holes that could ruin the look of your project.
Now, let’s talk about the tools you’ll need for this assembly process. Here’s a quick rundown:
| Tool | Purpose |
|---|---|
| Drill | For creating holes in the door and wall/frame |
| Screwdriver | To secure screws into brackets |
| Level | To ensure your headboard is perfectly horizontal |
| Stud Finder | To locate wall studs for mounting |
As you embark on this assembly journey, don't forget to keep your headboard level. A crooked headboard can be an eyesore, so using a level tool during installation will help you achieve that polished look. If you’re working with a particularly heavy door, enlisting a friend to hold it in place while you secure it can make the process much smoother and safer.
Lastly, once everything is in place, take a step back and admire your handiwork! You’ve transformed an old door into a functional piece of art for your bedroom. But remember, it’s not just about how it looks; it’s also about how it’s built. A well-assembled headboard not only enhances your room's aesthetic but also provides comfort and support while you relax or read in bed.

Wall-Mounted Options
When it comes to creating a stunning focal point in your bedroom, wall-mounted headboards are a fantastic choice! Not only do they save space, but they also add a unique touch to your decor. Imagine walking into your bedroom and being greeted by a beautifully upcycled door transformed into a headboard that exudes character and style. But how do you ensure that your masterpiece is securely and safely mounted? Let’s dive into the essentials of wall-mounted options!
First things first, before you start drilling holes into your wall, you’ll want to determine the ideal height for your headboard. A good rule of thumb is to position the top of the headboard about 54 to 60 inches from the floor, depending on your bed height and personal preference. This height creates a balanced look, making your bed feel like the centerpiece it deserves to be.
Next, you’ll need to gather the right materials for mounting your door. Here’s a quick checklist of what you’ll need:
- Stud Finder: This tool will help you locate the studs in your wall, ensuring a secure attachment.
- Drill: A power drill is essential for making holes in the wall and driving screws.
- Screws and Wall Anchors: Choose screws that are long enough to penetrate the wall and reach the studs. Wall anchors are also useful if you can’t hit a stud directly.
- Level: To ensure your headboard is perfectly straight, a level is a must-have.
Once you’ve gathered your materials, it’s time to get to work! Start by marking where you want the top of your headboard to sit. Use a pencil to make light marks on the wall. Then, using your stud finder, locate the studs and mark them as well. This step is crucial, as mounting your headboard into the studs will provide the stability needed to support its weight.
After marking your spots, drill pilot holes into the wall at the stud locations. If you’re using wall anchors, drill holes according to the anchor instructions. Next, align your headboard with the marks on the wall and use your level to ensure it’s straight before securing it with screws. Remember, a little patience goes a long way here—double-check your work as you go to avoid any mishaps!
For an added touch of flair, consider incorporating some decorative elements around your headboard. You could hang artwork or string lights above it, creating a cozy ambiance that transforms your bedroom into a personal sanctuary. Just imagine how inviting it will feel to snuggle up in bed surrounded by your unique decor!
In summary, wall-mounted headboards not only maximize your space but also allow you to showcase your creativity. With a little planning and the right tools, you can turn an ordinary door into a stunning centerpiece that reflects your style. So, roll up your sleeves and get ready to make your bedroom dreams a reality!
Q1: Can I use any door for my headboard?
A1: While you can technically use any door, it's best to choose one that complements your bedroom's style and is the right size for your bed. Consider the material and design to ensure it fits your aesthetic.
Q2: How do I ensure my headboard is secure?
A2: Always mount your headboard into wall studs for the best stability. Use a stud finder to locate them and ensure you’re using the correct screws and anchors for your wall type.
Q3: What if I can’t find studs where I want to mount my headboard?
A3: If you can’t hit a stud, use heavy-duty wall anchors designed for your wall material. This will help distribute the weight of the headboard and keep it secure.
Q4: Can I paint or stain my door before mounting it?
A4: Absolutely! In fact, it’s recommended to finish your door before mounting it to avoid any mess. Just make sure it’s completely dry before installation.

Bed Frame Attachments
When it comes to attaching your newly upcycled door headboard to a bed frame, the process is not just about functionality; it's also about aesthetics. You want to ensure that your headboard not only stays securely in place but also looks great while doing so. One of the most popular methods for attaching a headboard to a bed frame is by using L-brackets. These sturdy metal brackets provide a solid anchor point, ensuring that your headboard remains stable even during those restless nights.
Before you dive into the installation, it's crucial to measure the height of your bed frame. This will help you determine how high you want your headboard to sit. Ideally, the top of your headboard should be at least a few inches above your mattress for a balanced look. Once you've got your measurements, gather your materials. You'll need:
- L-brackets (typically 2-4, depending on the width of your door)
- Screws (make sure they are suitable for the material of your bed frame)
- Drill (for making holes in the headboard and bed frame)
- Level (to ensure your headboard is perfectly straight)
Begin by positioning your headboard against the wall or the bed frame, depending on your design choice. Use the level to ensure it's straight, and then mark where the L-brackets will attach to both the headboard and the bed frame. Drill pilot holes in these marked spots to make the installation easier and to prevent the wood from splitting.
Next, attach the L-brackets to the back of the headboard first. Make sure they are flush against the wood for a clean look. Once the brackets are securely fastened to the headboard, it’s time to attach the other side of the brackets to the bed frame. Align the headboard with your bed frame and use the screws to secure the brackets to the frame. This method not only provides stability but also allows for easy removal if you ever decide to rearrange your bedroom or switch up your decor.
One important thing to remember is that if your bed frame has a slatted design or is lower to the ground, you may need to adjust your approach. In these cases, consider using wooden cleats instead of L-brackets. A cleat is a long piece of wood that can be attached horizontally to the bed frame, allowing you to rest your headboard against it. This method provides a more seamless look and can be particularly useful if you want to add some decorative elements to your headboard later on.
Finally, don't forget to check the stability of your installation after everything is in place. Give your headboard a gentle shake to ensure it’s securely attached. If it wobbles, you might need to tighten your screws or adjust the brackets. With the right attention to detail, your upcycled door headboard will not only serve as a stunning focal point in your bedroom but will also stand the test of time.
Q: Can I use any type of door for my headboard?
A: While you can use various types of doors, it's best to choose one that is solid and sturdy, such as a wooden door, to ensure durability and stability.
Q: How do I ensure my headboard is at the right height?
A: Measure the height of your mattress and add a few inches for a comfortable look. This way, your headboard will be both functional and visually appealing.
Q: What if my bed frame is too low for a standard headboard?
A: Consider using a wall-mounted installation or adjusting the height of the headboard by adding legs or a base to raise it above the frame.
Q: Can I paint or stain my headboard after installation?
A: Yes, you can always add a fresh coat of paint or stain to your headboard to match your bedroom decor. Just ensure it’s fully dry before attaching it to the bed frame.

Finishing Touches
Now that you've transformed your old door into a stunning headboard, it’s time to add those that will truly make it shine and reflect your unique style. Think of this stage as the icing on the cake; it’s where your creativity can really take center stage. There are several ways you can elevate your headboard, and the options are as varied as your personal taste!
One popular approach is to incorporate decorative molding. Adding a crown or base molding can create a sophisticated look, giving your headboard a more polished and complete appearance. You can choose from various styles, such as traditional, modern, or even quirky, depending on the vibe you want to achieve. If you're feeling adventurous, consider layering different types of molding for a truly unique effect!
Another fantastic way to enhance your headboard is by introducing fabric accents. This could be as simple as attaching a soft, plush fabric to the upper portion of the door or even creating a padded panel that can be upholstered with your favorite material. Fabrics like velvet or linen can add a touch of luxury and comfort, making your headboard not only a visual centerpiece but also a cozy spot to lean against while reading or relaxing in bed.
Lighting is also a game-changer when it comes to finishing touches. Adding wall sconces or fairy lights around your headboard can create a warm, inviting ambiance in your bedroom. Imagine the soft glow of lights framing your headboard, making your space feel like a serene retreat. You could even install small LED strip lights along the edges for a modern touch. The right lighting can transform the entire atmosphere of your room!
Lastly, don’t forget about personalization. Adding personal items such as framed photos, artwork, or even decorative shelves can help tell your story and make your bedroom feel like home. Think of your headboard as a canvas where you can express your personality. Maybe you want to display travel souvenirs or favorite quotes that inspire you each day. The possibilities are endless!
In conclusion, the finishing touches you choose can make all the difference in the world. They allow you to add your unique flair to your DIY headboard project, ensuring that it’s not just a piece of furniture but a reflection of who you are. So go ahead, let your creativity flow, and enjoy the process of making your bedroom a true sanctuary!
Here are some common questions that might help you as you embark on your DIY headboard journey:
- How do I choose the right fabric for my headboard? Consider the durability and maintenance of the fabric, especially if you plan to lean against it often. Fabrics like canvas or upholstery-grade materials are great choices.
- Can I paint the door instead of staining it? Absolutely! Painting can provide a more vibrant look and allows for endless color options to match your decor.
- What type of lighting works best for a headboard? Wall sconces or LED strip lights are popular choices. They provide soft illumination and can enhance the overall aesthetic of your bedroom.

Maintenance and Care
Once you've transformed that old door into a stunning headboard, the last thing you want is for it to lose its charm over time. Proper maintenance and care are essential to ensure your upcycled masterpiece remains a focal point in your bedroom for years to come. Think of it like nurturing a plant; with the right attention, it will thrive and continue to beautify your space.
First and foremost, consider the material of your headboard. If your door is made of wood, it's important to keep it clean and free from dust and grime. A simple solution of warm water and mild soap can work wonders. Just grab a soft cloth and gently wipe down the surface. Avoid using harsh chemicals, as they can strip the finish and dull the natural beauty of the wood.
If you opted for a painted or stained finish, be on the lookout for any signs of wear and tear. Over time, you might notice chips or scratches. Don’t panic! A little touch-up paint or stain can easily restore your headboard to its former glory. Just remember to test any touch-up color on a small, inconspicuous area first to ensure it matches perfectly.
For those of you who went with a more rustic look, you may want to embrace the natural aging process of the wood. However, if you prefer to keep that rustic charm intact, consider applying a clear protective sealant. This will not only enhance the wood's natural grain but also protect it from moisture and stains.
Another crucial aspect of maintenance is checking the hardware. If your headboard is wall-mounted or attached to a bed frame, it’s a good idea to periodically check the screws and brackets. Just like any piece of furniture, over time, they can loosen. A quick tightening can save you from a potential disaster.
Finally, let’s talk about the finishing touches that can enhance your headboard’s longevity. Adding fabric accents or decorative pillows can not only elevate the aesthetic but also provide an extra layer of protection against wear and tear. If you choose to add lighting, ensure that it is installed safely and does not overheat, which could damage the wood.
Here are some common queries regarding the maintenance and care of your upcycled headboard:
- How often should I clean my headboard? Aim to clean it at least once a month to keep dust and dirt at bay.
- Can I use furniture polish on my wooden headboard? Yes, but make sure it's suitable for the type of finish you have applied.
- What should I do if my headboard gets scratched? Use a wood filler for deep scratches and touch-up paint for minor ones.
- Is it necessary to seal my headboard? While not mandatory, sealing can greatly enhance durability, especially for frequently used surfaces.
Frequently Asked Questions
- What type of door is best for making a headboard?
When selecting a door for your headboard, consider the style and material. Solid wood doors offer durability and a classic look, while hollow-core doors are lighter and easier to handle. Look for a door that complements your bedroom decor and fits the desired size for your headboard.
- How do I prepare the door before transforming it into a headboard?
Preparation is key for a successful DIY project. Start by cleaning the door thoroughly to remove any dirt or grime. Next, sand the surface to create a smooth finish and to help paint or stain adhere better. If you want a specific color or finish, consider applying paint or stain after sanding.
- Can I use a door with a unique design or pattern?
Absolutely! A door with a unique design can add character and a personal touch to your headboard. Just ensure that the design fits well with your overall bedroom theme. You can also enhance the door's features with paint or stain to make it stand out even more.
- What are some creative design ideas for my headboard?
There are endless possibilities when it comes to design! For a rustic look, consider distressing the door or adding natural elements like wood accents. If you prefer a modern aesthetic, opt for bold colors or a minimalist approach. Don't hesitate to mix and match styles to create something uniquely yours!
- How do I securely attach the headboard to my bed frame?
To attach your headboard to a bed frame, start by positioning it against the frame and marking where the screws will go. Use brackets or L-brackets for added stability. Make sure to drill pilot holes to prevent splitting the wood, and use screws that are long enough to secure the headboard firmly.
- What are the best maintenance practices for my upcycled headboard?
To keep your headboard looking fresh, regularly dust it with a soft cloth. For painted or stained surfaces, consider using a mild soap solution for deeper cleaning. If you notice any scratches or wear, touch up the paint or stain as needed to maintain its appearance.
- Can I add lighting to my headboard?
Yes! Adding lighting can create a cozy ambiance in your bedroom. Consider installing LED strip lights along the edges or mounting sconces on either side of the headboard. Just ensure that any electrical work is done safely and in accordance with local regulations.