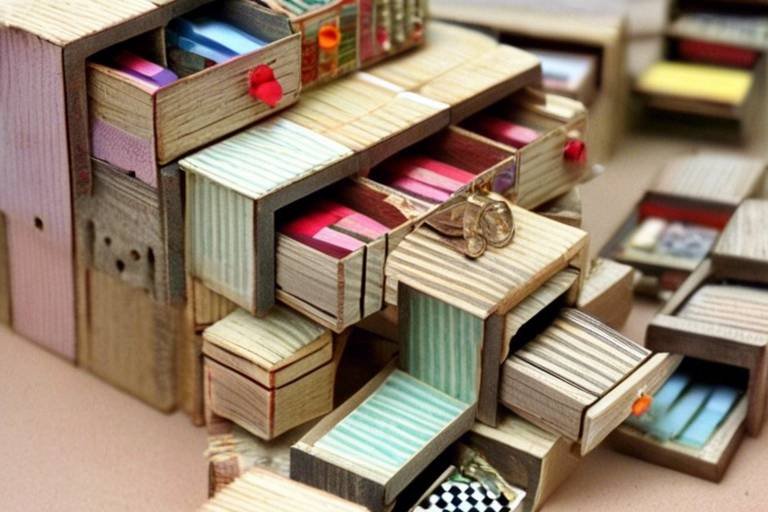
Upcycle Discarded Matchboxes into Miniature Drawers
Have you ever looked at a discarded matchbox and thought, "What a waste!"? Well, you're not alone! Many of us toss these little boxes aside without realizing their potential for transformation. Upcycling discarded matchboxes into charming miniature drawers is not just a fun project; it’s a fantastic way to contribute to sustainability while adding a touch of creativity to your home. Imagine creating tiny storage solutions that are both practical and aesthetically pleasing. In this article, we'll guide you through the entire process, from gathering materials to showcasing your finished creations. So, roll up your sleeves and let’s dive into the world of upcycling!
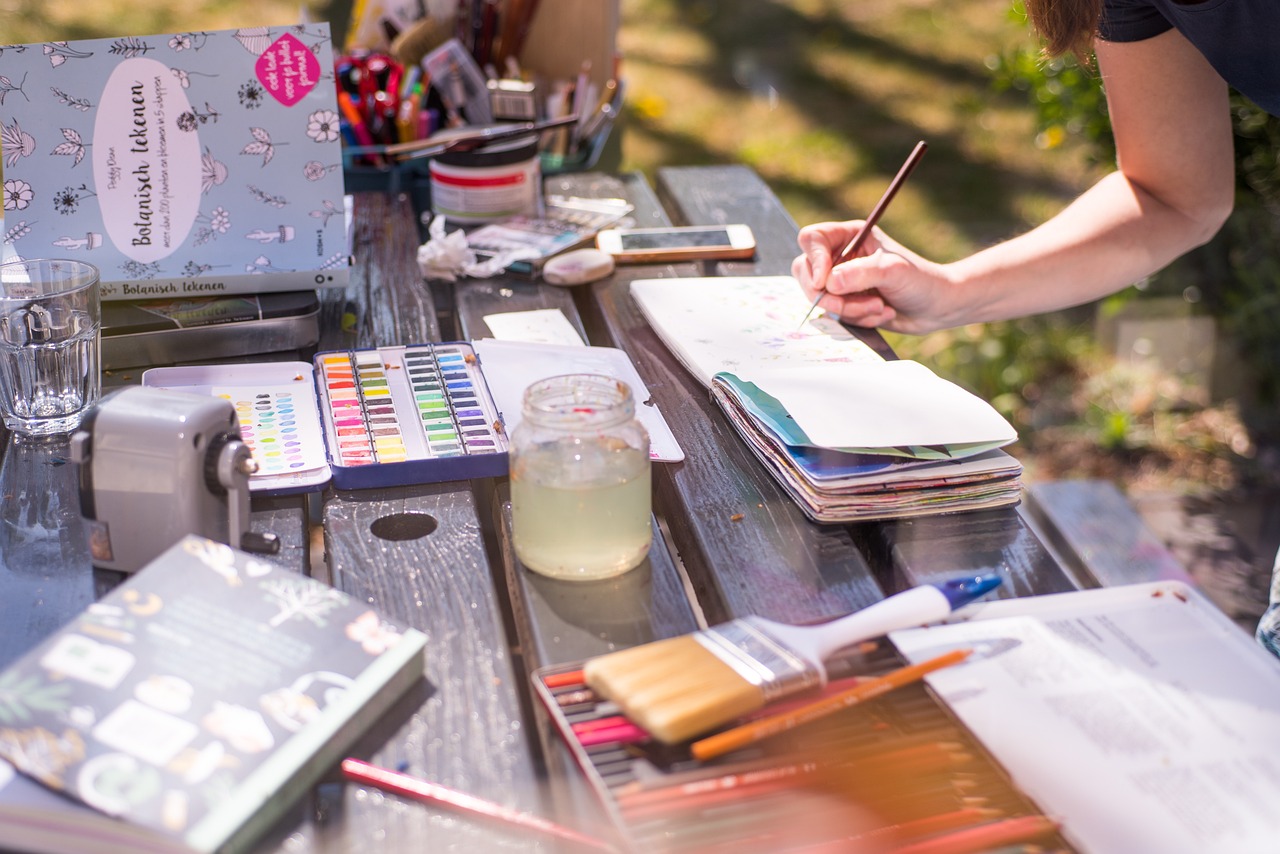
Before we embark on this creative journey, let’s talk about the materials you’ll need to get started. The good news? Most of these items are likely already sitting in your home, waiting for a new purpose. Here’s a quick list of essentials:
- Matchboxes: The star of the show! Gather as many as you can find.
- Adhesive: A strong glue or adhesive tape will help secure your drawers.
- Paint: Choose your favorite colors to bring your drawers to life.
- Decorative Items: Think stickers, washi tape, or even fabric scraps to add flair.
With these materials in hand, you’re already on your way to creating something unique. The beauty of this project lies in its simplicity and the endless possibilities for customization!
Now that we have our materials, it’s time to prepare for the fun part! Proper preparation is crucial for a smooth crafting experience. Let’s break it down into manageable steps that will ensure you’re ready to create your miniature masterpieces.
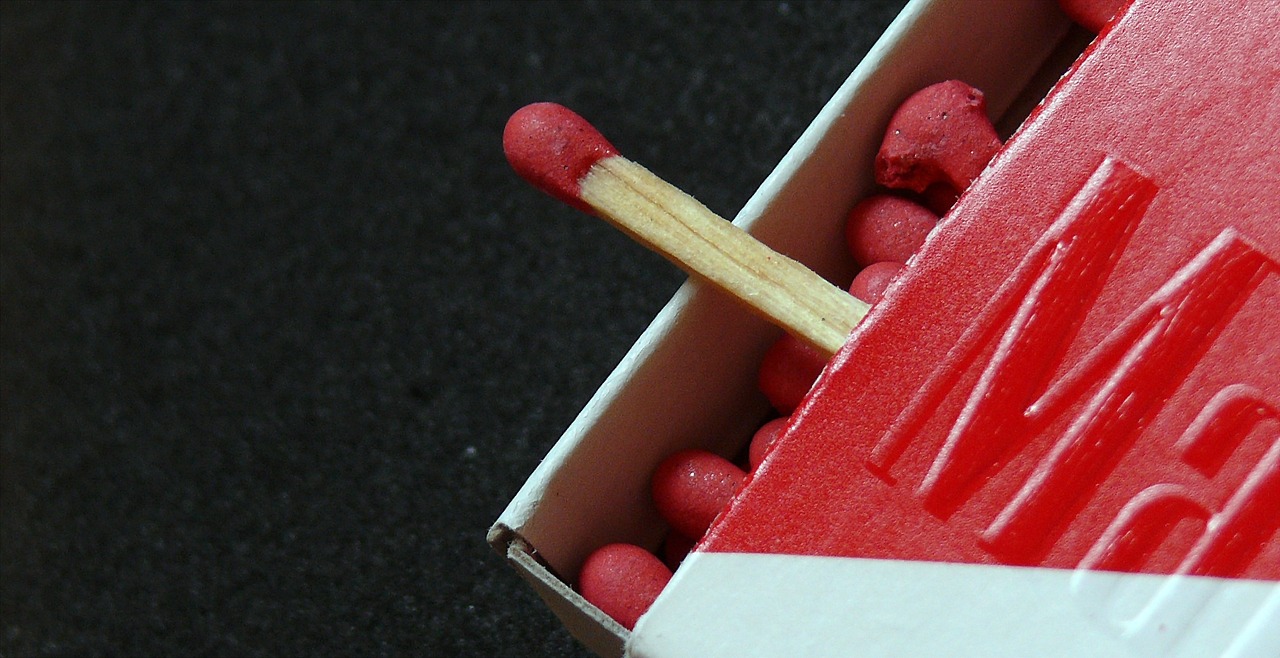
First things first, we need to start with clean matchboxes. After all, nobody wants to work with dusty or sticky surfaces! Cleaning your matchboxes not only gives you a fresh base but also enhances the overall look of your finished product. To achieve this, you can follow a couple of effective techniques:
Labels can be stubborn little things. To remove them without damaging the matchbox surface, try soaking the boxes in warm, soapy water for a few minutes. This will loosen the adhesive, making it easier to peel off the label. If you find any residue left behind, a little rubbing alcohol on a cotton ball can work wonders!
Once the labels are off, it’s essential to wash the matchboxes thoroughly. Use a damp cloth to wipe them down, ensuring there’s no leftover soap or residue. After washing, let them air dry completely. This step is crucial, especially if you plan to paint or decorate them afterward. A damp matchbox can ruin your creative efforts!
Before you dive into the crafting process, take a moment to organize your workspace. A clutter-free area will enhance your creativity and efficiency. Make sure you have all your materials within reach, and consider laying down some newspaper or a plastic sheet to protect your surfaces from paint spills. Trust me, your future self will thank you for this extra step!
Now that you’re all prepped and ready, let’s talk about design! This is where the real fun begins. Your miniature drawers can reflect your personality and style, so let your creativity shine. Here are some design ideas to inspire you:
Choosing the right color scheme can elevate your project from ordinary to extraordinary. Think about colors that make you happy or themes that resonate with you. Whether you prefer vibrant hues or muted tones, the possibilities are endless. A popular combination could be pastels for a soft look or bold primaries for something more eye-catching.
From painting to decoupage, there are countless ways to decorate your matchbox drawers. Use acrylic paints for a solid color base, or try decoupage with your favorite patterned paper for a unique touch. You could even incorporate natural elements like pressed flowers or leaves for an organic feel. The key is to have fun and experiment with different techniques!
With your materials prepared and designs chosen, it’s time to assemble your miniature drawers! Follow these step-by-step instructions for a seamless process:
Start by aligning your matchboxes in the desired configuration. Whether you want a single drawer or a stacked design, make sure they fit together snugly. Use your adhesive to securely join the boxes, applying pressure for a few seconds to ensure a strong bond. This is where your drawer structure begins to take shape!
Don’t forget about the handles! They’re essential for both functionality and aesthetics. You can get creative here—use buttons, beads, or even small pieces of wood to create unique handles. Attach them with glue, ensuring they’re placed at a comfortable height for easy opening. A well-placed handle can transform your drawer from simple to stunning!
Once your miniature drawers are complete, it’s time to put them to good use! These charming creations can serve various practical applications around your home. Here are a couple of ideas:
Miniature drawers are perfect for organizing small items like jewelry, office supplies, or craft materials. You can categorize your belongings effectively, making it easy to find what you need. Imagine a beautifully organized workspace where everything has its place!
Not only are these drawers functional, but they can also be turned into decorative displays. Arrange them on a shelf or coffee table, showcasing your creativity. You can fill them with little treasures, like seashells or tiny plants, adding charm and character to your space.
Once you've completed your project, why not share your creations with others? Showcasing your work can inspire fellow crafters and spread the joy of upcycling. Here are some tips on how to share your journey:
Social media is a fantastic way to connect with other enthusiasts. Platforms like Instagram and Pinterest are perfect for showcasing your miniature drawers. Use relevant hashtags to reach a broader audience and engage with other crafters who share your passion.
Joining crafting communities can provide support and inspiration. Look for local or online groups that focus on upcycling and DIY projects. Engaging with like-minded individuals can spark new ideas and motivate you to keep creating!
Q: Can I use any type of matchbox?
A: Yes! Any matchbox will work, but larger ones may offer more storage space.
Q: What if I don’t have paint?
A: No worries! You can use markers, colored pencils, or even wrapping paper to decorate your drawers.
Q: How do I ensure my drawers are sturdy?
A: Make sure to use a strong adhesive and allow time for it to set before using your drawers.
Q: What are some creative uses for these drawers?
A: Besides storage, you can use them as gift boxes or even as part of a larger art project!

Materials Needed
Before diving into the exciting world of upcycling discarded matchboxes into charming miniature drawers, it's crucial to gather all the necessary materials. This project is not only about creativity but also about ensuring you have everything at your fingertips to make the process smooth and enjoyable. Here’s what you’ll need:
First and foremost, you’ll need a good supply of matchboxes. These can be found in your kitchen drawer, or you might even consider asking friends or family if they have any lying around. The beauty of this project is that you can use different sizes and styles of matchboxes to create a unique look.
Next, you'll require a reliable adhesive. A strong craft glue or hot glue gun works wonders for securing the matchboxes together. You want to ensure that your drawers are sturdy enough to hold whatever treasures you decide to store inside. Additionally, having some scissors and a craft knife on hand will help you make precise cuts when necessary.
To bring your miniature drawers to life, you'll want to gather some paint. Acrylic paint is a fantastic choice because it comes in a wide array of colors and dries quickly. You can also explore decorative items such as stickers, washi tape, or even fabric scraps to enhance the aesthetics of your drawers. These elements will allow you to express your personal style and creativity.
Finally, consider having some finishing touches ready, like tiny knobs or beads for drawer handles, which can add a delightful touch to your project. With these materials on hand, you’ll be well-equipped to transform those forgotten matchboxes into stunning, functional pieces of art!
Preparation Steps
Before diving into the exciting world of upcycling matchboxes into charming miniature drawers, proper preparation is crucial for a successful crafting experience. Think of this stage as the foundation of a house; without a solid base, everything else might crumble. First and foremost, you need to gather your matchboxes. Aim for a variety of sizes to add character to your drawers. You might even want to collect some decorative matchboxes, as they can add an interesting flair to your project.
Once you have a good stash of matchboxes, it’s time to clean and organize them. This step is essential because it ensures that you start with a fresh canvas. Imagine trying to paint on a dirty surface; the results would be far from ideal, right? So, let’s get those boxes ready!
Cleaning your matchboxes is a simple yet effective way to kick off the project. You’ll want to remove any residue or labels that might interfere with your artistic vision. To tackle this, you can use a few effective techniques. For instance, a damp cloth can help wipe away any dust or dirt, while a gentle adhesive remover can assist in getting rid of stubborn labels. Just be careful to avoid damaging the cardboard surface; you want it to be as smooth as possible for painting and decorating.
Now, let's talk about those pesky labels. They can be quite stubborn, but fear not! There are various methods to peel them off without leaving a trace. One effective way is to soak the matchbox in warm, soapy water for a few minutes. This softens the adhesive, making it easier to remove the label. If that doesn’t do the trick, try using a hairdryer on a low setting to warm the label, which can also help loosen the glue. With a little patience, you'll have a clean matchbox ready for transformation!
After successfully removing the labels, washing the matchboxes is the next step. This isn’t just about aesthetics; it’s crucial for ensuring that any remaining adhesive or grime doesn’t interfere with your paint or decorations. A gentle wash with soap and water will do the trick. Once washed, make sure to dry them thoroughly. You can either air dry them or use a soft cloth to speed up the process. Just remember, moisture and paint don’t mix well!
An organized workspace is like a blank canvas waiting for your creativity to flow. Before you start crafting, take a moment to set up your area. Clear away any clutter that might distract you. Consider using a table or a sturdy surface where you can spread out your materials. Having everything within arm's reach will enhance your efficiency and keep your creative juices flowing. You might even want to create a small caddy to hold your essential tools like glue, scissors, and paints. Trust me, a tidy space makes for a happy crafter!
In summary, preparation is key to transforming those discarded matchboxes into delightful miniature drawers. By cleaning, organizing, and setting up your workspace, you’re not just preparing materials; you’re setting the stage for a fun and rewarding crafting experience. So, roll up your sleeves and get ready to unleash your creativity!
Cleaning the Matchboxes
Cleaning your matchboxes is a crucial step in the upcycling process, as it sets the foundation for a successful project. You want your miniature drawers to look pristine, and starting with a clean slate is the best way to achieve that. First, gather your supplies: you’ll need some warm water, mild soap, a sponge or cloth, and possibly some rubbing alcohol for those stubborn spots. Think of it like preparing a canvas for a masterpiece; the cleaner the surface, the better the result!
Begin by removing any visible dirt or dust from the matchboxes. You can simply wipe them down with a dry cloth to get rid of loose particles. Next, fill a bowl or sink with warm, soapy water and submerge the matchboxes for a few minutes. This soaking will help loosen any residues or grime that have accumulated. After soaking, take your sponge or cloth and gently scrub the surfaces, paying close attention to the corners and edges where dirt likes to hide.
Sometimes, matchboxes may have sticky residues from labels or glue. For these stubborn spots, a little rubbing alcohol can work wonders. Just apply a small amount to a cotton ball or cloth and rub it over the affected area until the residue lifts away. It's like using a magic eraser for your crafting supplies! Once you’ve cleaned all the matchboxes, rinse them thoroughly under clean water to remove any soap or alcohol traces. Then, lay them out on a towel to dry completely. This drying process is essential before you start painting or decorating, as wet surfaces can lead to uneven finishes.
In summary, keeping your matchboxes clean ensures that your crafting journey begins on the right foot. By taking the time to properly clean and prepare your materials, you're not just enhancing the aesthetics of your project, but you're also ensuring that the paint and decorative elements adhere better, resulting in a beautiful finished product. So, roll up your sleeves and get those matchboxes sparkling!

Removing Labels
Removing labels from matchboxes can sometimes feel like a daunting task, especially when those pesky adhesives seem to cling on for dear life. But fear not! With the right techniques, you can ensure that your matchboxes are label-free and ready for their transformation into charming miniature drawers. First, start by using a sharp utility knife or a pair of tweezers to gently lift the edge of the label. This initial step is crucial as it provides a starting point for the removal process. If the label is stubborn, applying heat can work wonders.
Using a hairdryer on a low setting, carefully warm the label for a few seconds. The heat will soften the adhesive, making it easier to peel off without damaging the matchbox underneath. If you find any residue left behind, don't worry! A little bit of rubbing alcohol on a cotton ball or cloth can help dissolve the remaining sticky bits. Just gently rub the area, and voilà! Your matchbox should be clean and ready for the next step.
In some cases, you might encounter labels that are particularly resistant. For these, consider soaking the matchbox in warm, soapy water for about 10 minutes. This method works well for labels that are paper-based. After soaking, you can easily peel the label off, and any leftover adhesive can be scrubbed away with a soft sponge. Remember, patience is key! Taking your time to ensure the matchbox is clean will pay off when you start painting and decorating.
To summarize, here are some effective methods for removing labels:
- Using a sharp utility knife: Gently lift the edge of the label.
- Applying heat: Use a hairdryer to soften the adhesive.
- Using rubbing alcohol: Dissolve any leftover residue.
- Soaking in warm, soapy water: Ideal for stubborn paper labels.
By following these steps, you'll not only prepare your matchboxes for a beautiful makeover, but you'll also enjoy the process of upcycling. Now that your matchboxes are label-free, you're one step closer to crafting those delightful miniature drawers!
Q: Can I use any type of matchbox for this project?
A: Yes, you can use any type of matchbox, but larger ones provide more space for storage and creativity.
Q: What if I still have some adhesive left after removing the label?
A: If there's any adhesive residue, rubbing alcohol or a gentle adhesive remover can help clean it off effectively.
Q: Are there any alternatives to matchboxes for this project?
A: Absolutely! You can use small cardboard boxes, tin cans, or even small wooden boxes as alternatives.
Q: How can I ensure my painted matchboxes look professional?
A: Make sure to use high-quality paint and apply thin layers, allowing each coat to dry completely before adding another.
Q: Can I use these miniature drawers for anything other than storage?
A: Yes! They can also serve as decorative elements, such as displaying small plants or as part of a larger art piece.
Washing and Drying
Once you have successfully removed the labels from your matchboxes, the next step is to ensure they are clean and ready for your creative touch. Washing and drying your matchboxes is not just a chore; it's a crucial part of the upcycling process that sets the stage for a beautiful final product. Think of it like preparing a canvas before painting; you want a pristine surface to work with!
To wash your matchboxes, start by filling a bowl or sink with warm water and a few drops of mild dish soap. This gentle solution will help to break down any remaining adhesive or grime. Submerge the matchboxes in the soapy water for a few minutes to allow the solution to work its magic. After soaking, use a soft sponge or cloth to gently scrub the surfaces, paying special attention to the corners and edges where dirt might accumulate.
Once you've scrubbed them clean, rinse each matchbox thoroughly under running water to remove any soap residue. It's essential to ensure that no soap remains, as it can interfere with paint adhesion later on. After rinsing, place the matchboxes on a clean towel or drying rack and allow them to air dry completely. This step is vital; any moisture left in the boxes can lead to issues down the line, such as peeling paint or mold growth.
For those who are a bit impatient, you can speed up the drying process by using a hairdryer on a low setting. Just be careful not to hold it too close, as the heat can warp the cardboard. Once the matchboxes are completely dry, you’ll have a clean slate ready for painting, decorating, and turning into those charming miniature drawers you envisioned!
In summary, the washing and drying process is simple yet essential. By taking the time to ensure your matchboxes are clean and dry, you are setting yourself up for success in your upcycling project. Remember, a little care in preparation goes a long way in achieving a polished final result!
Organizing Your Workspace
Creating a charming set of miniature drawers from discarded matchboxes is not only a fun project but also a fantastic way to express your creativity. However, before diving into the fun part of painting and decorating, it's crucial to ensure that your workspace is organized. An organized workspace can significantly enhance your creativity and efficiency, allowing you to focus on the task at hand without unnecessary distractions. Imagine trying to paint a masterpiece in a cluttered room; it’s like trying to find a needle in a haystack! So, let's get started on how to set up your crafting area for success.
First, you’ll want to identify a dedicated space for your project. This could be a table in your craft room, a corner of your living room, or even your kitchen counter. Make sure this space is well-lit, as good lighting will help you see the details of your work. You wouldn’t want to miss a tiny spot while painting, right? Next, gather all your materials and tools. Having everything within arm's reach will save you time and keep your creative flow uninterrupted. Here’s a quick checklist of what you might need:
- Matchboxes
- Adhesive (glue or tape)
- Paint and brushes
- Decorative items (stickers, ribbons, etc.)
- Scissors
- Ruler and pencil for measurements
Once you have your materials, it’s time to think about organization. Use small containers or trays to keep your supplies sorted. For example, you can have one container for paints, another for brushes, and yet another for decorative items. This way, you won’t have to rummage through a pile of materials to find what you need. Additionally, consider using a small caddy or basket to keep your tools handy. A tidy workspace not only looks appealing but also makes it easier to locate items quickly, allowing for a smoother crafting experience.
Moreover, don’t forget about the importance of a comfortable chair and a good posture. You’ll be spending a fair amount of time working on your miniature drawers, so make sure your workspace is ergonomically friendly. A comfortable setup can make a world of difference, preventing fatigue and keeping your mind focused on the creative process. Lastly, take a moment to clear your mind before you start. A clutter-free mental space can boost your creativity, helping you come up with unique ideas for your upcycled matchbox drawers.
In summary, organizing your workspace is a vital step in the crafting process. By setting up a dedicated area, gathering your materials, and keeping everything tidy, you’ll create an environment that encourages creativity and productivity. So, roll up your sleeves, put on some music, and let’s get crafting!
Q: What materials do I need to start upcycling matchboxes?
A: You will need matchboxes, adhesive, paint, decorative items, scissors, and basic crafting tools.
Q: How can I remove stubborn labels from matchboxes?
A: You can use warm water and soap to soak the matchboxes or apply a little rubbing alcohol to help loosen the adhesive.
Q: What are some creative uses for the finished miniature drawers?
A: They can be used for storing small items like jewelry, office supplies, or even as decorative displays for your home.
Q: Can I customize the size of the drawers?
A: Yes! You can stack multiple matchboxes or cut them down to create different sizes according to your needs.
Q: Where can I share my upcycled creations?
A: Social media platforms like Instagram, Pinterest, and Facebook are great places to showcase your work and connect with fellow crafters.

Design Ideas
When it comes to designing your miniature drawers from upcycled matchboxes, the only limit is your imagination! These tiny treasures can be transformed into stunning decor pieces that not only serve a purpose but also showcase your unique style. Start by considering themes that resonate with you. For instance, you might want to create a vintage-inspired look with muted colors and distressed finishes, or perhaps a vibrant, modern aesthetic with bold hues and clean lines.
One of the first steps in your design journey is to choose a color scheme. Think about the colors that make you happy or complement your existing decor. Popular combinations include:
- Pastels: Soft pinks, blues, and yellows create a calming and charming vibe.
- Monochromatic: Different shades of the same color can create a sophisticated look.
- Bold Contrasts: Bright reds paired with deep blues or greens can make a striking statement.
Once you've settled on a color scheme, the next step is to explore various decorative techniques that can elevate your drawers. Painting is a classic option, allowing you to add layers of color and texture. You can use acrylic paints for a smooth finish or even experiment with spray paints for a more modern touch. If you're feeling adventurous, consider using decoupage techniques to apply decorative paper or fabric to the surfaces of your matchboxes. This can add intricate designs and patterns that reflect your personality.
Another fun idea is to incorporate stenciling into your design. You can create custom patterns or words that inspire you. Simply choose your stencil, apply some paint, and voilà! You've added a unique touch that makes your drawers truly one-of-a-kind. Don't forget about embellishments! Adding small decorative elements like buttons, beads, or even tiny charms can bring your drawers to life and make them feel special.
As you embark on this creative journey, remember that the goal is to have fun and express yourself. Each drawer can tell a story or serve as a reminder of a cherished memory. So, gather your materials, let your creativity flow, and transform those discarded matchboxes into beautiful pieces of art that you'll be proud to display!
Color Schemes
When it comes to designing your miniature drawers, the color scheme you choose can make all the difference. Just like a well-planned outfit can elevate your style, the right colors can transform your matchbox creations from ordinary to extraordinary. Here are some popular color combinations to consider:
- Pastel Palette: Soft pinks, blues, and yellows can create a dreamy, whimsical feel, perfect for a child’s room or a playful crafting space.
- Monochrome Magic: Using varying shades of a single color can add depth and sophistication. Think different tones of blue or green for a serene look.
- Bold Contrasts: Pairing bright colors like red and turquoise can create a vibrant, eye-catching effect that’s sure to stand out in any room.
- Earthy Tones: Shades of brown, green, and beige can give your drawers a rustic charm, making them ideal for a cozy, natural decor.
Choosing the right colors is not just about aesthetics; it’s also about the mood you want to evoke. For example, if you aim to create a calming space, opt for cool colors like blues and greens. On the other hand, if you want to energize your environment, go for warm colors like reds and yellows. Consider the purpose of your drawers when selecting colors. Are they for a workspace, a child’s room, or perhaps a decorative display? Each setting may call for a different approach.
Once you've settled on a color scheme, think about how to apply it effectively. You can paint the entire drawer in a solid color for a bold statement or use a combination of techniques like sponging or stenciling to add texture and interest. Don’t shy away from experimenting; after all, upcycling is all about creativity and personal expression!
In summary, the colors you choose for your miniature drawers can greatly influence their overall appeal and functionality. So, take your time, explore different palettes, and let your imagination run wild. You might be surprised by the stunning results you can achieve with just a few paint strokes!
Decorative Techniques
When it comes to transforming your discarded matchboxes into charming miniature drawers, the decorative techniques you choose can truly elevate your project. It's not just about functionality; it's about making a statement! Whether you want a rustic look or something chic and modern, the options are endless. Let’s dive into some popular techniques that can add flair and personality to your creations.
One of the most straightforward yet impactful methods is painting. A fresh coat of paint can breathe new life into your matchboxes. You can opt for a single color for a minimalist style or go all out with a vibrant palette that reflects your personality. Consider using acrylic paints, which are easy to work with and dry quickly. To achieve a smooth finish, use a fine brush for detailed areas and a foam brush for larger surfaces. Remember, layering colors can create depth, so don’t shy away from experimenting!
Another fun technique is decoupage. This is where you can really let your creativity run wild! By using decorative paper, fabric, or even old magazine clippings, you can create unique patterns and designs on your drawers. Simply cut your chosen material to size, apply a layer of adhesive, and smooth it down to avoid bubbles. Once dried, seal it with a clear finish to protect your artwork. The beauty of decoupage lies in its versatility; you can mix and match different materials to achieve a one-of-a-kind look.
If you’re looking for a more textured finish, consider using embellishments. Adding small items like beads, buttons, or even pieces of lace can give your drawers a tactile quality that makes them stand out. You can glue these embellishments on the edges or corners for added interest. Just imagine a drawer with a delicate lace trim or a row of colorful buttons—such delightful details can turn a simple matchbox into a treasured piece!
Additionally, using stencils can help you achieve intricate designs without the need for advanced painting skills. You can purchase ready-made stencils or create your own with cardstock. Simply place the stencil on the surface of the matchbox, apply paint with a sponge or brush, and voila! You’ve got a beautifully designed drawer that will surely catch the eye.
Lastly, don’t forget about personalization. Adding your initials, quotes, or even small illustrations can make your drawers feel special. You can use permanent markers or paint pens for this. This technique not only adds a personal touch but also makes your creations more meaningful. After all, who wouldn’t love a drawer that reflects their own style and story?
In conclusion, the decorative techniques you choose for your miniature drawers can transform simple matchboxes into stunning pieces of art. From painting and decoupage to embellishments and stencils, each method offers unique ways to express your creativity. So gather your materials, unleash your imagination, and let your matchboxes shine!
- What type of paint is best for matchboxes? Acrylic paint is recommended due to its quick drying time and ease of use.
- Can I use regular glue for decoupage? Yes, but using decoupage glue or Mod Podge is ideal as it dries clear and seals the project.
- How can I protect my decorated matchboxes? Sealing your project with a clear varnish or spray can protect it from wear and tear.
- Are there any alternatives to matchboxes for this project? Yes, you can use small cardboard boxes or even tin cans for similar upcycling projects.
Assembly Process
Now that you've gathered all your materials and finalized your design, it’s time to dive into the exciting of your miniature drawers. This is where your vision truly comes to life! To start, you'll need to ensure that you have a clean, flat workspace where you can comfortably work without distractions. Having everything organized will make the assembly smoother and more enjoyable.
First, let’s talk about joining matchboxes. The key to a sturdy drawer structure is ensuring that the matchboxes are properly aligned and securely glued together. Begin by taking two matchboxes and placing them side by side. Apply a strong adhesive to the edges where they will connect. You can use wood glue or a hot glue gun for quick adhesion. Once the glue is applied, hold the boxes together for a few seconds to allow the adhesive to set. It’s important to check for any misalignment at this stage, as even a small discrepancy can affect the overall appearance of your drawers.
After you’ve successfully joined the matchboxes, you might want to add a few more to create a multi-drawer unit. Make sure to repeat the gluing process, ensuring that each box is perfectly aligned with the previous one. If you're feeling adventurous, consider creating a staggered design by offsetting some of the boxes. This can add visual interest and make your miniature drawer set stand out even more!
Next, let’s move on to adding drawer handles. Handles are not only functional but can also serve as a decorative element of your project. You can get creative here! Consider using small beads, buttons, or even pieces of wire to create unique handles. For instance, if you have some old jewelry lying around, why not repurpose a pretty earring as a handle? To attach the handles, simply mark where you want them to go, drill a small hole (if necessary), and secure them with glue or by threading them through the hole. This little detail can elevate your drawers from simple to stunning!
As you assemble your drawers, don’t forget to consider how you want to finish them. Once everything is glued and dried, you can paint or decorate them to match your theme. Whether you choose to go with a vintage look or a bright, modern aesthetic, the finishing touches will make all the difference. Take your time during this stage; after all, this is where your personal style shines through!
Finally, after everything is assembled and decorated, allow your miniature drawers to dry completely before using them. This will ensure that all the glue is set, and your hard work will be rewarded with a beautiful and functional piece of art. Remember, the assembly process is not just about putting things together; it’s about creating something unique and personal that reflects your style and creativity.
- How long does the glue take to dry? Most craft glues will dry within 30 minutes to an hour, but it's best to wait at least 24 hours for a full cure.
- Can I use any type of paint on matchboxes? Yes! Acrylic paint works well, but make sure it’s suitable for the material of the matchbox.
- What if I make a mistake while assembling? Don’t worry! You can carefully pull apart the matchboxes while the glue is still wet and re-align them.

Joining Matchboxes
When it comes to creating your charming miniature drawers, the way you join matchboxes is crucial for both stability and aesthetics. Think of it as building the foundation of a house; if the foundation is shaky, everything else will crumble. To start, you’ll want to gather your matchboxes and ensure they are clean and dry from your earlier preparations. A well-prepared base makes all the difference!
One effective technique for joining matchboxes is to use a strong adhesive. Craft glue or hot glue works wonders here. Start by applying a thin layer of glue on the edges of one matchbox. Align it carefully with another matchbox, ensuring that the edges are flush. Hold them together for a few seconds to allow the glue to set. This method not only secures the boxes but also provides a seamless look when you’re done.
It's essential to consider the alignment of the matchboxes. Misalignment can lead to uneven drawers that may not open or close properly. To avoid this, you can use a straight edge or a ruler to guide your placement. If you’re feeling adventurous, try stacking the matchboxes in various configurations to create unique drawer sizes. For example, you might want a wider drawer at the bottom and a narrower one on top, resembling a tiered cake!
Once you’ve glued the matchboxes together, give them ample time to dry. Depending on the type of adhesive you use, this could take anywhere from a few minutes to several hours. Patience is key here; rushing the process can lead to a messy finish. After the glue has dried, you can reinforce the structure by adding small pieces of tape at the joints. This extra support can be especially helpful if you plan to fill your drawers with heavier items.
Additionally, consider incorporating decorative elements while you join the matchboxes. For instance, you can wrap washi tape around the edges where they meet. This not only adds a pop of color but also helps to hide any imperfections in the alignment. You could even paint the edges with acrylic paint to blend them seamlessly into your overall design. The goal is to make your miniature drawers not just functional but also a delightful addition to your space.
In summary, joining matchboxes is a simple yet vital step in creating your miniature drawers. By using strong adhesives, ensuring proper alignment, and adding decorative touches, you can craft a sturdy and visually appealing storage solution. So, roll up your sleeves, embrace your creativity, and let those matchboxes come together to form something truly special!
- What type of glue is best for joining matchboxes? Craft glue or hot glue is recommended for a strong bond.
- Can I paint the matchboxes before joining them? Yes, painting them beforehand can add a personal touch, but ensure the paint is fully dry before gluing.
- How long should I wait for the glue to dry? It depends on the type of glue used, but generally, 1-2 hours is a good rule of thumb.
- Can I stack matchboxes in different configurations? Absolutely! Feel free to experiment with different shapes and sizes for a unique design.
Adding Drawer Handles
When it comes to your miniature drawers, is like putting the cherry on top of a sundae. Not only do handles enhance the functionality of your drawers, making them easier to open and close, but they also contribute significantly to the overall aesthetic of your creation. Imagine a beautifully painted matchbox drawer adorned with a whimsical handle that reflects your unique style. It's these small details that can really make your project pop!
There are numerous ways to add handles to your miniature drawers, and the choice largely depends on your personal taste and the materials you have on hand. Here are a few creative options:
- Beads and Wire: Use colorful beads threaded onto a piece of wire. Simply poke the wire through the front of the drawer and twist it on the inside to secure it. This method allows for a playful and vibrant look.
- Buttons: Old buttons can make charming drawer handles. Just drill a small hole in the matchbox and attach the button with a small screw or glue. The variety of shapes and colors available means you can mix and match for a fun effect.
- Wooden Dowels: For a more rustic feel, cut small pieces of wooden dowel and glue them to the front of the drawer. Sand them down for a smooth finish, and paint or stain them to match your design.
- Fabric Loops: If you're feeling crafty, consider sewing small fabric loops that can be glued or attached to the drawer. This can add a soft, tactile element to your design.
To ensure your handles are not only stylish but also functional, consider the following tips:
| Tip | Description |
|---|---|
| Size Matters | Choose handles that are proportionate to the size of your drawers. Oversized handles can overwhelm a tiny drawer, while too-small handles may be difficult to grasp. |
| Placement | Position your handles at a comfortable height for easy access. Typically, placing them about a third of the way down from the top works well. |
| Secure Attachment | Make sure your handles are securely attached. If using glue, allow ample drying time before using the drawers to prevent any mishaps. |
In the end, adding handles to your miniature drawers is not just about functionality; it's about expressing your creativity and personal style. With a little imagination and some basic materials, you can transform a simple matchbox into a charming storage solution that reflects who you are. So, gather your tools, let your creativity flow, and make those handles a standout feature of your delightful upcycled drawers!
Q: What materials are best for making drawer handles?
A: You can use a variety of materials for handles, including beads, buttons, wooden dowels, or even fabric. Choose what fits your design aesthetic!
Q: How do I ensure my drawer handles are secure?
A: Make sure to use strong adhesive or screws, and allow sufficient drying time if using glue. Testing the handle before fully assembling your drawer can help.
Q: Can I paint or decorate my handles?
A: Absolutely! Feel free to paint or embellish your handles to match the theme of your drawers. This adds a personal touch to your project.
Practical Uses
Once your charming miniature drawers are complete, you might be wondering how to best utilize them in your space. These delightful creations are not just for show; they come with a plethora of practical applications that can enhance your home organization while adding a touch of creativity to your decor. Imagine having a tiny drawer dedicated to your most cherished items, or a colorful collection that organizes your workspace. Let’s dive into some of the fantastic ways you can incorporate these upcycled treasures into your daily life.
One of the most obvious uses for your miniature drawers is for storing small items. Whether it's jewelry, office supplies, or craft materials, these drawers can help you categorize and organize your belongings effectively. For instance, you could have:
- Jewelry: Use one drawer for earrings, another for bracelets, and a third for necklaces. This way, you can quickly find what you need without rummaging through a tangled mess.
- Office Supplies: Organize paper clips, sticky notes, and pens in separate drawers to keep your desk tidy and functional.
- Craft Materials: Store buttons, threads, and small tools in these cute drawers, making your crafting sessions more enjoyable and efficient.
But the fun doesn’t stop there! Your miniature drawers can also serve as decorative displays that add character to your home. Picture this: a beautifully arranged set of drawers on a shelf, each painted in different colors or adorned with unique patterns. They can become conversation starters, showcasing your artistic flair. You can fill them with:
- Succulents: Place small plants inside the drawers for a quirky touch of greenery.
- Seasonal Decor: Change the contents according to the season; think tiny pumpkins in fall or ornaments during the holidays.
- Photos or Mementos: Use them to store cherished memories, like ticket stubs or postcards, creating a personal display that tells your story.
Moreover, these miniature drawers are not just limited to personal use; they can also make for unique gifts! Imagine gifting a set of beautifully crafted drawers filled with small treats or handmade items. It’s a thoughtful way to share your creativity and give something truly special. You can even create themed drawers for specific occasions, like a birthday gift filled with party favors, or a holiday gift with seasonal goodies.
In conclusion, the practical uses for your upcycled matchbox drawers are as limitless as your imagination. They can serve as functional storage, artistic displays, or heartfelt gifts, all while helping you reduce waste and embrace creativity. So, gather those matchboxes and let your ideas flow!
Q: How can I ensure my miniature drawers are sturdy enough for storage?
A: To ensure durability, make sure to use a strong adhesive when joining the matchboxes. Additionally, consider reinforcing the structure with decorative tape or small wooden pieces for added strength.
Q: What type of paint is best for decorating the matchboxes?
A: Acrylic paint works wonderfully on matchboxes, as it adheres well and comes in a wide variety of colors. Just ensure that the paint is fully dry before applying any additional layers or decorations.
Q: Can I use other materials alongside matchboxes?
A: Absolutely! You can incorporate materials like fabric, paper, or even small wooden pieces to add more texture and interest to your miniature drawers. The sky's the limit!
Storing Small Items
Once you’ve crafted your charming miniature drawers, you might be wondering how to put them to good use. These little creations are not just for show; they can be incredibly practical! Imagine having a dedicated space for all those tiny items that tend to clutter your life. From jewelry to office supplies, these upcycled drawers can help you organize your belongings in a delightful way.
Think about the small items that often get lost in the shuffle of daily life. Here are some practical ideas for what you can store in your miniature drawers:
- Jewelry: Store rings, earrings, and necklaces neatly. You can even dedicate a drawer for each type of jewelry to keep things organized and easy to find.
- Office Supplies: Keep paper clips, thumbtacks, and sticky notes in separate drawers. This not only keeps your workspace tidy but also adds a personal touch to your office decor.
- Craft Materials: If you’re a crafter, these drawers are perfect for storing beads, buttons, and other small supplies. You can label each drawer for quick access.
- Buttons and Threads: For sewing enthusiasts, these drawers can serve as a great way to organize buttons and threads by color or type.
By categorizing your items, you’ll not only make it easier to find what you need but also create a visually appealing display. You can paint the drawers in different colors or use decorative paper to add a touch of flair that matches your personal style. Imagine opening a drawer to find a beautifully organized collection of your favorite things – it’s like a little treasure chest that brings joy every time you use it!
Moreover, these miniature drawers can be placed on desks, shelves, or even in bathrooms to hold makeup or toiletries. The versatility of the design means you can customize them to fit any space or purpose. Plus, they make great gifts! Who wouldn’t appreciate a handcrafted storage solution that’s both functional and stylish?
Q: Can I use matchboxes of different sizes?
A: Absolutely! Using matchboxes of various sizes can add dimension and interest to your miniature drawers.
Q: How do I ensure the drawers slide in and out smoothly?
A: Make sure to align the matchboxes properly when assembling them, and consider using a bit of wax or lubricant on the edges to help them slide smoothly.
Q: What if I want to use my miniature drawers for heavier items?
A: If you plan to store heavier items, reinforce the structure by gluing additional matchboxes on the sides or using a stronger adhesive.
Q: Can I paint the matchboxes before assembling them?
A: Yes! Painting the matchboxes before assembly can make it easier to cover all surfaces and achieve a uniform look.

Decorative Displays
Once your miniature drawers are complete, the fun doesn’t stop there! These charming little creations can serve as not only practical storage solutions but also as delightful decorative displays that can elevate any space in your home. Imagine walking into a room and being greeted by a vibrant array of your handcrafted matchbox drawers, each one telling a story or showcasing your unique style. The key to a stunning display lies in how you arrange and present them.
First off, consider the theme of your display. Are you going for a rustic vibe, a modern touch, or perhaps something whimsical? Choosing a cohesive theme will help in selecting colors and decorative items that complement each other. For instance, if you want a vintage look, you might opt for muted pastel colors and embellishments like lace or old buttons. On the other hand, a contemporary theme could involve bold colors and geometric patterns.
Next, think about the placement of your miniature drawers. They can be arranged on shelves, hung on walls, or even placed on a coffee table as a centerpiece. If you have a collection of them, consider creating a tiered display using small stands or boxes to add depth and interest. This not only showcases your creativity but also makes it easier to access the items stored within. You might even want to incorporate some lighting, such as fairy lights, to add a magical touch to your display.
To further enhance your decorative displays, you can use the drawers to hold small decorative items. For example, you can fill them with dried flowers, tiny succulents, or even colorful pebbles that match your theme. This not only adds visual interest but also invites guests to explore and interact with your creations. You can even create labels for each drawer to indicate what treasures lie inside, turning your display into a functional art piece.
Finally, don’t forget to rotate your displays! Just like any art installation, changing the arrangement or the contents of your drawers from time to time keeps things fresh and exciting. It allows you to showcase different items and gives you a chance to play with new decorative ideas. So, whether you’re displaying them for a special occasion or just for your own enjoyment, let your creativity flow and have fun with it!
- What materials do I need to create decorative displays with matchbox drawers?
You'll need matchboxes, adhesive, paint, and any decorative items you wish to use, such as ribbons, beads, or small plants. - How can I ensure my display is visually appealing?
Choose a cohesive theme, consider color schemes, and arrange your drawers in a way that creates depth and interest. - Can I use the drawers for storage?
Absolutely! These miniature drawers are perfect for storing small items while also serving as decorative elements in your home.
Sharing Your Creations
Once you've poured your heart and soul into creating your charming miniature drawers, it’s time to share your masterpieces with the world! Sharing your creations not only allows you to receive feedback and compliments but also inspires others to embark on their own upcycling adventures. So, how can you effectively showcase your work? Let's dive into some exciting avenues!
First off, social media platforms serve as vibrant canvases for your creativity. Platforms like Instagram and Pinterest are perfect for visually showcasing your upcycled matchbox drawers. With their focus on images, you can capture the intricate details of your designs and connect with a community that appreciates art and DIY projects. Don’t forget to use relevant hashtags such as #Upcycling, #DIYDecor, and #CraftyCreations to broaden your reach and attract fellow enthusiasts who might be on the lookout for inspiration.
In addition to social media, consider joining crafting communities online. Websites like Facebook, Reddit, and specific crafting forums offer spaces where you can share your projects, ask for advice, and connect with like-minded individuals. Engaging with these groups can provide not only support but also a wealth of ideas and techniques that you can incorporate into future projects. You might even discover local meet-ups or workshops that allow you to interact with other crafters face-to-face!
When sharing your creations, remember to tell the story behind your project. People love to hear about the inspiration that sparked your creativity or the challenges you faced along the way. This personal touch can make your posts more relatable and engaging. You could even create a short video or a photo series documenting the entire process from start to finish. This not only showcases your finished product but also highlights your skills and the effort you put into the project.
Moreover, consider hosting a small exhibition at home or in a local community center. Invite friends, family, and neighbors to view your creations and perhaps even participate in a crafting session. This can be a fun way to engage your community and spread the joy of upcycling. You could even create a small flyer or poster to promote your exhibition, detailing what attendees can expect to see and do.
Lastly, don't underestimate the power of a blog or a personal website. If you enjoy writing, documenting your crafting journey can be a fulfilling way to share your knowledge and experiences. You can include tutorials, tips, and even a gallery of your creations. This not only helps you build a portfolio but also establishes you as a resource in the crafting community.
In summary, sharing your creations can be as rewarding as making them. Whether through social media, crafting communities, exhibitions, or blogging, there are countless ways to connect with others and inspire them with your upcycled matchbox drawers. So, don’t hold back—let your creativity shine and encourage others to join the upcycling movement!
Social Media Platforms
In today's digital age, social media platforms are not just for sharing selfies or vacation photos; they have become vibrant communities where creativity flourishes! If you've just completed your charming miniature drawers, why not showcase your hard work and artistic flair? Platforms like Instagram, Pinterest, and Facebook are fantastic avenues to share your upcycled creations and connect with fellow crafters.
On Instagram, you can create a visually appealing profile filled with stunning images of your drawers. Use popular hashtags such as #Upcycling, #CraftingCommunity, and #DIYProjects to reach a broader audience. Engage with other users by liking, commenting, and sharing their projects too—it's all about building a community!
Pinterest is another excellent platform for inspiration. You can create boards dedicated to your upcycling projects, pinning your own creations alongside those that inspire you. This not only helps you organize your ideas but also allows others to discover your work and possibly replicate it. Don't forget to include detailed descriptions and links to your process, as this will help others find your content easily.
Lastly, Facebook is perfect for joining crafting groups where you can share your projects and gain feedback. Many groups focus specifically on upcycling and DIY crafts, providing a supportive environment where you can ask questions, share tips, and even participate in challenges. Engaging in these communities can lead to collaborations and friendships with like-minded individuals who share your passion.
By leveraging these social media platforms, not only do you get to showcase your creativity, but you also inspire others to embark on their own upcycling journeys. So, grab your phone, snap some photos, and let the world see the beauty of your miniature drawers!
Q: What materials do I need to start upcycling matchboxes?
A: You'll need matchboxes, adhesive, paint, and decorative items like stickers, fabric, or washi tape. The possibilities are endless!
Q: Can I use any type of paint on matchboxes?
A: Yes, but it's best to use acrylic paint as it adheres well to cardboard and dries quickly. Make sure to let it dry completely before adding any decorations.
Q: How can I ensure my drawers are sturdy?
A: Use a strong adhesive when joining the matchboxes and consider reinforcing the corners with additional glue or tape for extra stability.
Q: What can I store in my miniature drawers?
A: These adorable drawers are perfect for small items like jewelry, office supplies, or even as a unique way to store craft materials.
Q: How can I share my creations with others?
A: Utilize social media platforms like Instagram and Pinterest to showcase your work, and consider joining crafting communities on Facebook for support and inspiration.
Crafting Communities
Joining can be one of the most rewarding aspects of your upcycling journey. These vibrant groups are filled with passionate individuals who share your love for creativity and innovation. By connecting with fellow crafters, you not only gain access to a wealth of knowledge and inspiration but also find a supportive network that encourages you to push your creative boundaries. Imagine sharing your latest miniature drawer creation, receiving feedback, and discovering new techniques that you never thought of before!
Crafting communities can be found in various forms, from local meet-ups to online forums and social media groups. Each platform offers unique opportunities to engage with others. For instance, on platforms like Facebook, you can join groups specifically dedicated to upcycling and crafting. These groups often host challenges, share tutorials, and provide a space for members to showcase their work. It’s like having a virtual craft fair right at your fingertips!
Moreover, participating in these communities can lead to collaborations on projects or even crafting events. Whether it’s a local workshop or an online webinar, these gatherings can enhance your skills and introduce you to new materials and techniques. You might even find a few crafting buddies who are just as enthusiastic about transforming matchboxes into charming drawers as you are!
Here are some popular platforms where you can find crafting communities:
- Facebook: Join groups that focus on upcycling, DIY projects, and crafting.
- Instagram: Follow hashtags related to upcycling and share your creations to connect with others.
- Reddit: Participate in subreddits dedicated to crafting and DIY.
- Pinterest: Discover ideas and connect with other crafters through shared boards.
In addition to online platforms, consider checking out local crafting stores or community centers. Many of them host workshops or crafting nights where you can meet like-minded individuals in person. This face-to-face interaction can be incredibly fulfilling and can lead to lasting friendships built on a shared passion for crafting.
Ultimately, being part of a crafting community not only enhances your skills but also fills your creative journey with joy and camaraderie. So, don’t hesitate to dive into these communities, share your ideas, and learn from others. You never know, you might just inspire someone else to start their own upcycling adventure!
Q1: Where can I find crafting communities online?
A1: You can find crafting communities on platforms like Facebook, Instagram, Reddit, and Pinterest. Look for groups or hashtags related to upcycling and crafting.
Q2: Do I need to have advanced skills to join a crafting community?
A2: Not at all! Crafting communities welcome all skill levels. Whether you’re a beginner or an expert, you’ll find support and inspiration.
Q3: Can I share my creations in these communities?
A3: Yes! Sharing your work is encouraged and often celebrated in crafting communities. It’s a great way to receive feedback and connect with others.
Q4: Are there any costs associated with joining crafting communities?
A4: Most online communities are free to join. However, local workshops or events may have a fee. Always check the details before attending.
Frequently Asked Questions
- What materials do I need to upcycle matchboxes into miniature drawers?
To get started with your upcycling project, you'll need a few basic materials: unused matchboxes, a strong adhesive, paint for decorating, and any decorative items you wish to use, such as stickers, fabric, or washi tape. Having these materials on hand will make your crafting experience smooth and enjoyable!
- How do I clean and prepare matchboxes before starting my project?
Cleaning your matchboxes is essential for a successful project. Start by removing any labels using methods like soaking them in warm water or using adhesive removers. After that, wash the matchboxes with mild soap and water to eliminate any residue. Make sure to dry them thoroughly before you begin painting or decorating!
- What are some creative design ideas for my miniature drawers?
The sky's the limit when it comes to design! You can explore various color schemes that resonate with your style, like pastels for a soft look or bold colors for a vibrant touch. Additionally, consider decorative techniques such as painting, decoupage, or even adding embellishments like buttons or beads to personalize your drawers.
- How do I assemble the matchboxes to create sturdy drawers?
To assemble your miniature drawers, start by securely joining the matchboxes using a strong adhesive. Make sure to align them properly to create a cohesive look. For added stability, you can reinforce the corners with additional glue or small wooden dowels. Once assembled, let them dry completely before adding any handles or decorations.
- What practical uses do these miniature drawers have?
Your upcycled drawers can serve multiple purposes! They are perfect for storing small items like jewelry, office supplies, or craft materials. Additionally, you can use them as decorative displays to showcase trinkets or plants, adding a unique touch to your home decor.
- How can I share my creations with others?
Sharing your upcycled creations is a fantastic way to inspire others! You can post photos and tutorials on social media platforms like Instagram, Pinterest, or Facebook. Additionally, consider joining crafting communities online where you can connect with fellow enthusiasts, share tips, and showcase your work.