Discover the Art of Pyrography in Woodworking
Have you ever wondered how some wood pieces come alive with intricate designs and stunning details? Welcome to the captivating world of pyrography, an ancient art form that transforms simple wood into breathtaking masterpieces. Pyrography, often referred to as "wood burning," is not just a hobby; it’s a fusion of artistry and craftsmanship that invites creativity and personal expression. Whether you're a seasoned woodworker or a curious beginner, diving into pyrography can open up a realm of possibilities, allowing you to create something truly unique.
The beauty of pyrography lies in its simplicity and versatility. With just a few tools and a dash of imagination, you can etch delicate patterns, bold images, or even heartfelt messages onto wood. Imagine gifting a loved one a personalized wooden piece that reflects their personality or interests! It’s not just about burning designs; it’s about telling a story through your artwork. Each stroke of the pyrography pen is a step into a journey of creativity, where the only limits are those of your imagination.
In this article, we’ll explore the rich history of pyrography, tracing its roots back to ancient civilizations and how it has evolved into a modern artistic expression. We’ll also delve into the essential tools you need to get started, ensuring you have everything at your fingertips to embark on this exciting journey. But that’s not all! We’ll discuss various wood types and preparation techniques, helping you choose the perfect canvas for your designs. And for those eager to take their skills to the next level, we’ll introduce advanced techniques that will elevate your work from simple to stunning.
So, are you ready to ignite your creativity and explore the art of pyrography? Whether you’re looking to create beautiful home decor, personalized gifts, or simply want to express yourself through art, pyrography offers a fulfilling and rewarding experience. Let's dive into the fascinating world of wood burning and discover how you can transform ordinary pieces of wood into extraordinary works of art!
Understanding the origins of pyrography reveals its evolution from ancient practices to modern artistry, showcasing how cultures across the globe have embraced this unique form of expression in woodworking.
A successful pyrography project requires specific tools. This section will discuss the essential equipment, including pens, wood types, and safety gear, to help you get started on your pyrography journey.
Selecting the appropriate wood type is crucial for pyrography. Here, we will explore various wood options, their characteristics, and how they affect the final artwork's appearance and durability.
This subsection compares softwoods and hardwoods, detailing their unique properties and suitability for different pyrographic techniques, ensuring you make informed choices for your projects.
Preparation is key in pyrography. Learn the best practices for sanding, cleaning, and treating wood surfaces to achieve optimal results and enhance your artwork's longevity.
Mastering basic pyrography techniques is essential for beginners. This section covers fundamental methods, including shading, line work, and texturing, to help you develop your skills and create stunning pieces.
Once you grasp the basics, exploring advanced techniques can elevate your work. This part introduces methods such as layering, stenciling, and incorporating color to create intricate designs.
Integrating pyrography with other artistic mediums can enhance your creations. Discover how to blend painting, carving, and mixed media to produce unique, multidimensional artworks that stand out.
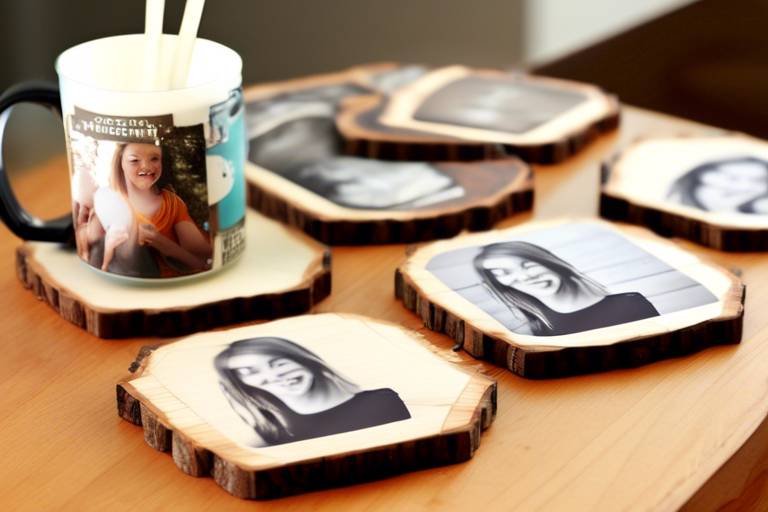
Personalizing your pyrography projects is a fulfilling aspect of the craft. This section will guide you through the process of designing and transferring custom patterns onto wood for your artwork.
Once your artwork is complete, showcasing it effectively is essential. Learn about framing, displaying, and promoting your pyrography pieces to share your talent with others and potentially sell your work.
- What is pyrography? Pyrography is the art of decorating wood or other materials by burning designs into the surface with a heated tool.
- Do I need special tools to start pyrography? Yes, you'll need a pyrography pen, suitable wood, and safety gear. Other optional tools can enhance your experience.
- Can I use any type of wood for pyrography? While you can use many types of wood, some are better suited than others due to their grain and density.
- Is pyrography safe? As with any craft, safety precautions are essential. Always work in a well-ventilated area and use protective gear.
- How can I improve my pyrography skills? Practice is key! Try different techniques, take classes, and learn from experienced pyrographers.
The History of Pyrography
Understanding the origins of pyrography reveals a fascinating journey that intertwines artistry with cultural heritage. The term "pyrography" itself comes from the Greek words "pur," meaning fire, and "graphos," meaning writing. This ancient art form dates back thousands of years, with evidence suggesting that early humans used heated tools to create designs on wood and leather as far back as 12,000 years ago. Imagine the thrill of those first artists, using fire to etch their stories into the surfaces they had at hand!
Throughout history, different cultures have embraced pyrography, adapting it to their unique styles and materials. In ancient Egypt, for example, artisans would burn designs into wood and leather, crafting intricate patterns that told stories of their gods and daily life. Fast forward to the Victorian era, where pyrography became a popular pastime among the upper class. They would gather in parlors, showcasing their skills on wooden objects, often creating elaborate designs that were both functional and decorative.
In the 20th century, pyrography saw a resurgence as artists began to explore its potential in contemporary art. The introduction of electric pyrography pens revolutionized the craft, making it accessible to a wider audience. No longer limited to the elite, people from all walks of life began experimenting with this captivating technique. Today, pyrography is celebrated not only as a traditional craft but also as a modern art form that allows for endless creativity.
As we delve deeper into the world of pyrography, it's essential to recognize the various styles that have emerged over the years. Some artists focus on detailed portraits, while others might create abstract designs or nature-inspired motifs. This diversity showcases the versatility of pyrography, allowing each artist to express their individuality and connect with their audience in unique ways.
To summarize, pyrography is more than just a technique; it's a rich tapestry of history and culture. From its ancient beginnings to its modern-day applications, this art form continues to captivate and inspire. Whether you're a seasoned artist or a curious beginner, understanding the history of pyrography can deepen your appreciation for this remarkable craft.
- What is pyrography? Pyrography is the art of decorating wood or other materials with burn marks, creating intricate designs using heat.
- When did pyrography originate? The practice of pyrography dates back to ancient times, with evidence of its use found in various cultures around the world.
- What tools do I need to start pyrography? Essential tools include a pyrography pen, wood pieces, and safety gear like gloves and goggles.
- Can I use any type of wood for pyrography? While many types of wood can be used, softer woods like pine or basswood are often preferred for beginners due to their ease of burning.
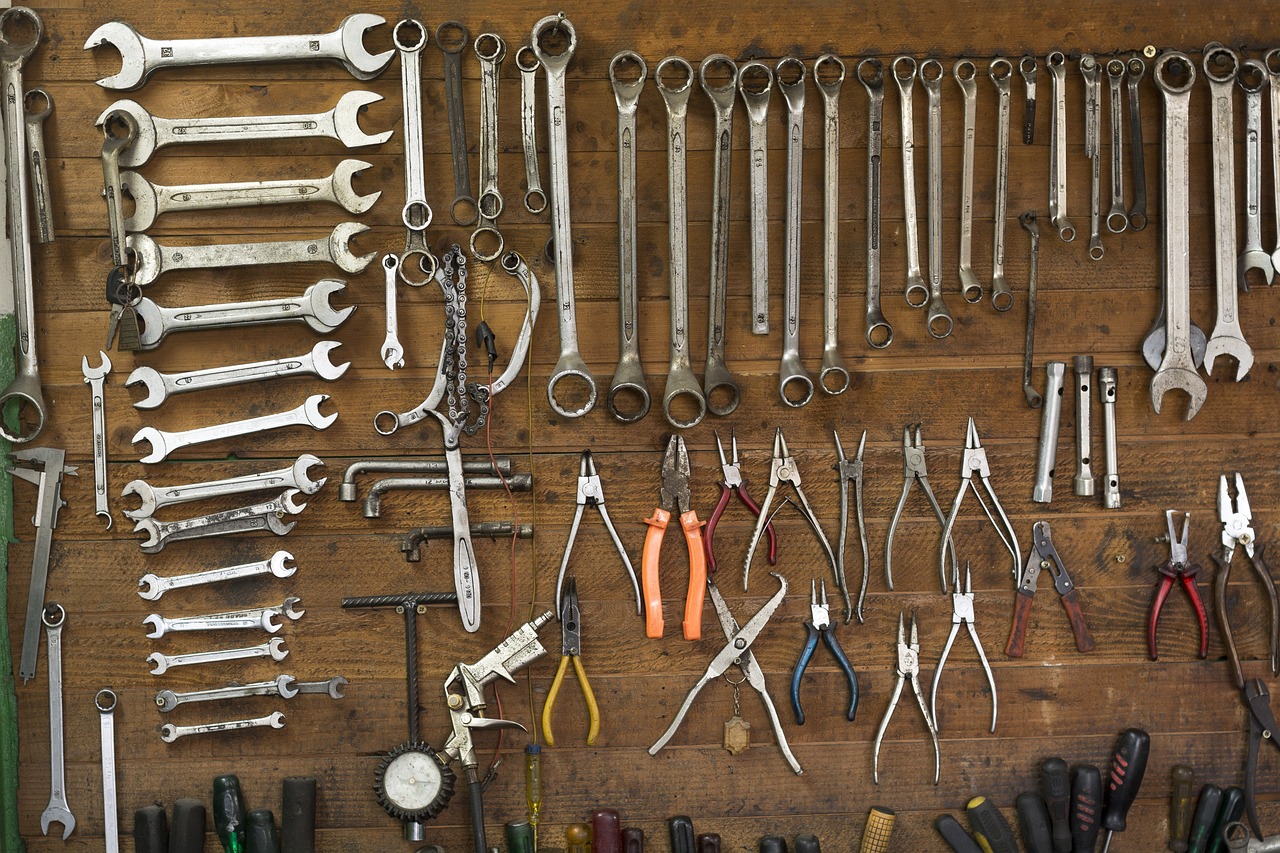
Essential Tools for Pyrography
Embarking on your pyrography journey is an exciting venture, but to truly unleash your creativity, you'll need the right tools at your disposal. Pyrography, often referred to as "wood burning," requires a unique set of equipment that can make or break your artistic experience. Think of it like a painter needing their brushes or a chef requiring their knives—each tool plays a pivotal role in the final masterpiece. So, let’s dive into the essential tools that every aspiring pyrographer should consider.
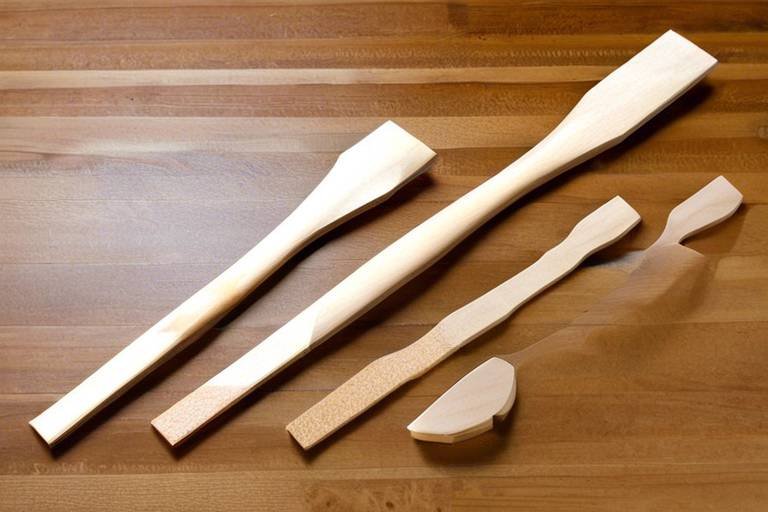
First and foremost, the pyrography pen is your primary instrument. This tool is akin to a paintbrush for a painter, allowing you to create intricate designs and patterns on wood. There are various types of pyrography pens available, ranging from simple, fixed-temperature models to more advanced, adjustable-temperature units. The latter offers greater control, enabling you to experiment with different techniques like shading and line work. Investing in a quality pyrography pen can significantly enhance your artistic capabilities.
Next up is the wood itself. The type of wood you choose will greatly influence the outcome of your project. Softwoods, such as pine and cedar, are generally easier to burn and can yield beautiful results, especially for beginners. On the other hand, hardwoods like oak and maple provide a more durable surface but can be challenging to work with due to their density. Understanding the characteristics of various wood types is crucial for achieving the desired effects in your pyrography.
Additionally, safety gear should never be overlooked. While pyrography can be a delightful craft, it does involve the use of heat, which can pose risks if not handled properly. A pair of heat-resistant gloves and safety goggles will protect you from accidental burns and smoke inhalation. Remember, safety should always come first, even in the name of art!
To give you a clearer picture, here's a quick overview of the essential tools for pyrography:
| Tool | Description |
|---|---|
| Pyrography Pen | Your primary tool for burning designs into wood. |
| Wood Selection | Choosing the right type of wood affects the burning process and final appearance. |
| Safety Gear | Protective gloves and goggles to ensure safe practice. |
| Sanding Tools | For preparing the wood surface before starting your pyrography. |
| Transfer Tools | Tools for transferring designs onto your wood surface. |
Finally, don’t forget about transfer tools. These can include carbon paper or graphite pencils, which allow you to sketch or transfer designs onto your wood surface before you start burning. This step can save you a lot of time and frustration, ensuring that your final piece reflects your original vision.
In summary, equipping yourself with the right tools is essential for any pyrography project. From the pyrography pen to the type of wood you choose and the safety gear you wear, each element contributes to the overall success of your artistic endeavors. So, gather your tools, prepare your workspace, and get ready to ignite your creativity!
- What is the best wood for beginners in pyrography? Softwoods like pine or basswood are ideal for beginners due to their ease of burning.
- Can I use any pen for pyrography? No, it's important to use a specific pyrography pen designed for wood burning to achieve the best results.
- Do I need special safety gear for pyrography? Yes, wearing heat-resistant gloves and safety goggles is recommended to protect against burns and smoke.
Choosing the Right Wood
When it comes to pyrography, the choice of wood is not just a matter of preference; it’s a critical factor that can significantly influence the outcome of your artwork. Selecting the right type of wood can mean the difference between a stunning piece of art and a frustrating experience. Different woods have distinct characteristics that affect how well they accept pyrographic techniques, their durability, and the overall aesthetic of your finished piece. So, how do you choose the right wood for your pyrography project?
First and foremost, it’s essential to consider the grain pattern of the wood. Woods with a fine, even grain, such as birch or maple, are typically preferred for pyrography because they allow for smooth, detailed designs. On the other hand, woods with a coarse grain, like oak or pine, can produce a more textured appearance, which might not be suitable for intricate designs but can add a rustic charm to simpler patterns.
Another important aspect is the color of the wood. Lighter woods like pine and aspen tend to show burn marks more prominently, which can enhance the visibility of your designs. Conversely, darker woods such as walnut or mahogany can create a beautiful contrast with the burn marks, but they may require more skill to handle effectively. This contrast can add depth and richness to your artwork, making it visually appealing.
Moreover, the density of the wood plays a crucial role in pyrography. Hardwoods, such as maple and cherry, are denser than softwoods, which can affect how the heat from the pyrography pen interacts with the surface. While hardwoods can provide a more durable finish, they may also require more time and effort to achieve the desired burn depth. Softwoods, like cedar and pine, are easier to work with, allowing for quicker results, but they may not hold up as well over time.
Here’s a quick overview of some popular wood types and their characteristics:
| Wood Type | Grain Pattern | Burn Visibility | Density |
|---|---|---|---|
| Birch | Fine | High | Medium |
| Pine | Coarse | High | Low |
| Walnut | Medium | Medium | High |
| Maple | Fine | High | High |
| Cedar | Coarse | Medium | Low |
Before you start your pyrography project, it’s also wise to consider the availability of the wood. Some woods may be exotic or hard to find, which can complicate your project if you run out mid-way. Local availability can also affect the cost, so it’s a good idea to check with local suppliers or lumberyards to find the best options that fit your budget and artistic vision.
In conclusion, choosing the right wood for pyrography is a blend of art and science. It requires understanding the properties of various woods and how they will interact with your tools and techniques. Whether you’re aiming for a delicate design or a bold statement piece, the right wood will set the foundation for your creative journey. So, take your time, explore your options, and let the wood guide your artistic expression!
- What is the best wood for beginners in pyrography? Softwoods like pine and basswood are recommended for beginners due to their ease of use and availability.
- Can I use plywood for pyrography? Yes, but ensure it is high-quality plywood without voids, as lower-quality plywood can produce uneven results.
- How do I prepare wood for pyrography? Sand the surface to a smooth finish, clean it with a damp cloth, and let it dry before starting your project.
Softwoods vs. Hardwoods
When diving into the world of pyrography, one of the first decisions you’ll face is choosing between softwoods and hardwoods. Each type of wood has its own unique characteristics that can significantly influence your artwork. Understanding these differences is crucial to achieving the best results in your pyrographic projects.
Softwoods, such as pine, cedar, and fir, are generally easier to work with due to their lower density. This means they are softer and more forgiving, making them ideal for beginners. The grains in softwoods are often more pronounced, which can add a lovely texture to your designs. However, because they are less dense, they may not hold intricate details as well as hardwoods. This could be a consideration if your pyrography style leans towards fine line work or detailed shading.
On the other hand, hardwoods like oak, maple, and cherry are denser and more durable. This density allows for greater detail in pyrographic designs, making them a preferred choice for experienced artists looking to create intricate patterns. However, the increased hardness can also make them more challenging to burn into, requiring a steady hand and a bit more experience. Additionally, hardwoods often have a finer grain, which can result in a smoother finish but may also require more preparation to ensure the surface is suitable for burning.
Here’s a quick comparison of softwoods and hardwoods to help you decide which might be best for your next pyrography project:
| Feature | Softwoods | Hardwoods |
|---|---|---|
| Density | Lower density, easier to burn | Higher density, holds detail better |
| Grain | More pronounced grain, adds texture | Finer grain, smoother finish |
| Workability | Ideal for beginners | Requires more skill and experience |
| Durability | Less durable, may warp | More durable, withstands wear |
Ultimately, the choice between softwoods and hardwoods boils down to your personal preference and the specific requirements of your project. If you’re just starting out, you might find softwoods to be more forgiving and easier to manage. However, if you're looking to challenge yourself and create more complex designs, hardwoods could be the way to go. Remember, the beauty of pyrography lies in experimentation, so don’t hesitate to try both types of wood to discover what works best for you!
- What is the best wood for beginners in pyrography? Softwoods like pine and cedar are recommended due to their ease of use.
- Can I use plywood for pyrography? Yes, but ensure it is of high quality and free of chemicals that could produce harmful fumes when burned.
- How do I prepare wood for pyrography? Sand the surface smooth, clean it to remove dust, and consider applying a wood conditioner for an even burn.
Preparing Your Wood Surface
When it comes to pyrography, the preparation of your wood surface is crucial for achieving stunning results. Think of your wood as a blank canvas; if it's not properly prepared, the final artwork may not reflect your true potential. The first step in this process is to select a suitable wood type, as different species can significantly impact the quality of your work. Once you've chosen your wood, the next step is to ensure that it is smooth and clean.
Start by sanding the surface of the wood using fine-grit sandpaper, typically around 220-grit. This will help to eliminate any rough spots or imperfections that could interfere with the burning process. Sanding not only creates a smooth texture but also opens up the wood's pores, allowing for better absorption of the pyrography marks. Remember to sand in the direction of the wood grain to avoid scratches that could detract from your design.
After sanding, it's important to clean the surface thoroughly. Dust and debris can accumulate during sanding, and if left behind, they can create unwanted blemishes in your artwork. Use a soft cloth or a tack cloth to wipe down the surface, ensuring that all particles are removed. If your wood has any existing finishes, such as varnish or paint, you’ll need to strip those away to allow for optimal burning. A chemical stripper or sandpaper can be effective for this task, but always follow safety precautions when handling chemicals.
Once your wood is clean, consider treating it with a wood conditioner. This step isn’t mandatory, but it can enhance the overall appearance of your finished piece. A conditioner helps to stabilize the wood and can prevent uneven burning, which is particularly important for softer woods. Apply the conditioner according to the manufacturer's instructions, allowing it to dry completely before you begin your pyrography work.
Finally, before you start burning, it’s a good idea to sketch your design lightly on the wood surface with a pencil. This not only serves as a guide but also allows you to visualize how your final piece will look. Keep in mind that the pencil marks will burn away during the pyrography process, so don’t worry about them being permanent. With your wood surface properly prepared, you’re now ready to unleash your creativity and dive into the mesmerizing world of pyrography!
- What type of wood is best for pyrography? Hardwoods like maple, birch, and cherry are often preferred due to their fine grain, but softwoods like pine can also work well for beginners.
- Do I need to treat the wood before pyrography? While treating is optional, using a wood conditioner can help achieve smoother burns and enhance the final appearance of your artwork.
- Can I use painted or stained wood for pyrography? It’s best to avoid painted or stained wood, as the finishes can produce unpredictable results when burned.
- How do I clean my wood after sanding? Use a tack cloth or a damp cloth to remove dust and debris before starting your pyrography project.
Basic Techniques in Pyrography
When it comes to pyrography, mastering the basic techniques is like laying the foundation for a magnificent building. Without a solid base, your artistic structure might crumble. So, let’s dive into the essential methods that every budding pyrographer should know! Understanding these techniques will not only enhance your skill set but also open up a world of creative possibilities.
The first technique to grasp is line work. This is the bread and butter of pyrography, where you create outlines and shapes using a heated pen. The key here is to maintain a steady hand and consistent pressure. Think of it as drawing with a pencil, but instead, you're using heat to burn the design into the wood. The beauty of line work is that it can range from simple outlines to intricate, detailed patterns, making it versatile for any project.
Next up is shading. This technique adds depth and dimension to your artwork, transforming flat images into lifelike representations. Shading can be achieved by varying the temperature of the pen and the speed at which you move it across the surface. For example, moving the pen slowly will create a darker shade, while quicker strokes will yield lighter tones. Imagine painting with light and shadow instead of colors—this is the essence of shading in pyrography.
Texturing is another fundamental technique that can elevate your pyrographic art. By using various tips and tools, you can create different textures that mimic natural elements like bark, fur, or fabric. For instance, a pointed tip can produce fine lines for fur, while a flat tip can create broader strokes for wood grain. Experimenting with textures can make your designs pop and give them a more tactile feel.
To help you visualize these techniques, here’s a quick comparison of the three:
| Technique | Description | Purpose |
|---|---|---|
| Line Work | Creating outlines and shapes | Forms the basis of your design |
| Shading | Adding depth through varying heat and speed | Creates dimension and realism |
| Texturing | Using different tips for varied surface effects | Mimics natural elements and adds interest |
As you practice these techniques, remember that patience is key. Just like learning to ride a bike, you might wobble a bit at first, but with time, you'll find your balance. Don’t hesitate to experiment—try combining these techniques to see what unique effects you can create. The world of pyrography is vast, and your imagination is the only limit!
To wrap up this section, let’s remember that the journey of mastering pyrography is ongoing. Each piece you create is a stepping stone to greater artistry. So grab your tools, ignite your passion, and let the wood tell your story!
- What type of wood is best for beginners in pyrography? Softwoods like pine are great for beginners due to their ease of burning and affordability.
- Do I need special safety gear for pyrography? Yes, it's advisable to wear a mask to avoid inhaling smoke and goggles to protect your eyes from flying debris.
- Can I use regular pens for pyrography? No, you need a specialized pyrography pen that can reach high temperatures for burning wood.
- How do I clean my pyrography tools? Regularly clean the tips of your pen with a damp cloth and ensure they are cooled down before handling.
Advanced Pyrography Techniques
Once you've mastered the basics of pyrography, it's time to elevate your craft by exploring advanced techniques that can truly transform your artwork. These methods not only enhance the visual appeal of your pieces but also allow for greater creativity and expression. One of the most exciting techniques is layering, which involves building up different shades and textures to create depth. Imagine painting with fire—each layer adds a new dimension, much like how a painter layers colors on a canvas. This technique can be particularly effective when creating landscapes or portraits, where shadows and highlights play a crucial role.
Another advanced method to consider is stenciling. This technique allows you to incorporate intricate designs into your pyrography projects without the need for freehand drawing. You can create your own stencils or purchase them, making it easier to achieve detailed patterns. Just think of it as using a cookie cutter for wood; it simplifies the process while ensuring precision. When using stencils, it's essential to secure them well to prevent any movement during burning. A simple spray adhesive can work wonders here!
Incorporating color into your pyrography is another thrilling avenue to explore. While traditional pyrography often relies on the natural tones of burned wood, adding color can make your artwork pop. You can use colored pencils, inks, or even paints to enhance your designs. However, it's crucial to choose the right medium that adheres well to wood and complements the burn marks. For instance, watercolor pencils can be a fantastic choice as they can be activated with water, allowing for smooth blending. Just remember to seal your work afterward to protect both the color and the pyrography details.
Combining pyrography with other artistic mediums can also yield stunning results. Think of it as a fusion of different art forms—like a symphony where each instrument adds its unique sound. You might consider pairing pyrography with painting or carving to create multidimensional pieces that captivate viewers. For example, you could carve a design into the wood and then use pyrography to add intricate details, followed by painting to bring the piece to life. This approach not only showcases your versatility but also allows for a more personalized touch.
Finally, creating custom designs is an integral part of advancing your pyrography skills. Personalizing your projects can be incredibly fulfilling and allows you to express your unique style. Start by sketching out your ideas on paper, then transfer them to your wood surface using transfer paper or carbon paper. This method ensures that your design is accurately placed before you start burning. Don't be afraid to experiment with different motifs and styles—after all, the beauty of pyrography lies in its endless possibilities!
In summary, advancing your pyrography skills involves exploring layering, stenciling, incorporating color, combining mediums, and creating custom designs. Each technique offers a new way to express your creativity, allowing you to produce breathtaking pieces that reflect your artistic vision. So, grab your tools, ignite your passion, and let the flames of creativity guide you on this exciting journey!
- What is pyrography? Pyrography is the art of decorating wood or other materials with burn marks, using a heated tool to create designs and images.
- What tools do I need to start pyrography? Essential tools include a pyrography pen, various wood types, safety gear, and optional stencils or patterns for advanced techniques.
- Can I use any type of wood for pyrography? While you can use various woods, softer woods like pine or basswood are often preferred because they burn easily and show detail well.
- How can I protect my pyrography artwork? Sealing your artwork with a protective finish, such as varnish or polyurethane, can help preserve the design and color from fading or damage.
Combining Pyrography with Other Mediums
One of the most exciting aspects of pyrography is its versatility. By combining pyrography with other artistic mediums, you can create stunning, multidimensional pieces that truly stand out. Imagine the warmth of a wooden canvas adorned with the intricate designs of pyrography, enhanced by the vibrant colors of paint or the texture of carved elements. This fusion not only broadens your creative horizons but also allows you to express your artistic vision in unique ways.
For instance, you can start with a pyrography base and then add acrylic paints to bring your designs to life. The contrast between the rich, dark lines of pyrography and the bright colors of paint creates a visually striking effect. Alternatively, you might consider incorporating mixed media elements, such as fabric or metal, to add depth and texture to your work. This approach can transform a simple piece into a complex artwork that captures the viewer's attention.
When combining mediums, it's essential to consider how each material interacts with the others. For example, if you're painting over pyrography, ensure that the paint you choose adheres well to the wood surface. A good practice is to test a small area before committing to your entire piece. Additionally, you may want to use a sealant to protect your artwork once it's complete, especially if you’ve used multiple mediums. This will help preserve the integrity of both the pyrography and any additional materials you've incorporated.
Here are some popular combinations to consider:
- Pyrography and Painting: Use watercolors or acrylics to enhance the burnt designs.
- Pyrography and Carving: Carve out sections of the wood before applying pyrography for a layered effect.
- Pyrography and Collage: Add paper or fabric elements to create a mixed media masterpiece.
By experimenting with these combinations, you can discover new techniques and styles that resonate with your artistic voice. Remember, art is all about exploration and expression. Don't be afraid to push the boundaries of traditional pyrography; let your imagination run wild! As you blend these mediums, you’ll find that each piece tells a story, showcasing not just your skill in pyrography but also your creativity in using various artistic tools.
In conclusion, combining pyrography with other mediums can elevate your woodworking projects to new heights. Whether you’re adding color, texture, or different materials, the possibilities are endless. So grab your tools, let your creativity flow, and start experimenting with the beautiful fusion of pyrography and other art forms!
Q1: Can I use any type of paint on pyrography?
A1: While you can use various paints, it's best to choose ones that are suitable for wood surfaces, such as acrylics. Always test on a small area first.
Q2: How do I seal my pyrography work after combining it with other mediums?
A2: Use a clear wood finish or sealant that is compatible with both pyrography and the other materials used. Make sure it’s dry before displaying your artwork.
Q3: What are some other mediums I can combine with pyrography?
A3: You can combine pyrography with painting, carving, collage, and even textile elements to create unique pieces.
Creating Custom Designs
Creating custom designs in pyrography is one of the most exciting aspects of this art form. It allows you to express your individuality and creativity, turning a simple piece of wood into a unique masterpiece that reflects your personal style. But how do you go about designing and transferring your ideas onto wood? Let’s break it down step by step.
First, it’s essential to gather inspiration for your design. This could come from nature, geometric patterns, or even your favorite quotes. The world around you is brimming with ideas waiting to be transformed into pyrographic art. Once you have a concept in mind, sketching it out on paper is a great way to visualize your final piece. Don't worry about perfection; the goal is to capture the essence of your idea. Think of this sketch as a roadmap for your artistic journey.
After you’ve finalized your sketch, it’s time to transfer your design onto the wood. There are several methods to achieve this:
- Carbon Transfer: This method involves placing a sheet of carbon paper between your sketch and the wood. By tracing over your design, the carbon will leave an imprint on the wood surface.
- Graphite Transfer: Similar to carbon transfer, you can rub graphite on the back of your sketch and trace over it to transfer the design onto the wood.
- Direct Drawing: If you’re confident in your drawing skills, you can directly sketch your design onto the wood with a pencil. This approach allows for more spontaneity and adjustment as you go.
Once your design is on the wood, it’s time to fire up your pyrography tool! Start with the outline of your design, using a fine tip to create clean lines. As you progress, you can switch to different tips for shading and texturing, bringing your design to life. Remember, patience is key in pyrography. Take your time to ensure each detail is executed to your satisfaction. If you make a mistake, don’t panic! Many artists embrace imperfections, turning them into unique features of their work.
After completing your pyrography, consider adding a finish to protect your artwork. A clear varnish or wood oil can enhance the wood’s natural beauty while providing a layer of protection against wear and tear. This final touch not only preserves your artwork but also adds a professional quality to your piece.
In conclusion, creating custom designs in pyrography is a rewarding process that allows for endless creativity. By gathering inspiration, transferring your designs carefully, and utilizing various pyrography techniques, you can craft stunning pieces that are truly your own. So grab that wood, unleash your creativity, and let your imagination soar!
1. What tools do I need to create custom designs in pyrography?
To start, you'll need a pyrography pen, a variety of tips, quality wood, and some basic sketching tools like pencils and paper. Optional tools include carbon paper for transferring designs and a clear finish for protecting your artwork.
2. Can I use any type of wood for pyrography?
While you can technically use any wood, softer woods like pine and basswood are generally easier to work with and provide better results for beginners. Hardwoods can also be used but may require more skill and experience.
3. How do I fix mistakes in my pyrography work?
Mistakes can often be corrected by adjusting your technique or using a lighter touch. If a mistake is significant, you can sand down the area and start over, or incorporate it into your design creatively.
4. Is it necessary to finish my pyrography artwork?
While not strictly necessary, finishing your artwork with a clear varnish or oil can protect it from damage and enhance its appearance, making your piece look more polished and professional.

Showcasing Your Pyrography Art
Once you've poured your heart and soul into creating stunning pyrography art, the next exciting step is showcasing your masterpieces. After all, what's the point of crafting beautiful pieces if they remain hidden away? Whether you're looking to impress friends and family, display your work in a gallery, or even sell your creations, there are several effective ways to present your art that can truly enhance its appeal.
First and foremost, consider the framing of your artwork. A well-chosen frame can elevate your piece and make it look more professional. Think of it like dressing up for a special occasion; the right frame can complement your art and draw attention to the intricate details of your pyrography. You can opt for simple wooden frames that echo the natural beauty of your work or go for something more ornate, depending on your style and the theme of your piece.
Next, think about how you want to display your art. Here are a few ideas to consider:
- Wall Mounting: Hang your pieces in a well-lit area where they can be appreciated from different angles.
- Tabletop Displays: Use easels or stands for smaller pieces, allowing viewers to admire them up close.
- Participate in Art Shows: Local art fairs and exhibitions are great opportunities to showcase your work and connect with other artists.
In addition to physical displays, don’t underestimate the power of the digital world. Creating a website or social media account dedicated to your pyrography art can help you reach a wider audience. Share high-quality images of your work, behind-the-scenes videos of your creative process, and engage with followers to build a community around your art. Platforms like Instagram and Pinterest are particularly visual and can help you attract potential buyers or collaborators.
If you're considering selling your work, think about promotional strategies. Here are some effective methods:
- Online Marketplaces: Websites like Etsy or eBay can provide a platform for selling your art to a global audience.
- Local Art Shops: Partner with local galleries or shops that might be interested in showcasing your work.
- Networking: Attend local craft fairs or art events to meet potential buyers and other artists.
Remember, showcasing your pyrography isn't just about the art itself; it's also about telling your story. Share your journey, the inspiration behind your pieces, and the techniques you use. This personal touch can create a deeper connection with your audience, making them more likely to appreciate and purchase your work.
Finally, consider creating a portfolio of your best pieces. This can be a physical binder or a digital collection that showcases your skills and style. A well-organized portfolio can be a powerful tool when meeting potential clients or galleries, demonstrating your versatility and commitment to the craft.
Q: How should I frame my pyrography art?
A: Choose a frame that complements your artwork. Simple wooden frames work well, but feel free to explore ornate designs that match your piece's theme.
Q: Can I sell my pyrography art online?
A: Absolutely! Platforms like Etsy, eBay, and even your own website can help you reach a wider audience for your art.
Q: What are some effective ways to promote my pyrography art?
A: Use social media to showcase your work, participate in local art shows, and network with other artists and potential buyers.
Q: How do I create a portfolio for my pyrography pieces?
A: Gather your best works and organize them in a physical binder or a digital format, highlighting your skills and unique style.
Frequently Asked Questions
- What is pyrography?
Pyrography is the art of decorating wood or other materials with burn marks resulting from the controlled application of heat. It combines creativity and craftsmanship, allowing artists to create intricate designs and patterns.
- Do I need special tools for pyrography?
Yes, to get started with pyrography, you'll need a pyrography pen, various wood types, and safety gear. The pen is essential for applying heat to create designs, while the right wood can significantly impact the final artwork.
- What type of wood is best for pyrography?
Softwoods like pine are easier to work with for beginners, but hardwoods like maple or birch offer more durability and detail in designs. The choice of wood will affect both the appearance and longevity of your artwork.
- How do I prepare the wood for pyrography?
Preparing your wood surface is crucial. Start by sanding it smooth, cleaning off any dust, and treating it if necessary. This ensures that the heat from the pyrography pen can penetrate evenly and create clear designs.
- What are some basic techniques I should learn?
Begin with fundamental techniques like line work, shading, and texturing. Mastering these basics will help you build a strong foundation for creating stunning pyrographic pieces.
- Can I combine pyrography with other art forms?
Absolutely! Pyrography can be beautifully integrated with painting, carving, and mixed media. This combination allows for unique, multidimensional artworks that truly stand out.
- How can I create custom designs for my projects?
Creating custom designs involves sketching your ideas, transferring them onto the wood, and then using your pyrography pen to bring them to life. This personalization adds a special touch to your artwork.
- What are some tips for showcasing my pyrography art?
Once your artwork is complete, consider framing it, displaying it in a well-lit area, or even promoting it online. Sharing your talent can lead to opportunities to sell your work and connect with other art enthusiasts.