Creating a Wooden Mirror Frame: A DIY Project
Have you ever looked at a plain mirror and thought, "This could use a little pizzazz?" Well, you're in luck! In this article, we're diving into the world of DIY woodworking to create a stunning wooden mirror frame that will not only elevate your space but also give you a sense of accomplishment. Imagine the satisfaction of stepping back and admiring a piece you've crafted with your own hands. This guide will take you through every step, from selecting the right materials to putting on those finishing touches. So, grab your tools, roll up your sleeves, and let's get started!
When it comes to creating a wooden mirror frame, the first thing you need to consider is the type of wood you'll be using. Selecting the appropriate wood is crucial—not just for durability, but also for achieving the look you desire. You wouldn't want a flimsy frame that falls apart, right? Here are some great options:
- Oak: Known for its strength and beautiful grain, oak is a popular choice for furniture and frames.
- Pine: A softer wood that is easy to work with, pine is budget-friendly and takes paint and stain well.
- Maple: If you're looking for a finer finish, maple offers a smooth surface and a light color that can brighten up any room.
When selecting wood, think about the overall aesthetic you want to achieve. Do you prefer a rustic vibe or something more modern? The wood you choose can set the tone for your entire project.
Before you jump into the fun part of crafting, it's essential to gather all the tools and materials you'll need. Preparing ahead can save you a lot of time and frustration later on. Here’s a quick rundown of what you’ll need:
- Wood: Choose your preferred type as discussed earlier.
- Measuring tape: For accurate measurements.
- Miter saw or hand saw: For cutting your wood pieces.
- Wood glue: To secure the joints.
- Sandpaper: To smooth out rough edges.
- Finishing materials: Paint, stain, or sealant, depending on your desired finish.
Having the right tools can make all the difference. While some tools are essential, others can enhance your crafting experience. For instance, a good quality miter saw can save you time and ensure precision, while hand tools can give you more control over smaller details.
Now, onto the nitty-gritty: measuring and cutting your wood! Accurate measurements are vital for a well-fitted mirror frame. Imagine trying to fit a square peg in a round hole—frustrating, right? To avoid this, always double-check your measurements before you cut. Here are some tips:
- Use a measuring tape to get the dimensions of your mirror.
- Mark your wood clearly with a pencil.
- Make sure to measure twice and cut once!
Once you've got your measurements down, it’s time to cut. If you're using a miter saw, set it up on a stable surface and adjust the angle for precise cuts. For those opting for hand saw techniques, ensure your cuts are steady and follow the marked lines closely.
A miter saw is a fantastic tool for making precise angled cuts, which are essential for creating corners in your frame. To set it up:
- Place your wood securely on the saw.
- Adjust the angle to your desired measurement, typically 45 degrees for corners.
- Make sure to wear safety goggles and keep your hands clear of the blade.
With a little practice, you'll become a pro at making those perfect cuts!
If you’re going old school with a hand saw, don't worry—great results are still within your reach! Here are some tips:
- Hold the saw at a comfortable angle.
- Use long, steady strokes for clean cuts.
- Keep the blade straight to avoid jagged edges.
Hand sawing can be therapeutic, and it gives you a greater connection to the material. Plus, it’s a great workout!
Once all your pieces are cut, it’s time to assemble the frame. This is where your vision starts to take shape! Use wood glue to secure the joints, and consider using clamps to hold everything in place while it dries. There are various joining methods you can use, such as butt joints or miter joints, depending on your skill level and desired look.
After assembling your frame, it’s time for the finishing touches! Applying a finish not only enhances the wood’s appearance but also protects it from wear and tear. You can choose from stains, paints, or sealants based on the look you want to achieve. For example, a rich stain can bring out the natural beauty of the wood, while paint can add a pop of color to your decor.
Deciding between staining and painting can impact the final look of your frame. Staining allows the wood grain to show through, creating a warm, natural look, while painting offers endless color options. Think about your existing decor and what will blend best.
Finally, don’t forget to apply a protective sealant! This step is crucial for longevity and will keep your frame looking fresh for years to come. Make sure to follow the instructions on your sealant for the best results. A well-sealed frame will resist scratches and moisture, ensuring your hard work stands the test of time.
Q: How long does it take to make a wooden mirror frame?
A: The time varies based on your experience and the tools you have, but you can expect to spend a few hours on the project, including drying time for glue and finishes.
Q: Can I use reclaimed wood for my frame?
A: Absolutely! Reclaimed wood adds character and is an eco-friendly option. Just make sure to inspect it for any damage before you start.
Q: What type of mirror should I use for my frame?
A: A standard mirror from a craft store works well, but you can also use a custom-cut mirror from a glass shop for a more tailored fit.
Creating a wooden mirror frame can be a rewarding experience that not only beautifies your space but also showcases your craftsmanship. So, what are you waiting for? Dive into this DIY project and let your creativity shine!

Choosing the Right Wood
When it comes to crafting a stunning wooden mirror frame, the choice of wood is not just a matter of preference—it's a pivotal decision that can significantly affect both the durability and aesthetic appeal of your project. Imagine walking into a room and being immediately drawn to a beautifully framed mirror that complements the decor perfectly; that’s the power of the right wood. So, how do you select the best option? Let’s dive into some of the most popular types of wood used for mirror frames, along with their unique characteristics.
First on the list is pine. This softwood is often favored for its affordability and ease of use. Pine is lightweight, making it simple to work with, especially for beginners. Its natural grain can be quite beautiful, but it can also be prone to dents and scratches. However, with the right finish, pine can be transformed into a stunning piece that enhances any room.
Another excellent choice is oak. Known for its strength and durability, oak is a hardwood that can withstand the test of time. It boasts a beautiful grain pattern that can add a touch of elegance to your mirror frame. Although it may be a bit more challenging to work with due to its density, the end result is often worth the effort. Oak can be stained in various colors, allowing you to customize the look to fit your style.
If you're looking for something a bit more exotic, consider teak. This wood is renowned for its natural oils, which make it resistant to moisture and insects. Teak's rich color and unique grain patterns can create a luxurious look for your mirror frame. However, it comes at a higher price point, so it’s essential to weigh your budget against your design aspirations.
For those who want a sustainable option, bamboo is a fantastic alternative. Technically a grass, bamboo is incredibly strong and lightweight. It grows rapidly, making it an eco-friendly choice. Its unique appearance can bring a modern twist to your mirror frame, and it can be stained or left natural for a fresh, minimalist look.
To help you visualize these options, here’s a quick comparison of the woods mentioned:
| Type of Wood | Durability | Cost | Ease of Use | Appearance |
|---|---|---|---|---|
| Pine | Medium | Low | Easy | Light grain |
| Oak | High | Medium | Moderate | Beautiful grain |
| Teak | Very High | High | Challenging | Rich color |
| Bamboo | Medium | Medium | Easy | Modern look |
Ultimately, the right wood for your mirror frame will depend on your personal style, budget, and the look you wish to achieve. Whether you gravitate towards the rustic charm of pine, the classic elegance of oak, the luxurious feel of teak, or the modern appeal of bamboo, each wood type has its unique story to tell. So, take your time, explore your options, and choose a wood that resonates with you.
- What type of wood is best for beginners? Pine is often recommended due to its affordability and ease of use.
- How do I know if the wood is of good quality? Look for straight grains, no knots, and a smooth surface.
- Can I mix different types of wood in my project? Yes, mixing woods can create unique contrasts, but ensure they complement each other.
Essential Tools and Materials
Before diving into the exciting world of creating your own wooden mirror frame, it's essential to gather all the necessary tools and materials. Think of this phase as laying the groundwork for a successful DIY adventure. Just like a chef needs the right ingredients to whip up a masterpiece, you too need to ensure you have everything at your fingertips to craft a stunning frame.
First and foremost, you'll need to select a type of wood that suits your design vision. Popular choices include pine, oak, and maple. Each of these woods has its unique characteristics; for instance, pine is lightweight and easy to work with, while oak offers a robust and timeless appeal. When choosing your wood, consider the color, grain, and durability to match your personal style and the decor of the space where the mirror will hang.
Now, let’s talk tools. Here’s a brief overview of what you’ll need:
- Miter Saw - Perfect for making precise angled cuts.
- Hand Saw - A reliable alternative if you prefer a more traditional approach.
- Drill - Essential for making holes for screws or dowels.
- Screwdriver - To secure your frame together.
- Sandpaper - For smoothing out rough edges and surfaces.
- Wood Glue - A must-have for strong joints.
- Clamps - To hold your pieces together while the glue dries.
In addition to these essentials, there are some optional tools that can enhance your crafting experience. For example, a router can add decorative edges to your frame, while a jigsaw can help you create unique shapes. If you're feeling adventurous, think about incorporating some embellishments or carvings to give your mirror frame a personal touch.
Don’t forget about the finishing materials either! Once your frame is assembled, you’ll want to protect and beautify it. This involves choosing stains, paints, or sealants. Each option has its benefits; for instance, stains can enhance the natural beauty of the wood, while paints can add a pop of color. Sealants are crucial for protecting your frame from scratches and moisture, ensuring it stands the test of time.
In summary, having the right tools and materials is the cornerstone of any successful DIY project. By carefully selecting your wood, gathering the necessary tools, and thinking about your finishing options, you’ll set yourself up for a rewarding experience. So, roll up your sleeves, because your beautiful wooden mirror frame is just a project away!
Q: What type of wood is best for beginners?
A: Pine is often recommended for beginners due to its softness and ease of handling. It's forgiving for mistakes and readily available.
Q: Can I use recycled wood for my mirror frame?
A: Absolutely! Recycled wood can add character and uniqueness to your project. Just make sure it’s in good condition and free of pests.
Q: How long does it take for the glue to dry?
A: Most wood glues take about 30 minutes to set, but it's best to let it cure for at least 24 hours for maximum strength.
Q: Is it necessary to sand the wood before painting or staining?
A: Yes, sanding is crucial as it creates a smooth surface for better adhesion of paint or stain, resulting in a more professional finish.

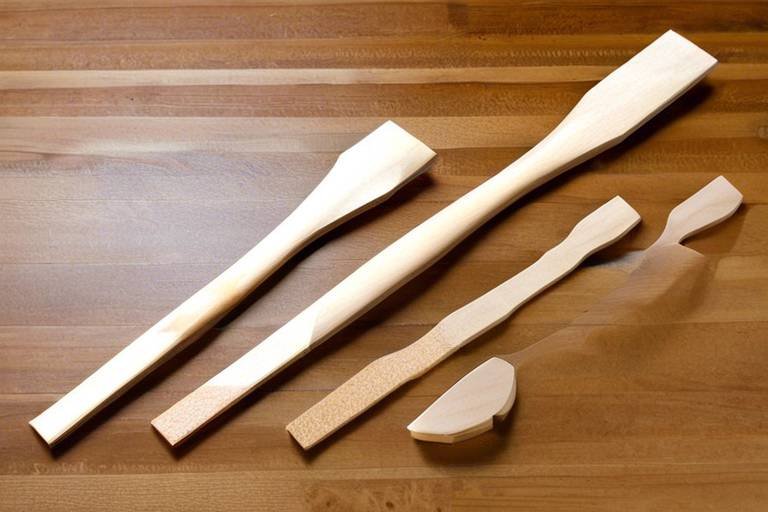
Measuring and Cutting Wood
When it comes to crafting a stunning wooden mirror frame, measuring and cutting wood accurately is absolutely vital. Think of it like baking a cake; if you don’t measure your ingredients correctly, you might end up with a disaster instead of a delicious treat! So, let’s dive into the steps that will ensure your mirror frame fits perfectly and looks fabulous.
First and foremost, gather your materials. You’ll need a tape measure, a square, and a pencil for marking your cuts. These tools will help you achieve precision, which is key. You wouldn’t want a frame that’s crooked or uneven, right? Start by measuring the dimensions of your mirror. Once you have those measurements, it’s time to translate them into your wood pieces. Make sure to take into account the thickness of the wood and the design you want for your frame. A well-planned cut list can save you a lot of headaches later on.
Next, let’s talk about the actual cutting. If you’re using a power tool like a miter saw, set it up on a stable surface. Adjust the angle for your cuts based on your design preferences. For instance, if you want a classic look, you might opt for 45-degree angles at the corners. Always remember to measure twice and cut once—this old adage is a lifesaver! For those who prefer a more hands-on approach, hand saw techniques can also yield fantastic results. Just ensure your cuts are steady and controlled.
Here’s a quick comparison of the two methods:
| Method | Pros | Cons |
|---|---|---|
| Miter Saw |
|
|
| Hand Saw |
|
|
After you’ve made your cuts, it’s essential to check the fit of each piece before proceeding to assembly. Lay out the pieces on a flat surface and see how they come together. This is your chance to make any adjustments before the final assembly. If you notice any discrepancies, don’t panic! You can always sand down edges for a better fit. The key is to be patient and take your time; rushing through this process can lead to mistakes that might be difficult to fix later.
In summary, measuring and cutting wood is a foundational step in creating your wooden mirror frame. With the right tools and techniques, you can achieve clean, precise cuts that will make your frame not only functional but also a stunning piece of art in your home. So grab your tools, measure carefully, and let your creativity shine!
Using a Miter Saw
When it comes to crafting a wooden mirror frame, precision is key, and a miter saw can be your best friend in achieving those perfect angles. This powerful tool is designed specifically for making accurate crosscuts and angled cuts, which are essential for a seamless frame. Imagine trying to fit together pieces of a puzzle with mismatched edges; that’s what a poorly cut frame would look like. So, let’s dive into how to set up and use a miter saw effectively.
First, ensure your workspace is organized and safe. A clean area allows you to focus on the task at hand without distractions. Before you even turn on the saw, take a moment to familiarize yourself with its parts. The blade, fence, and base are your main components. The blade does the cutting, the fence helps guide your wood for straight cuts, and the base provides stability. Make sure the blade is sharp; a dull blade can lead to uneven cuts and can be dangerous.
Next, let’s talk about measuring your wood. Accurate measurements can’t be overstated. Use a reliable tape measure and mark your cut lines clearly with a pencil. Remember, “measure twice, cut once” is a mantra worth repeating! Once you have your wood marked, it’s time to set up the miter saw. Adjust the angle of the saw to match the cuts you need—most mirror frames require a 45-degree angle for the corners. This is where the magic happens, transforming your straight pieces into beautifully angled corners.
Now, it's time for the actual cutting. Place your wood against the fence, ensuring it’s snug and secure. When you’re ready, pull the saw down smoothly and let the blade do the work. Avoid forcing the saw through the wood; instead, let it glide through at its own pace. Once you’ve made your cut, lift the saw back up and check your work. If you’ve done everything right, you should have a clean, precise angle that will fit perfectly when you assemble the frame.
However, using a miter saw isn’t just about cutting; it’s about safety too. Always wear protective eyewear to shield your eyes from sawdust and debris. Additionally, keep your hands clear of the blade’s path, and never reach over the saw while it’s running. A moment of inattention can lead to serious injuries.
In summary, a miter saw is an invaluable tool for anyone looking to create a wooden mirror frame. With its ability to make precise angled cuts, it can help you achieve a professional-looking finish that will enhance the beauty of your home. So, gear up, measure carefully, and let that miter saw work its magic!
- What is the best type of wood for a mirror frame? Popular choices include pine, oak, and maple due to their durability and aesthetic appeal.
- How do I ensure my cuts are straight? Use a miter saw with a sturdy base and fence, and double-check your measurements before cutting.
- Can I use a miter saw for other projects? Absolutely! Miter saws are versatile and can be used for various woodworking projects, not just mirror frames.

Hand Saw Techniques
When it comes to woodworking, using a hand saw can feel like stepping back in time, but fear not! This traditional tool is still a fantastic option for crafting a wooden mirror frame, especially if you're looking for a more hands-on experience. While power tools are great for speed, hand saws offer precision and a certain charm that can make your project feel more personal. So, let’s dive into some effective techniques that will help you achieve clean, accurate cuts.
First off, it's important to select the right type of hand saw for your project. There are various saws available, each designed for specific types of cuts. For instance, a crosscut saw is ideal for cutting across the grain of the wood, while a rip saw is meant for cutting with the grain. If you're unsure about which to choose, a back saw is a versatile option that can handle both types of cuts with finesse.
Before you start cutting, preparation is key. Make sure to measure your wood accurately and mark your cut lines clearly. This is where a square can come in handy, ensuring your lines are straight and true. When you’re ready to cut, position your wood securely on a stable surface or workbench. Using clamps can help keep your material in place, preventing any unwanted movement during the sawing process.
Now, let’s talk about technique. When using a hand saw, maintain a comfortable stance—your feet should be shoulder-width apart for balance. Grip the saw handle firmly, and start your cut with a few gentle strokes to create a groove along your marked line. This initial groove will guide your saw and help prevent any slipping. Once you have that groove established, you can increase your speed. Remember to use long, smooth strokes, letting the saw do the work rather than forcing it. This not only provides a cleaner cut but also reduces fatigue on your arms.
As you approach the end of your cut, be cautious. The last few strokes can cause the wood to splinter, so slow down and apply gentle pressure. If you're cutting a piece of wood that is not fully supported, you might want to place a scrap piece underneath to prevent tear-out. This will ensure a clean finish on both sides of your cut.
After you've completed your cuts, take a moment to inspect your work. If you notice any rough edges, don’t worry! You can easily smooth them out using sandpaper. Start with a coarser grit to remove any major imperfections, and then switch to a finer grit to achieve a polished look. This finishing touch is crucial, as it not only enhances the appearance of your frame but also prepares it for the next steps in your project.
In summary, while hand saws may seem old-fashioned, they can be incredibly effective when used correctly. With the right technique, you’ll find that they offer a level of control and precision that can elevate your woodworking skills. So, grab that hand saw, and let your creativity flow!
- What type of hand saw is best for beginners? A back saw is often recommended for beginners due to its versatility and ease of use.
- How do I maintain my hand saw? Regularly clean the blade and ensure it remains sharp. You can use a file to sharpen the teeth if they become dull.
- Can I use a hand saw for thicker wood? Yes, but you may need a larger saw designed for deeper cuts, such as a rip saw.

Assembling the Frame
Assembling your wooden mirror frame is where the magic truly happens! After all the hard work of measuring and cutting, it’s time to bring those pieces together into a beautiful, cohesive design. Think of this step as the moment when all the individual ingredients of a recipe come together to create a delicious dish. Without proper assembly, even the most stunning materials can fall flat. So, let’s dive into the nitty-gritty of frame assembly!
First, you’ll want to lay out all your cut pieces on a flat surface. This not only helps you visualize the final product but also ensures that you have everything you need before you start gluing or nailing. It’s like setting the stage before a performance—everything must be in its right place! When laying out your pieces, make sure to check for any imperfections or rough edges that might need sanding down to ensure a smooth finish.
Now, onto the joining methods! There are several ways to connect the pieces of your frame, and the method you choose can significantly affect the frame's stability and appearance. Here are a few popular techniques:
- Wood Glue: A strong adhesive that works well for joining edges. Apply a generous amount to the joint and clamp it for a few hours to ensure a tight bond.
- Corner Brackets: These metal brackets can provide extra support, especially for larger frames. They are easy to install and can be hidden from view with a little creativity.
- Wood Dowels: For a more traditional approach, you can drill holes and insert wooden dowels to connect the corners. This method requires precise drilling but results in a clean, seamless look.
Once you’ve chosen your joining method, it’s time to start assembling! Begin with the corners of the frame, as they are the most critical points for stability. If you’re using wood glue, apply it to the edges, press them together, and secure them with clamps. This is where patience pays off; let the glue cure fully before proceeding to the next step. It’s like letting a cake cool before frosting—it’s crucial for the best outcome!
After the corners are secured, you can attach the longer sides of the frame. If you opted for corner brackets or dowels, now is the time to install them. Make sure everything is square—use a carpenter’s square to check that your angles are correct. This step is essential; a crooked frame can be an eyesore and may not hang properly later on.
Finally, once everything is assembled and secure, take a moment to admire your handiwork! Before moving on to the finishing touches, check for any gaps or uneven areas. A little sanding or touch-up can go a long way in ensuring your frame looks professional. Remember, this is your creation, and the attention to detail will make all the difference!
Q: What type of wood is best for a mirror frame?
A: Hardwoods like oak or maple are excellent choices due to their durability and aesthetic appeal. However, softer woods like pine can also work well if you prefer a more rustic look.
Q: How do I ensure my frame is square?
A: Use a carpenter’s square during assembly to check your angles. It’s vital to make sure all corners are 90 degrees for a professional finish.
Q: Can I use screws instead of glue?
A: Yes, screws can provide a very sturdy connection. Just be sure to pre-drill your holes to prevent the wood from splitting.
Q: How long should I let the glue dry?
A: Most wood glues require 24 hours for a full cure, but check the manufacturer’s instructions for specifics.

Finishing Touches
After you've painstakingly assembled your wooden mirror frame, it's time to add those all-important finishing touches that will elevate your creation from good to absolutely stunning. Think of this stage as the cherry on top of a delicious sundae; it’s what makes your frame truly pop and protects it for years to come. Whether you want a rustic charm or a sleek modern look, the finish you choose can dramatically change the character of your frame.
First things first, let's talk about finishes. There are several options available, and each comes with its own set of benefits. You can choose to stain the wood, which enhances its natural grain and color, or you might prefer to paint it for a more vibrant, uniform look. Both methods have their merits, and the choice ultimately depends on your personal style and the overall aesthetic you want to achieve. For instance, if you want to maintain the natural beauty of the wood, a stain is your best bet. On the other hand, if you’re going for a bold statement, painting could be the way to go.
When considering your options, it's also essential to think about the durability of the finish. Wood is susceptible to wear and tear, especially in high-traffic areas. Therefore, applying a sealant after staining or painting is crucial. A good sealant acts like a protective shield, guarding against moisture, scratches, and fading. It's like putting on a raincoat before heading out on a drizzly day; you want to keep your frame looking fresh and new for as long as possible.
Here’s a quick comparison to help you decide between staining and painting:
| Feature | Staining | Painting |
|---|---|---|
| Appearance | Enhances natural wood grain | Provides solid color finish |
| Durability | Less protective without sealant | Highly protective with proper sealant |
| Maintenance | Requires reapplication over time | May chip or fade, needing touch-ups |
Once you've decided on your finish, applying it is the next step. If you're staining, use a clean cloth or brush to apply the stain evenly across the surface. Remember to wipe away any excess to avoid a sticky mess. For painting, a high-quality brush or roller will do wonders in achieving a smooth finish. Don’t rush this process; patience is key. Allow each coat to dry thoroughly before applying a second coat, if necessary. It’s like baking a cake; if you rush it, you might end up with a soggy bottom!
After your frame is stained or painted, it's time to apply that all-important protective sealant. This step cannot be overlooked. A sealant will not only preserve the beauty of your work but also extend its lifespan. Use a brush or spray to apply the sealant evenly, ensuring every nook and cranny is covered. Allow it to dry completely, and then consider giving it a light sand with fine-grit paper for an ultra-smooth finish.
In conclusion, the finishing touches you apply to your wooden mirror frame can make a world of difference. Whether you opt for staining, painting, or a combination of both, remember that the goal is to enhance the beauty of your frame while providing it with the protection it needs. So take your time, enjoy the process, and let your creativity shine!
Here are some common questions you might have as you embark on your wooden mirror frame project:
- How long does it take for the finish to dry? - Drying times can vary based on the type of finish used. Generally, stains take about 2-4 hours to dry, while paint can take 4-8 hours.
- Can I use a sealant over paint? - Absolutely! A sealant can provide an extra layer of protection over paint, ensuring your frame stays beautiful for years.
- What type of wood is best for a mirror frame? - Hardwoods like oak and maple are excellent choices due to their durability and aesthetic appeal, but softwoods like pine can also work well for a more rustic look.

Staining vs. Painting
When it comes to finishing your wooden mirror frame, the choice between staining and painting can significantly impact the final look of your masterpiece. Both methods offer unique benefits and aesthetic qualities, but your decision should align with your personal style and the overall design of your space. Let's dive into the details!
Staining enhances the natural beauty of the wood, allowing the grain to shine through. It’s perfect for those who appreciate the organic look of wood and want to maintain its character. Stains come in various shades, from light to dark, enabling you to complement or contrast with your existing decor. Moreover, staining not only beautifies the wood but also provides a layer of protection against moisture and UV rays, which is crucial for longevity.
On the other hand, painting offers a completely different aesthetic. It allows for a broader range of colors and finishes, from matte to glossy, giving you the flexibility to match any color scheme. If you’re looking for a bold statement piece or want to incorporate trendy colors, painting is the way to go. However, it’s important to note that paint can sometimes obscure the wood grain, which may not appeal to everyone.
To help you decide, here’s a quick comparison of staining and painting:
| Feature | Staining | Painting |
|---|---|---|
| Appearance | Enhances natural wood grain | Variety of colors, may obscure grain |
| Durability | Protects against moisture and UV | Good durability, but may chip |
| Application | Easy to apply, often requires fewer coats | May require primer and multiple coats |
| Maintenance | May need reapplication over time | Can be easily touched up |
Ultimately, the choice between staining and painting comes down to your personal preference and the look you want to achieve. If you love the warmth and texture of wood, staining might be your best bet. But if you’re feeling adventurous and want to make a bold statement, painting is the way to go. Whichever route you choose, the end result will surely be a stunning addition to your home!
- Can I stain over paint? No, staining over paint won’t yield the desired effect, as the stain won’t penetrate the paint.
- How long does it take for stain or paint to dry? Generally, stains dry within 1-2 hours, while paint may take several hours to dry, depending on the type.
- Is one method more environmentally friendly than the other? Stains often contain fewer volatile organic compounds (VOCs) than paints, making them a more eco-friendly choice.
Applying a Protective Sealant
After you’ve meticulously crafted your wooden mirror frame, it’s time to give it the protection it deserves. Applying a protective sealant not only enhances the beauty of the wood but also acts as a barrier against moisture, dirt, and everyday wear and tear. Think of it as a superhero cape for your mirror frame, shielding it from the elements and ensuring it remains stunning for years to come.
Before diving into the application process, it’s essential to choose the right type of sealant. There are various options available, including polyurethane, varnish, and lacquer. Each has its unique properties:
| Sealant Type | Characteristics | Best For |
|---|---|---|
| Polyurethane | Durable, water-resistant, available in gloss or satin finishes | High-traffic areas, moisture-prone spaces |
| Varnish | Flexible, UV resistant, enhances natural wood grain | Indoor furniture, decorative pieces |
| Lacquer | Fast-drying, high-gloss finish, easy to apply | Quick projects, professional finish |
Once you’ve selected your sealant, preparation is key. Start by ensuring your frame is clean and free from dust or debris. A smooth surface will help the sealant adhere better, so if necessary, lightly sand the frame with fine-grit sandpaper. After sanding, wipe it down with a damp cloth to remove any residual dust. This step is crucial because even the tiniest speck of dust can ruin the perfect finish.
Now, let’s talk about application. Using a high-quality brush or foam applicator, apply the sealant in thin, even coats. It’s better to apply multiple thin layers rather than one thick layer, which can lead to drips and an uneven finish. Allow each coat to dry completely before applying the next one. Depending on the type of sealant you choose, drying times may vary, so be sure to check the manufacturer’s instructions.
After you’ve achieved your desired level of protection (usually two to three coats should do the trick), give your frame a final light sanding with very fine sandpaper between coats. This not only smooths out any imperfections but also helps the subsequent layers adhere better. Once you’re satisfied with the finish, let the final coat cure for at least 24 hours before handling or hanging your mirror.
In summary, applying a protective sealant is a vital step in ensuring your wooden mirror frame stands the test of time. By choosing the right sealant, preparing your surface properly, and applying it with care, you’ll create a beautiful and durable piece that enhances your living space.
- How often should I reapply the sealant? Depending on the wear and tear, reapply every 3-5 years or as needed.
- Can I use a sealant on painted wood? Yes, but make sure the paint is fully cured before applying the sealant.
- What if I accidentally apply too much sealant? Wipe off excess sealant with a clean cloth before it dries to avoid an uneven finish.
Frequently Asked Questions
- What type of wood is best for a mirror frame?
When it comes to choosing wood for your mirror frame, hardwoods like oak, maple, or cherry are excellent choices due to their durability and aesthetic appeal. If you're looking for something more budget-friendly, softwoods like pine can also work well, especially if you plan to paint or stain them.
- What tools do I need for this DIY project?
To create a wooden mirror frame, you'll need a few essential tools: a miter saw for precise cuts, a hand saw if you prefer traditional methods, a measuring tape, wood glue, clamps, and sandpaper. Optional tools like a router or a drill can enhance your project but aren't strictly necessary.
- How do I ensure accurate measurements and cuts?
Accurate measurements are crucial for a well-fitted frame. Always measure twice and cut once! Use a measuring tape and a square to mark your cuts clearly. When using a miter saw, set the angles carefully to ensure each piece fits together perfectly.
- What are the best joining methods for assembling the frame?
There are several ways to join your frame pieces, including using wood glue and clamps for a simple, strong bond. You can also use corner brackets or dowels for added stability. Choose a method that suits your skill level and the design of your frame.
- Should I stain or paint my mirror frame?
This really depends on the look you're going for! Staining enhances the natural grain of the wood, giving it a rich, warm finish, while painting offers a wide range of color options. Consider the overall decor of your space when making your choice.
- How do I apply a protective sealant?
Applying a protective sealant is essential for the longevity of your frame. Start by sanding the surface to ensure it's smooth. Then, apply the sealant with a brush, following the manufacturer’s instructions. Make sure to let it dry completely before hanging your mirror.