
Starting Your First Quilting Project: Valuable Tips
Embarking on your first quilting project can feel like stepping into a new world filled with vibrant colors, intricate patterns, and endless possibilities. It’s not just about sewing fabric together; it’s about creating something uniquely yours, a piece that tells a story and holds memories. Whether you're looking to make a cozy quilt for your bed or a decorative wall hanging, the journey of quilting is both rewarding and enjoyable. In this article, we’ll dive deep into essential tips that will help you navigate the exciting yet sometimes overwhelming process of starting your first quilting project. From selecting the right fabric to mastering various techniques, we’ve got you covered.
When it comes to quilting, the fabric you choose is like the canvas for a painter. It sets the tone for your entire project! You’ll encounter a variety of fabric types, each with its own characteristics. Cotton is the most popular choice due to its durability and ease of handling, making it perfect for beginners. However, don’t shy away from exploring blends or specialty fabrics like flannel or batik, which can add a unique flair to your quilt. When selecting fabric, consider the following:
- Weight: Heavier fabrics may be more challenging to work with, while lighter ones can be easier to manipulate.
- Pattern: Bold patterns can make a statement, but they might overshadow smaller details in your design.
- Color: Choose colors that resonate with you and fit the theme of your project.
Ultimately, the right fabric will not only enhance the aesthetic of your quilt but also make the sewing process enjoyable.
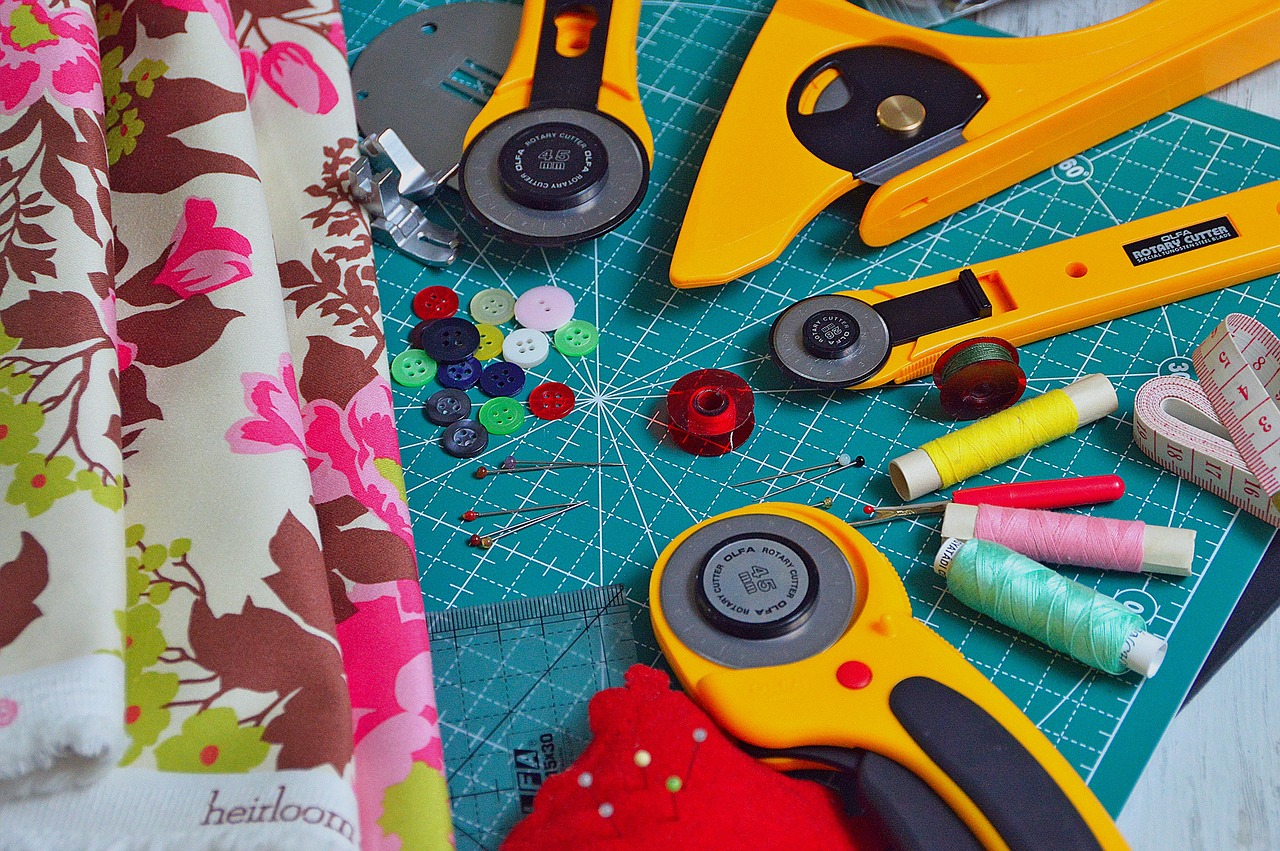
Before you dive into the world of quilting, it’s crucial to gather the right tools and supplies. Think of your tools as the instruments of a musician; having the right ones can make all the difference in your performance. Here’s a quick rundown of must-have supplies:
| Tool | Purpose |
|---|---|
| Rotary Cutter | For precise cutting of fabric layers. |
| Cutting Mat | Protects your surfaces and provides a grid for accurate measurements. |
| Quilting Ruler | Helps in measuring and cutting fabric accurately. |
| Sewing Machine | Essential for piecing together your quilt. |
| Thread | Choose a strong, quality thread that matches your fabric. |
Having these tools at your disposal will not only streamline your process but also enhance your overall quilting experience.
Now that you have your materials ready, it’s time to familiarize yourself with different quilting techniques. Think of these techniques as the brush strokes of an artist; each one contributes to the final masterpiece. Here are some basic methods to get you started:
- Piecing: This is the fundamental technique where you sew together pieces of fabric to create the quilt top.
- Appliqué: This technique involves sewing a piece of fabric onto another fabric, adding a decorative element.
- Quilting Styles: You can choose between hand quilting, machine quilting, or even tying your quilt.
By understanding these techniques, you can decide which ones resonate with your style and how they can be incorporated into your project.
Piecing is the backbone of quilting, and mastering it will empower you to create stunning quilt tops. Start with simple straight seams to build your confidence. As you progress, you can explore more advanced methods, such as curved piecing or Y-seams, which can add complexity and beauty to your designs. Remember, practice makes perfect, so don’t be afraid to experiment!
Appliqué is like adding jewelry to your quilt; it enhances its beauty and intricacy. Begin with basic shapes and gradually move on to more complex designs. A few tips for achieving clean edges include using fusible webbing and a sharp needle. With a little practice, you’ll be able to create professional-looking appliqué that will make your quilt stand out.
Choosing a pattern is one of the most exciting parts of quilting! It’s like picking the theme for a party. You want something that resonates with you and reflects your personality. Look for beginner-friendly patterns that are simple yet beautiful. Websites, quilting books, and local quilt shops can be great sources of inspiration. Don’t hesitate to adapt existing designs to make them your own; after all, your quilt should be a reflection of you!
Creating a quilt sandwich is a vital step in the quilting process. It involves layering your quilt top, batting, and backing fabric. This step ensures that everything stays in place while you quilt. Take your time to smooth out any wrinkles, as a well-prepared quilt sandwich will lead to a more professional finish.
Proper pinning and basting methods are essential for keeping your layers in place. Consider using safety pins or basting spray to secure your quilt sandwich. The goal is to prevent any shifting during the quilting process, which can lead to uneven stitches and frustration. A well-pinned quilt is a happy quilt!
Deciding between machine and hand quilting can feel like choosing between a sports car and a vintage bicycle; both have their charm and advantages. Machine quilting is faster and allows for intricate designs, while hand quilting offers a personal touch and a meditative experience. Consider your preferences and the time you have available to help you make the best choice for your project.
Once your quilt is complete, it’s time to add those all-important finishing touches. Binding your quilt is like framing a painting; it gives it a polished look. You can choose from various binding methods, including straight, bias, or even piped binding. Don’t forget to label your quilt with your name and the date; it’s a lovely way to document your work. Lastly, proper care and maintenance will ensure that your masterpiece lasts for years to come. Wash it gently and store it properly to keep it looking fresh!
Q: What is the best fabric for beginners?
A: Cotton is highly recommended for beginners due to its ease of use and availability.
Q: How long does it take to complete a quilt?
A: It varies based on the complexity of the design and your skill level, but a simple quilt can take anywhere from a few days to several weeks.
Q: Do I need an expensive sewing machine to quilt?
A: While a good quality machine is beneficial, many affordable options are suitable for beginners.
Q: Can I quilt without a pattern?
A: Absolutely! Many quilters enjoy creating their own designs, so feel free to get creative!
Choosing the Right Fabric
When embarking on your first quilting project, the fabric you choose is like the canvas for a painter. It's the foundation upon which your creativity will flourish! Selecting the appropriate fabric can be both exciting and overwhelming, especially with the myriad of options available. To simplify this process, let's dive into the different types of fabrics and their characteristics that will help you make an informed decision.
First off, consider the fabric's weight. Quilting fabrics are generally categorized as lightweight, medium-weight, and heavyweight. For beginners, medium-weight cotton fabric is often the best choice due to its versatility and ease of handling. It holds its shape well and is less likely to fray, making it perfect for piecing together quilt tops. However, if you're feeling adventurous, you might want to explore other fabric types such as flannel, which adds warmth and texture to your quilts, or even batiks that offer vibrant colors and unique patterns.
Next, think about the print and color of the fabric. This is where your personal style shines! Whether you prefer bold patterns or subtle hues, the fabric you choose should resonate with your vision for the quilt. Remember, contrasting colors can create stunning visual effects, while harmonious colors can provide a calm and cohesive look. Don't hesitate to mix different prints and textures; just ensure they complement each other to avoid a chaotic appearance.
Another crucial factor is the fabric's durability. Quilts are often cherished heirlooms that endure years of use and washing. Therefore, selecting high-quality fabric is essential. Look for 100% cotton fabrics that are pre-washed to prevent shrinkage later on. You might also want to consider fabrics that are labeled as "quilt shop quality," as they tend to be more durable and colorfast, ensuring your quilt maintains its beauty over time.
As you explore your options, keep in mind the texture of the fabric. Different textures can add depth and interest to your quilt. For instance, combining smooth cotton with textured fabrics like minky or linen can create a delightful tactile experience. However, be cautious when mixing textures, as some may behave differently during the quilting process. Always test a small piece before diving in!
Before making a final decision, it’s wise to test swatches. Purchase small cuts of fabric and sew them together to see how they interact with one another. This will give you a feel for how they work together and help you visualize the final product. Additionally, consider the scale of the prints. Large prints can dominate a quilt, while smaller prints may get lost, especially in intricate designs. Finding the right balance is key to achieving a stunning quilt.
In summary, choosing the right fabric for your quilting project involves considering weight, print, color, durability, texture, and scale. Take your time, explore different options, and trust your instincts. After all, quilting is not just about the end result; it’s about the journey of creation and the joy that comes with it!
- What type of fabric is best for beginners? Medium-weight cotton is highly recommended due to its versatility and ease of handling.
- Can I use fabric blends for quilting? While cotton blends can be used, it's best to stick with 100% cotton for durability and ease of sewing.
- How do I prevent my fabric from fraying? Pre-washing your fabric and using a zigzag stitch or pinking shears on the edges can help prevent fraying.

Essential Tools and Supplies
When it comes to quilting, having the right tools and supplies can make all the difference between a frustrating experience and a joyful one. Think of your quilting tools as your trusty sidekicks; they help you navigate through the creative process and ensure that your quilt turns out just the way you envisioned it. So, what do you really need to get started? Let’s dive into the essential items that will set you up for success!
First and foremost, you’ll need a good sewing machine. While it’s possible to quilt by hand, a sewing machine can save you a ton of time and effort, especially for beginners. Look for a machine that offers a variety of stitches and has a reliable feed system. Brands like Singer, Brother, and Janome are popular among quilters for their user-friendly features and affordability.
Next up, cutting tools are essential for precise fabric pieces. A rotary cutter is a must-have for any quilter. It’s like a pizza cutter but for fabric! Pair it with a self-healing cutting mat and a clear acrylic ruler. These tools will help you measure and cut your fabric accurately, ensuring that your quilt pieces fit together perfectly.
In addition to the cutting tools, a quality iron is crucial for pressing your seams flat. A well-pressed seam can make a world of difference in the final look of your quilt. Choose an iron with a steam function to help remove stubborn wrinkles, and don’t forget to keep a pressing cloth handy to protect your fabric from direct heat.
Now, let’s talk about fabric! You’ll want to gather a variety of fabrics in different colors and patterns that inspire you. Cotton fabric is the go-to choice for quilting due to its durability and ease of handling. Keep in mind that fabric quality can vary, so investing in high-quality cotton will yield better results. You might also want to consider pre-cuts, which are convenient bundles of fabric already cut into squares or strips, making it easier to start your project.
Don’t overlook the importance of thread! The right thread can make or break your quilting project. Opt for 100% cotton thread for piecing and quilting, as it blends well with cotton fabric and provides excellent strength. Additionally, having a variety of thread colors on hand will allow you to match your stitches to your fabric seamlessly.
Finally, let’s not forget about the little things that can enhance your quilting experience. Here’s a quick rundown of some additional supplies you might find useful:
- Safety pins or basting spray: These help hold your quilt layers together while you sew.
- Quilting gloves: These can give you better grip and control while maneuvering your quilt through the sewing machine.
- Seam ripper: Mistakes happen, and having a seam ripper on hand will help you fix them quickly.
- Fabric markers or chalk: These are great for marking your fabric without leaving permanent marks.
With these essential tools and supplies in your quilting arsenal, you’ll be well on your way to creating beautiful quilts that showcase your personal style and creativity. Remember, every great quilter started somewhere, so don’t be afraid to experiment and find what works best for you!
Q: What is the best sewing machine for beginners?
A: Look for a machine that is user-friendly, has a variety of stitch options, and is within your budget. Brands like Brother and Singer offer great options for beginners.
Q: How much fabric do I need for my first quilt?
A: It depends on the size of the quilt you want to make. A lap quilt typically requires around 3-4 yards of fabric, while a twin-size quilt may need 6-8 yards. Always check your pattern for specific requirements!
Q: Can I use any type of fabric for quilting?
A: While you can technically use any fabric, cotton is highly recommended due to its durability and ease of handling. Avoid stretchy fabrics like knits, as they can be challenging to work with.

Understanding Quilting Techniques
When it comes to quilting, understanding the various techniques is like having a treasure map—it guides you to create stunning pieces of art! As a beginner, it’s essential to familiarize yourself with these techniques, as they form the backbone of your quilting journey. Think of quilting as a recipe; each technique adds a unique flavor to your final dish. Whether you're piecing together fabric or applying decorative elements, knowing the basics will make your experience more enjoyable and fulfilling.
One of the primary techniques you’ll encounter is piecing. This method involves sewing together different fabric pieces to create a quilt top. It’s fundamental because it sets the stage for the entire quilt. Imagine piecing as assembling a jigsaw puzzle; each piece must fit perfectly to reveal the beautiful picture you envision. There are various piecing methods, including straight seams, which are great for beginners, and more advanced techniques like curved piecing, which can add an exciting twist to your designs.
Another essential technique is appliqué. This method allows you to add intricate designs to your quilt by sewing smaller pieces of fabric onto a larger background. Think of it as adding frosting to a cake—it's the decorative touch that makes your quilt stand out! There are several styles of appliqué, such as raw-edge, which gives a more casual look, and needle-turn, which creates a polished finish. As you explore appliqué, you’ll find that it opens up a world of creativity, enabling you to express your personal style.
Now, let’s not forget about quilting styles. Once you've assembled your quilt top and added any appliqué, it's time to decide how you'll quilt it. There are numerous styles to choose from, including free-motion quilting, where you guide the fabric under the needle freely, and straight-line quilting, which offers a more structured look. Each style brings its own charm, so consider what resonates with you and the overall aesthetic you wish to achieve.
To help visualize these techniques, here’s a brief overview:
| Technique | Description | Skill Level |
|---|---|---|
| Piecing | Sewing together fabric pieces to create a quilt top. | Beginner |
| Appliqué | Adding fabric shapes onto a background for decorative effects. | Intermediate |
| Free-motion Quilting | Quilting without a guide, allowing for creative patterns. | Advanced |
| Straight-line Quilting | Creating straight lines for a clean and structured appearance. | Beginner |
As you embark on your quilting adventure, remember that practice makes perfect. Don’t be afraid to experiment with different techniques. Each stitch you make is a step toward mastering the art of quilting. You might even discover your unique style along the way! So grab your fabric, gather your tools, and let your creativity flow. The world of quilting is waiting for you!
- What is the best fabric for beginners? Cotton fabric is highly recommended for beginners due to its ease of handling and wide variety of patterns.
- How long does it take to complete a quilt? The time varies based on the complexity of the design and your skill level, but a simple quilt can take anywhere from a few days to several weeks.
- Do I need a special sewing machine for quilting? While a standard sewing machine can work, a machine with a quilting foot and a larger throat space can make the process easier.

Piecing Techniques
When it comes to quilting, piecing is the art of sewing together different pieces of fabric to create a cohesive quilt top. Think of it as assembling a jigsaw puzzle, where each piece contributes to the overall picture. As a beginner, mastering piecing techniques is crucial because it lays the foundation for all your future quilting projects. There are several methods you can explore, each with its unique charm and challenges.
One of the most common piecing techniques is the straight seam. This straightforward method involves sewing two fabric pieces together along a straight line. To achieve a clean finish, it’s essential to use a consistent seam allowance—usually 1/4 inch is standard in quilting. A handy tip is to use a sewing machine foot designed for quilting, which often has a guide to help maintain this seam allowance. It’s like having a personal coach guiding you along the way!
As you grow more comfortable with straight seams, you might want to experiment with interlocking seams. This technique allows you to create intricate designs by sewing pieces together in a way that they fit snugly against one another, much like a lock and key. It’s a fantastic way to add depth and interest to your quilt. Don’t worry if it feels a bit challenging at first; practice makes perfect, and soon you’ll be piecing like a pro!
For those looking to add a bit of flair, consider curved piecing. This method involves sewing pieces of fabric together along a curve, which can create stunning designs. While it may seem daunting, with the right tools and a bit of practice, you can master this technique. A good tip is to use a template for your curves; this will help you cut your fabric accurately and sew with confidence. Remember, every quilter was once a beginner, so don’t be afraid to make mistakes along the way!
To help you visualize these techniques, here’s a simple comparison table:
| Technique | Description | Difficulty Level |
|---|---|---|
| Straight Seams | Sewing two pieces of fabric together along a straight line. | Easy |
| Interlocking Seams | Fitting pieces together snugly for intricate designs. | Medium |
| Curved Piecing | Sewing fabric pieces together along a curve. | Advanced |
In summary, piecing techniques are the heart and soul of quilting. By starting with basic straight seams and gradually incorporating more complex methods like interlocking and curved piecing, you can create beautiful quilt tops that showcase your unique style. Remember, quilting is not just about the finished product; it’s about enjoying the journey and expressing your creativity along the way. So grab your fabric, thread, and sewing machine, and let the piecing adventure begin!
- What is the best fabric for beginners? Cotton fabric is highly recommended due to its ease of use and availability.
- How do I maintain a consistent seam allowance? Using a quilting foot with a guide can help you keep your seam allowance uniform.
- Can I mix different fabric types? While it’s possible, it’s best to stick with similar fabric types for a more cohesive look.
Appliqué Basics
Appliqué is like the icing on the cake when it comes to quilting—it's that delightful decorative element that can truly elevate your project! If you’re new to quilting, understanding the basics of appliqué will open up a world of creative possibilities. Essentially, appliqué involves sewing a piece of fabric onto a larger piece to create a design or pattern. This technique can be applied in various styles, each offering its own unique flair. Imagine transforming a simple quilt into a stunning masterpiece with just a few fabric pieces!
When diving into appliqué, you'll want to consider a few essential styles. The most common types include:
- Raw Edge Appliqué: This is the easiest and quickest method, where the edges of the fabric are left unturned. It creates a casual, modern look, but be mindful as it can fray over time.
- Turned Edge Appliqué: Here, the edges of the fabric are folded under before being stitched down, resulting in a clean and polished finish. This method is perfect for those who want their quilts to have a professional touch.
- Reverse Appliqué: This technique involves layering fabrics and cutting away the top layer to reveal the fabric underneath. It’s a bit more advanced but can yield stunning results!
To achieve beautiful appliqué, you’ll need a few tools in your arsenal. A good pair of sharp scissors is a must for precise cutting, while a fabric marker will help you trace your designs onto your fabric. Additionally, using fusible web can make your life easier by adhering your appliqué pieces to the quilt top without the need for pinning! Just remember to choose a fusible web that suits your fabric, as some are better for delicate materials.
One of the key aspects of successful appliqué is mastering your stitching technique. You can choose to hand stitch or use a sewing machine—both have their pros and cons. Hand stitching allows for more control and can be very relaxing, while machine stitching is faster and can cover larger areas quickly. If you're using a machine, a zigzag stitch or a satin stitch can provide a lovely finish around the edges of your appliqué pieces.
As you embark on your appliqué journey, don’t hesitate to experiment! Mix and match different fabrics, colors, and patterns to find what resonates with your style. Remember, quilting is all about expressing yourself and having fun. So, grab your fabric, unleash your creativity, and let your appliqué pieces tell a story on your quilt!
1. What is the best fabric for appliqué?
Cotton is generally the best choice for appliqué due to its versatility and ease of handling. However, you can also experiment with other fabrics like felt or wool for different textures.
2. How do I prevent my appliqué edges from fraying?
Using a turned edge appliqué method or applying a fusible web can help prevent fraying. Additionally, you can finish the edges with a zigzag stitch or a satin stitch for added durability.
3. Can I use my sewing machine for appliqué?
Absolutely! A sewing machine can speed up the process and provide a consistent stitch. Just make sure to choose the right stitch type for your desired finish.
4. Is appliqué suitable for beginners?
Yes! Appliqué can be a great way for beginners to add creativity to their quilts without needing advanced sewing skills. Start with simple shapes and gradually work your way up.
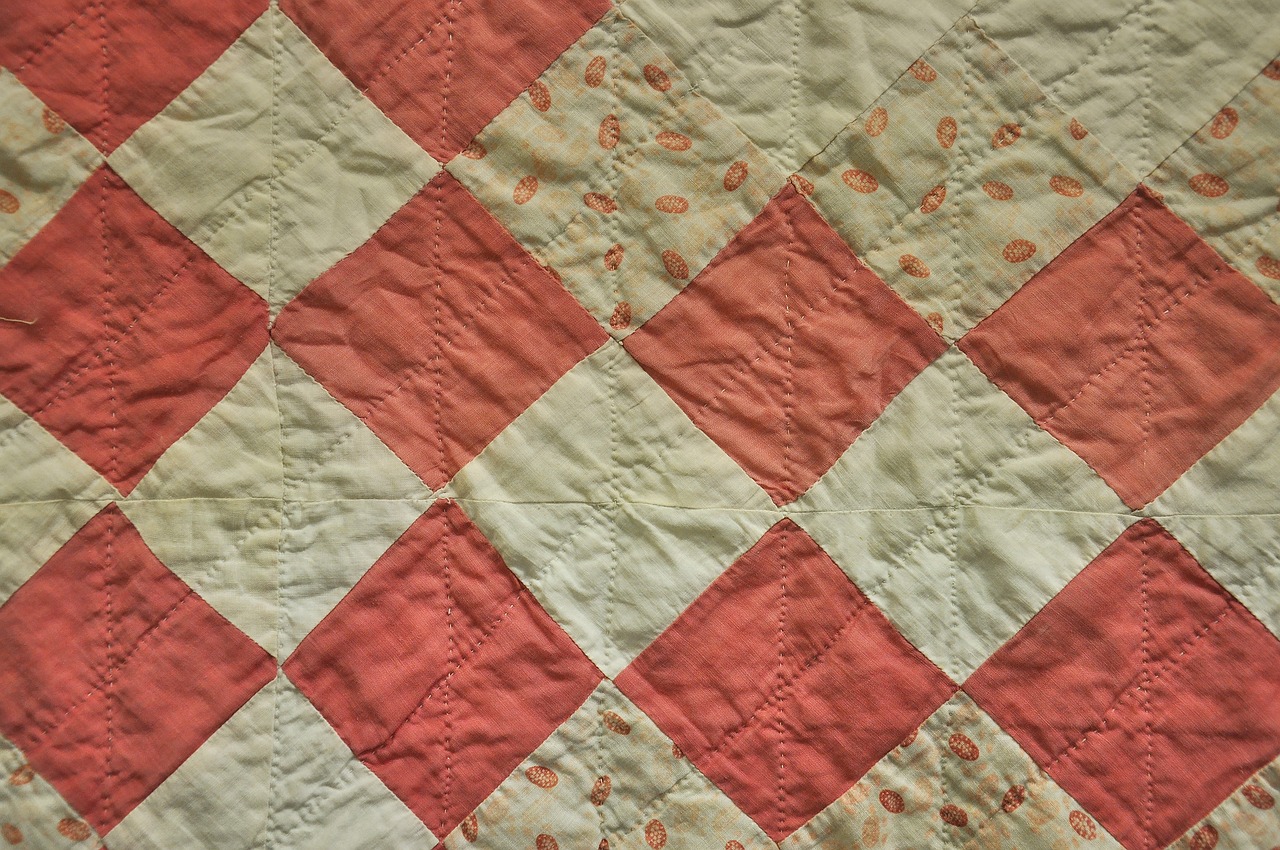
Quilting Patterns and Designs
Choosing a pattern is one of the most exciting and creative parts of your quilting journey. It’s like picking the perfect recipe for a delicious meal; the right pattern can turn a simple quilt into a stunning masterpiece. As a beginner, you might feel a bit overwhelmed with the myriad of options available, but don’t fret! Let’s break it down together.
First off, consider what inspires you. Is it the vibrant colors of a floral fabric, the geometric shapes of modern designs, or perhaps the nostalgia of traditional quilts? Your inspiration can guide you in selecting a pattern that resonates with your personal style. If you’re unsure where to start, browsing quilting magazines, websites, or social media platforms like Pinterest can spark some ideas. You might find a pattern that just calls out to you!
When selecting a pattern, it’s important to choose designs that are suitable for your skill level. As a beginner, you might want to start with simpler patterns that focus on basic shapes and techniques. Patterns labeled as “beginner-friendly” often have clear instructions and straightforward piecing methods, making the process less daunting. For instance, patterns that utilize squares, rectangles, or simple triangles are great starting points. You can find many free patterns online, which can be a fantastic way to practice without a huge financial commitment.
Another tip is to think about the size of your quilt. Are you aiming for a cozy lap quilt or a larger bed quilt? The size can influence the complexity of the pattern you choose. Smaller quilts can allow for more intricate designs, while larger quilts might benefit from simpler patterns that can be completed more quickly. Additionally, consider how the quilt will be used; if it’s going to be a playmat for kids, you might want to choose a pattern that is fun and colorful.
Once you’ve settled on a pattern, it’s time to adapt it to match your unique touch. Don’t hesitate to experiment with color combinations or fabric types. Maybe you want to swap out a solid color for a fun print or mix and match fabrics to create a scrappy look. The beauty of quilting is that it allows for personal expression, so let your creativity shine! If you're feeling adventurous, you can even combine elements from different patterns to create something entirely new.
To help you visualize your options, here’s a simple table outlining some popular quilt patterns for beginners along with their characteristics:
| Pattern Name | Difficulty Level | Key Features |
|---|---|---|
| Nine Patch | Easy | Uses simple squares; great for practicing piecing. |
| Log Cabin | Medium | Versatile design; can create various layouts. |
| Flying Geese | Medium | Dynamic shapes; adds movement to your quilt. |
| Simple Stripes | Easy | Quick to sew; perfect for showcasing fabric prints. |
In the end, remember that quilting is as much about the journey as it is about the finished product. Don’t rush the process; enjoy each stitch and the creativity that comes with it. The more you practice, the more confident you’ll become in your abilities, and soon you’ll be designing your own patterns! So grab your fabric, choose a design that excites you, and let’s get quilting!
- What is the best fabric to start with for quilting? Cotton fabric is highly recommended for beginners due to its ease of handling and availability in a wide variety of prints.
- How do I choose the right pattern for my skill level? Look for patterns labeled as “beginner-friendly” or those that utilize basic shapes like squares and triangles.
- Can I modify a quilting pattern? Absolutely! Feel free to change colors, fabrics, or even combine elements from different patterns to make it your own.

Preparing Your Quilt Sandwich
Creating a quilt sandwich is one of the most vital steps in the quilting process. Think of it as assembling a delicious sandwich where each layer contributes to the final flavor and texture of your creation. In quilting, the "sandwich" consists of three key components: the quilt top, the batting, and the backing. Each layer plays a crucial role in the overall look and feel of your quilt, so let’s dive into how to prepare each layer for a smooth and successful quilting experience.
First, you’ll want to lay out your quilt top, which is the decorative side featuring your chosen fabrics and designs. Make sure it’s pressed and free of wrinkles, as any creases can affect the final outcome. Next, you’ll need to choose your batting, which is the middle layer that provides warmth and loft. Batting comes in various materials such as cotton, polyester, or a blend of both. Each type has its own unique characteristics. For example, cotton batting gives a soft, vintage feel, while polyester provides a bit more loft and resilience.
Once you have your batting selected, it’s time to prepare the backing, which is the layer that will be on the back of your quilt. This fabric should be larger than your quilt top to allow for some wiggle room as you quilt. A solid color or a subtle pattern works well for backing, as it can beautifully complement the design of your quilt top without overpowering it.
Now that you have all your layers ready, it’s essential to assemble them correctly. Here’s a simple step-by-step process:
- Start by laying the backing fabric right side down on a flat surface.
- Next, place the batting on top of the backing.
- Finally, add the quilt top right side up on top of the batting.
After layering, it’s crucial to ensure everything is smooth and flat. You can use a large table or the floor for this process. If you notice any wrinkles or bubbles, gently smooth them out to avoid issues later on. Once your layers are perfectly aligned, it’s time to secure them in place. This is where pinning and basting come into play, which we’ll discuss in the next section. Properly securing your quilt sandwich is essential for a hassle-free quilting experience, as it prevents shifting while you sew.
In summary, preparing your quilt sandwich is a foundational step that can make or break your quilting project. By carefully selecting your materials and ensuring each layer is properly laid out and secured, you’re setting yourself up for success. Remember, the more attention you give to this stage, the smoother the quilting process will be. Happy quilting!

Pinning and Basting Techniques
When it comes to quilting, pinning and basting are two crucial techniques that can make or break your project. Think of these methods as the glue that holds your quilt layers together, ensuring they stay aligned while you sew. It’s like assembling a sandwich; if the layers aren’t properly stacked, you’ll end up with a messy bite instead of a delicious treat! So, let’s dive into the nitty-gritty of these essential techniques.
First off, let’s talk about pinning. This method involves using pins to secure the layers of your quilt—your quilt top, batting, and backing—together. Start by laying your quilt top face up on a flat surface, followed by the batting, and then the backing, which should be placed face down. It’s important to ensure that everything is smooth and flat, as wrinkles can cause issues later on. Now, grab your pins and start inserting them at regular intervals, about 4 to 6 inches apart. This spacing helps to keep everything in place without creating too much bulk. Remember, the goal is to keep your layers from shifting while you sew, so don’t skimp on the pins!
Next, we have basting, which is essentially a more permanent way of securing the layers together. You can baste your quilt using one of three methods: hand basting, spray basting, or using a basting stitch on your sewing machine. Each method has its own perks, so let’s break them down:
| Method | Description | Pros | Cons |
|---|---|---|---|
| Hand Basting | Using a long running stitch to secure layers | Great for precision and control | Time-consuming |
| Spray Basting | Using adhesive spray to bond layers temporarily | Quick and easy application | Can be messy and may require ventilation |
| Basting Stitch | Using a long stitch length on your sewing machine | Fast and effective for large quilts | Can be difficult to remove stitches later |
Each of these methods has its place, and the choice largely depends on your personal preference and the size of your quilt. For larger quilts, many quilters prefer spray basting due to its speed, while hand basting is often favored for smaller projects where precision is key.
Once you’ve pinned or basted your quilt sandwich, it’s time to start quilting! But before you jump in, take a moment to double-check everything. Is your quilt sandwich flat? Are the layers aligned? A little bit of extra care at this stage can save you a world of hassle later on. After all, nobody wants to spend hours sewing only to discover that their layers shifted and created unsightly puckers!
In summary, pinning and basting are essential techniques that ensure your quilt layers stay together during the sewing process. By taking the time to properly secure your quilt sandwich, you set yourself up for a smoother, more enjoyable quilting experience. So, grab those pins, choose your basting method, and get ready to bring your quilt to life!
- What is the best method for basting a quilt? The best method depends on your comfort level and the size of the quilt. Spray basting is quick for large quilts, while hand basting allows for more precision.
- How far apart should I pin my quilt layers? Pins should be placed about 4 to 6 inches apart to effectively hold the layers together without creating bulk.
- Can I use regular pins for quilting? Yes, but consider using quilting pins, which are longer and designed to hold multiple layers more effectively.

Machine vs. Hand Quilting
When it comes to quilting, one of the most debated topics among enthusiasts is whether to use a machine or to stick with hand quilting. Each method has its own unique charm and challenges, and the choice often boils down to personal preference, skill level, and the specific project at hand. Let's dive deeper into the pros and cons of both techniques to help you make an informed decision.
Machine quilting is often favored for its speed and efficiency. If you're working on a large quilt or have a tight deadline, a sewing machine can help you complete your project in a fraction of the time it would take by hand. With the right machine, you can achieve consistent stitches and intricate designs that might be difficult to replicate by hand. Plus, many modern sewing machines come equipped with special features like walking feet and quilting stitches, which can make the process even smoother.
On the flip side, hand quilting is a time-honored tradition that many quilters cherish for its personal touch and meditative quality. There's something incredibly satisfying about stitching each piece by hand, allowing for greater control over your work. Hand quilting can also give your quilt a unique texture and appearance that machine quilting sometimes lacks. It’s a great way to connect with your craft, and many quilters find it to be a relaxing and rewarding experience.
To help you visualize the differences, here’s a quick comparison:
| Aspect | Machine Quilting | Hand Quilting |
|---|---|---|
| Speed | Fast and efficient | Time-consuming |
| Control | Less control over intricate designs | Greater control over stitching |
| Texture | Uniform stitches | Unique texture and character |
| Learning Curve | Requires knowledge of machine operation | Requires practice for even stitching |
| Personal Satisfaction | Less personal connection | Highly rewarding and fulfilling |
Ultimately, the choice between machine and hand quilting depends on your individual style and the goals you have for your quilt. If you’re looking for something quick and efficient, machine quilting might be the way to go. However, if you want to immerse yourself in the process and create something truly personal, hand quilting could be your best bet. Why not try both methods on different projects? This way, you can discover what resonates with you the most and enhance your quilting skills along the way!
- Can I combine machine and hand quilting? Absolutely! Many quilters use both techniques in the same project, using machine quilting for the majority of the quilt and adding hand-stitched details for a personal touch.
- Which method is better for beginners? It often depends on the individual's comfort level. Machine quilting may be easier for those who are already familiar with sewing machines, while hand quilting can be a gentle introduction to the craft.
- How do I choose the right thread for my quilting method? For machine quilting, use a high-quality polyester or cotton thread that matches your fabric. For hand quilting, opt for a thread that is slightly thicker, such as hand quilting thread, to ensure durability.
Finishing Touches
Congratulations! You've made it to the final stages of your quilting journey, and now it's time to add those all-important that will elevate your quilt from a simple project to a cherished masterpiece. This part of the process is just as crucial as the initial piecing and quilting, and it can truly make or break the overall look and feel of your quilt. Let’s dive into some key elements you should consider as you wrap up your project.
First off, binding is one of the most significant finishing touches. It not only frames your quilt beautifully but also protects the edges from fraying. There are several methods to bind your quilt, including the traditional double-fold binding, which offers a neat and durable finish. You can also explore the option of machine binding or hand binding, depending on your preference and the look you want to achieve. Remember, the choice of fabric for your binding can dramatically influence the overall aesthetic, so don’t hesitate to get creative and choose a fabric that complements or contrasts with your quilt top.
Additionally, consider adding a label to your quilt. This small yet significant detail not only personalizes your creation but also provides important information like the date of completion, the name of the quilt, and even a special message or dedication. Labels can be made from fabric or paper, and they can be sewn on or attached with fabric glue. This is a great way to leave your mark on your work and create a lasting memory.
After binding and labeling, it’s time to think about the care and maintenance of your quilt. Proper care is essential to ensure your quilt remains beautiful for years to come. Always wash your quilt on a gentle cycle with cold water and a mild detergent. Avoid bleach and harsh chemicals, as these can damage the fabric and colors. When drying, opt for a low heat setting or air dry to prevent shrinkage and maintain the integrity of your quilt. If you want to keep your quilt looking fresh, consider storing it in a cool, dry place away from direct sunlight to prevent fading.
Lastly, let’s not forget about the joy of sharing your creation! Whether it’s a gift for a loved one or a display piece for your home, showing off your quilt can be incredibly rewarding. Consider hosting a small gathering to unveil your quilt or share your experience on social media. It’s a wonderful way to inspire others to take up quilting and to celebrate the hard work and creativity that went into your project.
- How do I choose the right fabric for binding? Look for a fabric that complements your quilt top; it can be a solid color, a print, or a contrasting fabric. Just ensure it’s durable enough to withstand wear and tear.
- What’s the best way to label my quilt? You can use fabric markers, embroidery, or printed fabric labels. Just make sure it’s securely attached and legible!
- How should I wash my quilt? Wash it on a gentle cycle with cold water and mild detergent, and air dry or tumble dry on low heat.
- Can I use a quilt as a wall hanging? Absolutely! Just be sure to use a hanging sleeve or clips to display it properly.
Frequently Asked Questions
- What type of fabric should I use for my first quilt?
For beginners, it's best to start with 100% cotton fabric. It's easy to work with, comes in a variety of colors and patterns, and holds up well over time. Plus, it’s forgiving if you make a mistake!
- What essential tools do I need to start quilting?
You’ll need a few basic tools to get going. These include a rotary cutter, cutting mat, quilting ruler, sewing machine, and pins. Having these supplies will make your quilting journey much smoother and more enjoyable!
- What is the difference between machine quilting and hand quilting?
Machine quilting is faster and allows for more intricate designs, while hand quilting can be more meditative and offers a traditional touch. It really depends on your personal preference and the time you want to invest.
- How do I prepare my quilt sandwich?
To create a quilt sandwich, layer your quilt top, batting, and backing fabric. Make sure everything is smooth and flat. Use pins or basting spray to secure the layers together, ensuring they don’t shift while you quilt!
- What are some beginner-friendly quilting techniques?
As a newbie, focus on basic piecing techniques like straight seams. Once you feel comfortable, you can explore appliqué and other methods. Remember, practice makes perfect!
- How do I finish the edges of my quilt?
You can finish your quilt edges using binding. This involves sewing a strip of fabric around the edges of the quilt. There are several methods for binding, including machine sewing and hand sewing, so choose one that suits your skill level!
- How can I find inspiration for my quilt design?
Look for inspiration everywhere! Browse quilting magazines, visit fabric stores, or check out social media platforms like Pinterest and Instagram. You’ll be amazed at the creativity you can find!
- What should I do if I make a mistake while quilting?
Don’t panic! Mistakes are part of the learning process. Depending on the error, you may be able to fix it by unpicking the stitches or adjusting your fabric. Just remember, every quilter has been there!
- How do I care for my finished quilt?
To keep your quilt looking great, wash it gently in cold water and tumble dry on low. Avoid harsh detergents and fabric softeners, as they can damage the fabric over time.


