Carving Wooden Flowers: A Beginner's Guide
Welcome to the enchanting world of wooden flower carving! If you've ever marveled at the intricate beauty of wooden flowers and thought, "I’d love to create something like that," then you're in the right place. This guide offers essential insights for beginners interested in the art of carving wooden flowers, covering tools, techniques, and tips to create beautiful and intricate designs. Carving wooden flowers is not just a hobby; it's a journey of creativity and craftsmanship that allows you to express your artistic side while connecting with nature. So, grab your tools and let’s dive into the magical realm of woodworking!
Before you start carving, it’s crucial to have the right tools at your disposal. Think of your tools as your trusted companions on this creative adventure. Here’s a comprehensive overview of the basic tools required for wooden flower carving:
- Carving Knives: These are your primary tools. A good quality carving knife will help you make precise cuts and intricate details.
- Chisels: Useful for removing larger chunks of wood and creating shapes. A variety of sizes will give you more flexibility.
- Safety Equipment: Always prioritize safety! Invest in a good pair of gloves and goggles to protect yourself while working.
- Sharpening Tools: Keep your tools sharp for the best results. A sharpening stone or strop will be essential in maintaining your knives and chisels.
Having the right tools not only makes the process easier but also enhances the quality of your work. Remember, a craftsman is only as good as his tools!
Next up is selecting the perfect wood for your flower carving project. Not all woods are created equal, and the type you choose can significantly affect the final outcome of your piece. Here are some characteristics to consider:
- Grain: Look for wood with a fine, even grain. Woods like basswood and butternut are popular choices for beginners due to their softness and ease of carving.
- Hardness: Softer woods are generally easier to carve, making them ideal for beginners. Hardwoods can be more challenging but offer stunning results.
- Availability: Choose wood that is readily available in your area. This will save you time and money in sourcing materials.
Experimenting with different types of wood will not only help you find your favorite but also expand your skills as a woodworker.
Now that you have your tools and wood, it’s time to dive into some fundamental carving techniques. Mastering these techniques will serve as the foundation for creating detailed wooden flower designs. Here are two essential techniques to get you started:
- Whittling: This is the process of removing thin shavings of wood to shape your flower. It requires patience and precision, but the results are worth it!
- Relief Carving: This technique involves carving into the surface of the wood to create a three-dimensional effect. It’s perfect for adding depth to your flowers.
Practice these techniques on scrap wood before moving on to your final project. Remember, practice makes perfect!
Before you start carving, take some time to plan and sketch your flower designs. This step is crucial! Visualizing your piece will help you understand the shapes and details you want to achieve. Grab a pencil and paper, and let your imagination flow. Don't worry about making it perfect; just get your ideas down. You can refine them later. A well-thought-out design can save you a lot of time and effort during the carving process.
Now, let’s talk about the step-by-step process of carving a wooden flower. This structured approach will guide you from rough shaping to fine detailing:
1. Rough Shaping: Start by removing large sections of wood to form the basic shape of your flower.
2. Refine the Shape: Gradually work on the details, smoothing out edges and curves.
3. Add Details: Use smaller tools to carve petals and other intricate features.
4. Fine Detailing: Pay attention to the smallest details to bring your flower to life.
Remember to take your time and enjoy the process. Each step is an opportunity to express your creativity!
Once your flower is carved, it’s time for the finishing touches. This is where your piece truly comes to life! Sanding, painting, and sealing your carved flowers will enhance their appearance and durability. Use fine-grit sandpaper to smooth the surface, and consider applying a wood stain or paint to add color. Finally, seal your masterpiece with a clear coat to protect it from the elements. A polished look showcases your craftsmanship and makes your creation shine!
As a beginner, it’s easy to make mistakes while carving. Here are some common pitfalls to watch out for:
- Rushing the Process: Take your time! Carving is an art that requires patience.
- Neglecting Safety: Always prioritize safety by using protective gear and keeping your workspace organized.
- Ignoring Tool Maintenance: Keep your tools sharp and clean for the best results.
By being aware of these mistakes, you can ensure a smoother carving experience and enjoy the process even more!
Finally, if you're looking for inspiration or resources to further develop your skills, consider exploring the following:
- Books: There are many excellent books on wooden flower carving that can provide you with techniques and ideas.
- Online Tutorials: Websites and YouTube channels dedicated to woodworking can be incredibly helpful.
- Community Groups: Joining a local or online carving community can offer support and inspiration from fellow enthusiasts.
Remember, the journey of carving wooden flowers is as beautiful as the flowers themselves. Enjoy every moment, and don’t hesitate to share your creations with others!
Q: What is the best wood for beginners?
A: Basswood is highly recommended due to its softness and fine grain, making it easy to carve.
Q: Do I need special tools to start carving?
A: While specialized tools can help, a basic carving knife and some chisels are sufficient for beginners.
Q: How long does it take to carve a wooden flower?
A: The time varies depending on the complexity of the design and your skill level, but expect to spend several hours on a detailed piece.
Q: Can I paint my carved flowers?
A: Absolutely! Painting can add a beautiful touch to your carved flowers, just remember to seal them afterward.
Essential Tools for Carving
When embarking on your journey into the delightful world of wooden flower carving, having the right tools is not just a convenience; it’s an absolute necessity. Imagine trying to paint a masterpiece without a brush—frustrating, right? Similarly, the tools you choose can make or break your experience. So, let’s dive into the essential tools that will help you craft those stunning floral designs.
At the heart of your carving toolkit are the knives and chisels. A whittling knife is a must-have for any beginner. Its sharp, curved blade allows for precise cuts and intricate details, making it perfect for shaping petals and leaves. You might also want to invest in a detail knife, which is ideal for those fine touches that bring your flowers to life. Chisels come in various shapes and sizes, each serving a unique purpose. For instance, a gouge chisel is fantastic for hollowing out areas, while a straight chisel is great for clean, flat surfaces.
But wait! Before you start carving away, let’s not forget about safety. A pair of cut-resistant gloves is essential. Trust me, your fingers will thank you later! Additionally, a carving apron can protect your clothes and keep your tools handy. It’s like wearing a superhero cape, but instead of saving the world, you’re creating beautiful art.
Now, let’s talk about some additional tools that can elevate your carving game. A bench hook can provide stability while you work, ensuring your project doesn’t move around. A mallet may also come in handy for driving your chisels into the wood with precision. And if you really want to get fancy, consider adding a wood burner to your toolkit. This tool allows you to add intricate designs and textures to your flowers, giving them that extra flair.
| Tool | Purpose |
|---|---|
| Whittling Knife | For shaping petals and leaves |
| Detail Knife | For fine detailing |
| Gouge Chisel | For hollowing out areas |
| Straight Chisel | For clean, flat surfaces |
| Cut-Resistant Gloves | For safety |
| Carving Apron | To protect clothes and hold tools |
| Bench Hook | For stability while carving |
| Mallet | To drive chisels into wood |
| Wood Burner | For adding designs and textures |
In summary, having the right tools is crucial for a successful carving experience. Each tool plays a unique role, and together, they form the backbone of your crafting arsenal. As you gather these essentials, remember that practice is key. The more you carve, the more comfortable you’ll become with your tools, and soon enough, you’ll be creating wooden flowers that are nothing short of breathtaking.
Choosing the Right Wood
When it comes to carving wooden flowers, selecting the right type of wood is crucial. The wood you choose can significantly impact the ease of carving, the final appearance, and the durability of your creation. So, what should you be looking for? First, consider the grain of the wood. A fine, even grain is ideal for intricate designs, as it allows for detailed carving without splintering. Woods like basswood and butternut are popular among beginners because they have a soft texture, making them easier to work with.
Next, think about the hardness of the wood. Softer woods are generally easier to carve, but they may not hold fine details as well as harder woods. For instance, pine is easy to carve but can be less durable over time, while maple offers a harder surface that can withstand wear and tear, albeit at the cost of being more challenging to carve. If you're just starting, it might be wise to stick with softer woods until you develop your skills.
Another factor to consider is the availability of the wood. Some exotic woods may look stunning, but they can be hard to find and often come with a hefty price tag. Sticking with locally sourced woods not only saves you money but also supports sustainable practices. For example, many craft stores offer pre-cut pieces of basswood that are perfect for beginners.
| Wood Type | Grain | Hardness | Availability |
|---|---|---|---|
| Basswood | Fine, even | Soft | Widely available |
| Butternut | Medium | Soft | Moderately available |
| Pine | Coarse | Soft | Common |
| Maple | Fine | Hard | Common |
In summary, choosing the right wood for carving flowers involves balancing the grain, hardness, and availability. Remember, the best wood for you might not be the best for someone else; it all depends on your personal preferences and skill level. So, grab a piece of wood, and let your creativity flow!
Q: What is the best wood for beginners?
A: Basswood is often recommended for beginners due to its softness and fine grain, making it easy to carve.
Q: Can I use hardwoods for carving?
A: Yes, but hardwoods are generally more challenging to carve. It's best to start with softer woods and gradually work your way up.
Q: Where can I buy wood for carving?
A: Local craft stores, lumber yards, and online retailers are great places to find suitable wood for carving projects.
Basic Carving Techniques
When it comes to carving wooden flowers, mastering basic techniques is essential for beginners. Think of these techniques as the building blocks of your carving journey. Just like a painter needs to know how to hold a brush, a carver needs to understand how to manipulate their tools effectively. Let’s dive into some fundamental techniques that will set you on the path to creating stunning wooden flowers.
The first technique to familiarize yourself with is whittling. This is a simple yet effective method that involves removing small slices of wood from your block to shape your flower. Imagine sculpting clay; you’re gradually revealing the form hidden within the wood. To begin whittling, hold the wood securely in one hand while using a carving knife in the other. Always cut away from your body to ensure safety. As you practice, you'll find that whittling allows for a lot of creativity and spontaneity, making it an enjoyable technique for beginners.
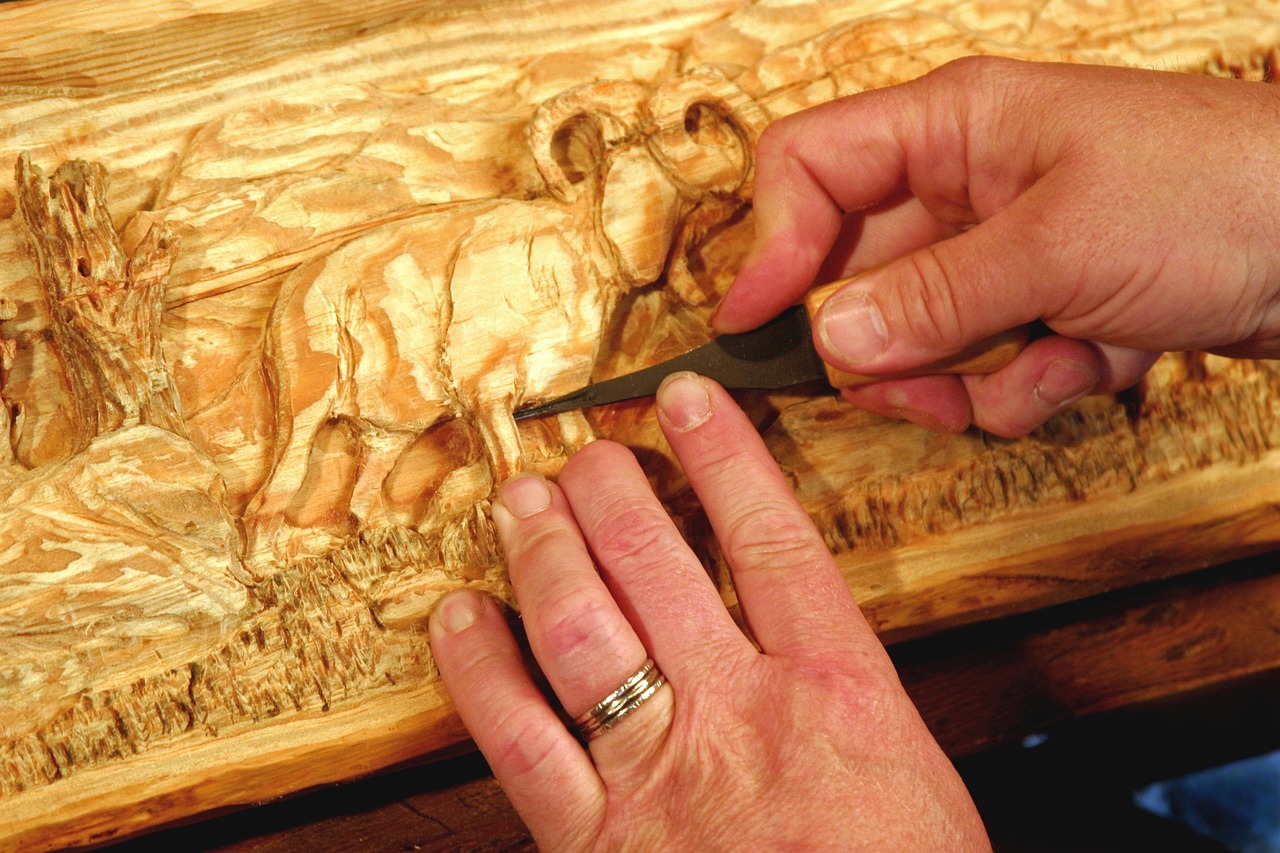
Next up is relief carving, which adds depth and dimension to your designs. This technique involves carving into the surface of the wood to create a three-dimensional effect. Think of it as giving your flowers a little lift! To start relief carving, sketch your flower design on the wood and then use a chisel to carve away the background, leaving the flower raised. This technique can be a bit more challenging, but it’s incredibly rewarding when you see your flower come to life.
Another technique worth mentioning is chip carving. This method focuses on creating intricate designs by removing small chips from the wood surface. Chip carving is like creating a beautiful mosaic, where every little chip contributes to the overall picture. You’ll need a specialized chip carving knife for this technique, which allows for precise cuts. It’s perfect for adding decorative elements to your flower designs, such as leaves or petals that pop off the surface.
As you practice these techniques, remember that patience and practice are your best friends. Start with simple designs and gradually progress to more complex ones. It’s also beneficial to experiment with different woods to see how they respond to each technique. Some woods are softer and easier to carve, while others are denser and may require more effort. Each wood type will teach you something new about your carving style.
Lastly, don’t forget about the importance of tool maintenance. Sharp tools make the carving process smoother and safer. Regularly honing your knives and chisels will save you time and frustration. Think of your tools as an extension of your hands; the better you care for them, the better they will help you create. Set aside some time after each carving session to clean and sharpen your tools, ensuring they’re always ready for your next project.
In conclusion, mastering these basic carving techniques will provide you with a solid foundation to create beautiful wooden flowers. Whether you choose to whittle, relief carve, or chip carve, each method offers unique possibilities for creativity. So grab your tools, and let your imagination bloom!
- What is the best wood for beginners? Basswood is often recommended due to its softness and ease of carving.
- Do I need special tools for carving? While basic knives can work, investing in a set of carving tools will enhance your experience.
- How long does it take to learn carving? The timeline varies; with regular practice, you can see significant improvement within a few months.
- Can I paint my carved flowers? Absolutely! Painting can add a personal touch and enhance the beauty of your creations.
Designing Your Flower
Designing your wooden flower is an exhilarating part of the carving process, akin to a painter preparing their canvas. Before you even pick up a knife, it's essential to visualize the final product. This stage is where your creativity can truly blossom. Think about the type of flower you want to carve. Is it a delicate rose, a vibrant sunflower, or perhaps a whimsical daisy? Each flower has its unique characteristics, and understanding these will help you in the design phase.
Start by sketching your ideas on paper. This doesn't need to be a masterpiece; simple outlines will do. Use a pencil to create light lines that you can easily adjust. As you sketch, consider the following elements:
- Petal Shape: Are they rounded, pointed, or layered? The shape will greatly influence the final look of your flower.
- Size Proportions: Think about how large each petal should be in relation to the center of the flower. This will help in achieving a balanced look.
- Details: Will you include veins on the petals or a textured center? Details can add depth and realism.
Once you have a rough sketch, it's time to refine it. Look closely at your design and ask yourself: Does it convey the essence of the flower? Make adjustments as necessary. You might even want to create multiple sketches to explore different styles or angles. This is your moment to experiment, so embrace it!
After finalizing your design, it's beneficial to transfer your sketch onto the wood. You can do this by either tracing it directly or using carbon paper for a more precise transfer. Make sure the design fits well on the piece of wood you’ve chosen, taking into account the grain and any imperfections that may affect your carving.
Another key aspect of designing your flower is understanding the layering of petals. Flowers often have layers that create a sense of depth. When carving, think about how you can achieve this effect. For instance, you might carve the back petals deeper than the front ones to create a natural shadow. This technique not only enhances the visual appeal but also adds a sense of realism to your work.
Lastly, don’t hesitate to gather inspiration from nature. Observing real flowers can provide insights into their shapes and colors, which can be incredibly helpful as you design your wooden flower. Remember, the more you practice your design skills, the more confident you’ll become in your carving journey.
Q: How important is it to sketch before carving?
A: Sketching is crucial as it helps you visualize the final product and plan the carving process effectively.
Q: Can I change my design while carving?
A: Yes, but it's best to have a clear plan to avoid significant alterations that could compromise the structure of the flower.
Q: What if I'm not good at drawing?
A: Don't worry! Simple sketches are enough. You can also use templates or trace images to get started.

Step-by-Step Carving Process
Carving a wooden flower can feel like a daunting task, especially for beginners, but don’t worry! With a little patience and the right approach, you can create stunning pieces that will impress anyone who sees them. Let’s break down the carving process into manageable steps, making it easier for you to follow along and enjoy the journey of bringing your wooden flower to life.
First things first, start with a rough sketch of your flower design on paper. This will serve as your blueprint. Once you have a clear image in your mind, transfer that design onto your chosen piece of wood. Use a pencil to lightly outline the flower shape on the wood surface. Remember, this is just a guide, so don’t stress about making it perfect!
Now, let’s get to the fun part—carving! Begin by using a carving knife to remove the excess wood around the outline. This is known as the rough shaping stage. Hold your knife at a comfortable angle and make controlled cuts, always moving away from your body. It’s essential to keep your hands steady and your grip firm. If you’re feeling unsure, practice on a scrap piece of wood first to get the hang of it.
As you carve, you’ll want to focus on creating depth and dimension. This is where the concept of relief carving comes into play. Start carving the petals of the flower, working from the center outward. Use a combination of your knife and chisels for different effects. For example, a V-tool can create sharp lines and details, while a flat chisel is great for broader areas. Don’t rush this stage; take your time to refine the shape of each petal.
Here’s a handy tip: always keep your tools sharp! Dull tools can lead to mistakes and frustration, so invest some time in maintaining them. A sharp knife will glide through the wood, making your carving experience much smoother.
Once you’re satisfied with the basic shape of your flower, it’s time to add the finer details. This is where your artistic flair can truly shine! Use smaller tools to carve in veins on the petals or texture on the leaves. You might want to refer back to your initial sketch to ensure you’re capturing the essence of your design. Remember, it’s all about layering; start with the most prominent details and work your way down to the subtle ones.
After you’ve finished carving, take a step back and admire your work. This is a crucial moment! Look for areas that might need a little more refinement or detail. It’s perfectly normal to make adjustments at this stage. Once you’re happy with your flower, it’s time to move on to the finishing touches.
Before you start sanding, make sure to clean any debris from your carving. Then, gently sand the entire piece to smooth out any rough edges. Start with a coarser sandpaper and gradually move to a finer grit for a polished finish. This step not only enhances the appearance of your flower but also prepares it for painting or sealing. Finally, apply your choice of finish—whether it’s paint, stain, or a clear sealant—to protect your creation and make it shine. Your carved wooden flower is now ready to be displayed!
In summary, the step-by-step process of carving a wooden flower involves:
- Sketching your design and transferring it onto the wood.
- Rough shaping the flower using a carving knife.
- Creating depth with relief carving techniques.
- Adding finer details with smaller tools.
- Sanding and applying a finish to enhance durability and appearance.
Remember, practice makes perfect! Don’t be discouraged by initial challenges; every carve is a step towards mastering this beautiful craft. Enjoy the process, and let your creativity blossom!
Q: What type of wood is best for beginners?
A: Basswood is an excellent choice for beginners due to its softness and ease of carving. It allows for intricate details without requiring excessive force.
Q: How do I maintain my carving tools?
A: Regularly sharpen your tools using a whetstone or sharpening system. Keep them clean and dry to prevent rust, and store them in a safe place.
Q: Can I paint my carved flowers?
A: Absolutely! Painting your carved flowers can add a unique touch. Just make sure to seal them afterward to protect the paint.
Finishing Touches
Once you've successfully carved your wooden flower, the real magic begins with the . This step is crucial because it transforms your rough creation into a stunning piece of art that will not only catch the eye but also stand the test of time. Think of this phase as the icing on a cake; it’s what makes the whole thing come together beautifully. So, let’s dive into the essential finishing techniques that will elevate your carving to the next level!
First off, sanding is an absolute must. It’s like giving your flower a spa day! Start with a coarser grit sandpaper to remove any rough edges and then gradually move to finer grits. This process will smooth out the surface, making it pleasant to the touch. Remember, the smoother your flower, the more appealing it will look. You might want to consider using a sanding sponge for those intricate areas where your fingers just can't reach.
Next, let’s talk about painting. This is where you can really let your creativity shine! Whether you choose vibrant colors or a more subdued palette, painting allows you to personalize your flower. Water-based acrylic paints are a fantastic choice for beginners because they’re easy to work with and clean up. Before you start painting, make sure your carved flower is completely dry and free of dust. You can even apply a primer to help the paint adhere better and enhance the colors. Don’t forget to let each layer dry completely before adding another to avoid any unsightly smudges!
After painting, it’s time to seal your masterpiece. Sealing not only protects your carving from moisture and dust but also enhances the colors, giving it a vibrant finish. You can use either a spray sealant or a brush-on product, depending on your preference. Just ensure that the sealant is compatible with the paint you used. Apply it in thin layers, allowing each coat to dry thoroughly before adding the next. This will help you achieve a durable, long-lasting finish that will keep your flower looking fresh for years to come.
Additionally, consider adding some natural elements to your finishing touches. Perhaps a light coat of beeswax can add a subtle sheen and a lovely scent to your wooden flower. It’s like a gentle hug for your creation! Just rub a small amount onto the surface and buff it out with a soft cloth. This will not only enhance the look but also provide a protective layer that helps resist moisture.
To summarize, here’s a quick checklist to ensure you don’t miss any finishing steps:
- Smooth out with sanding, starting from coarse to fine grits.
- Apply paint in layers, allowing each to dry completely.
- Seal your flower to protect and enhance the finish.
- Consider using beeswax for added shine and protection.
Remember, the finishing touches are where you can express your personal style and creativity. Don't rush this part; take your time to ensure that every detail is just right. Your carved wooden flower is a reflection of your hard work and creativity, so treat it with the care it deserves!
Q1: What type of paint should I use for my wooden flower?
A: Water-based acrylic paints are ideal for wooden flowers as they are easy to use and clean up.
Q2: How can I ensure my carving is smooth?
A: Use a progression of sandpaper from coarse to fine grit, and don’t rush the sanding process.
Q3: Is sealing necessary after painting?
A: Yes, sealing your carved flower is crucial as it protects the paint and enhances the overall appearance.
Q4: Can I use natural finishes instead of paint?
A: Absolutely! Natural oils or waxes can give your wooden flower a beautiful finish while showcasing the wood's natural grain.

Common Mistakes to Avoid
When you embark on the exciting journey of carving wooden flowers, it's easy to get caught up in the thrill of creativity. However, even the most enthusiastic beginners can stumble upon common pitfalls that can dampen their experience or, worse, lead to frustration. One of the biggest mistakes is skipping safety gear. It might seem tedious to don gloves and goggles, but trust me, your fingers and eyes will thank you later. Carving involves sharp tools, and a moment of negligence can result in accidents that could have been easily avoided.
Another frequent misstep is not selecting the right wood. While it’s tempting to grab any piece of scrap wood lying around, the type of wood you choose can make or break your project. For instance, softwoods like pine are easier to carve but may not hold intricate details well, while hardwoods like cherry or maple can be more challenging but offer stunning results. Always consider the grain and hardness of the wood before diving in.
Additionally, many beginners underestimate the importance of planning and sketching their designs. Jumping straight into carving without a clear plan can lead to mistakes that are difficult to fix. Take the time to create a rough sketch of your flower, noting the details you want to emphasize. This simple step can save you hours of rework and frustration. Remember, a good plan is half the battle won!
One more common error is rushing the process. Carving is an art that requires patience and precision. If you hurry through the steps, you might end up with a flower that looks more like a blob than a beautiful bloom. Instead, take your time with each cut, allowing yourself to enjoy the process. Think of it like baking a cake; if you rush, you might end up with a flat, sad dessert instead of a delicious masterpiece.
Lastly, many novice carvers neglect the finishing touches. After spending hours carving, it can be tempting to call it done, but this is where your flower can truly shine. Sanding, painting, and sealing your work not only enhance its appearance but also protect it from wear and tear. A well-finished piece reflects your dedication and craftsmanship.
In summary, by avoiding these common mistakes—skipping safety gear, choosing the wrong wood, neglecting planning, rushing the process, and overlooking finishing touches—you'll set yourself up for a successful and enjoyable carving experience. Remember, every mistake is a learning opportunity, so embrace the journey and let your creativity blossom!
Q: What safety gear do I need for carving?
A: Always wear gloves to protect your hands and goggles to shield your eyes from wood shavings. A dust mask is also recommended to avoid inhaling fine particles.
Q: Can I use any type of wood for carving?
A: While you can technically use any wood, it's best to choose softer woods like basswood or butternut for beginners, as they are easier to carve and shape.
Q: How can I improve my carving skills?
A: Practice is key! Start with simple designs, watch online tutorials, and consider joining a local carving group for tips and inspiration.
Q: What should I do if I make a mistake while carving?
A: Don’t panic! Assess the mistake and see if it can be fixed. Sometimes, a mistake can lead to a creative solution or an unexpected design element.
Inspiration and Resources
When diving into the enchanting world of carving wooden flowers, inspiration can often be the spark that ignites your creativity. Whether you're a complete novice or have a bit of experience under your belt, seeking out resources that can guide you through the process is essential. There are numerous avenues to explore, each offering unique insights and techniques that can elevate your carving skills.
One of the best places to start is by immersing yourself in books dedicated to wood carving. Titles such as "The Complete Book of Woodcarving" by Tom Hindes or "Woodcarving for Beginners" by John McPherson provide comprehensive overviews of techniques and projects, making them perfect companions for your carving journey. These books often include step-by-step instructions, photographs, and illustrations that can help you visualize your designs before you even pick up a knife.
In addition to books, the internet is a treasure trove of online tutorials and videos. Websites like YouTube feature channels dedicated to wood carving, where experienced carvers share their tips and tricks. Watching these experts in action can provide you with valuable insights into the nuances of technique, allowing you to learn at your own pace. Don't forget to check out platforms like Instructables and Skillshare, where you can find detailed guides and even take classes to enhance your skills.
Another fantastic resource is joining community groups or forums, both online and offline. Engaging with fellow wood carving enthusiasts can be incredibly beneficial. You can share your progress, ask questions, and receive feedback on your work. Websites like Reddit have dedicated subreddits, such as r/Woodworking, where you can connect with others who share your passion. Local carving clubs or workshops can also provide hands-on experience and the chance to meet like-minded individuals.
Lastly, don’t underestimate the power of social media. Platforms like Instagram and Pinterest are brimming with inspiration. Following hashtags like #WoodCarving or #WoodenFlowers can lead you to stunning creations that might just spark your next project. You can also share your own work, gaining feedback and encouragement from a global audience.
To summarize, the journey of carving wooden flowers can be greatly enriched by exploring various resources. Whether it's through books, online tutorials, community engagement, or social media, each resource offers a unique perspective that can help you grow as a carver. Remember, the more you expose yourself to different ideas and techniques, the more your creativity will flourish!
Q: What is the best wood for beginners to start carving flowers?
A: Basswood is highly recommended for beginners due to its softness and fine grain, making it easier to carve. Other woods like butternut and pine can also be good options.
Q: How long does it take to carve a wooden flower?
A: The time it takes can vary greatly depending on the complexity of the design and your skill level. A simple flower might take a couple of hours, while more intricate designs could take several days.
Q: Do I need special tools for carving wooden flowers?
A: While you can start with basic whittling knives, investing in a few specialized carving tools like gouges and chisels will help you achieve more detailed work as you progress.
Frequently Asked Questions
- What tools do I need to start carving wooden flowers?
To kick off your journey in wooden flower carving, you'll need some essential tools. A sharp carving knife, a set of chisels, and a flexible cutting mat are great starters. Don't forget safety gear like gloves and a protective eye mask to keep your hands and eyes safe while you create!
- Which type of wood is best for carving flowers?
When it comes to selecting wood, softer varieties like basswood or butternut are fantastic for beginners. They’re easier to carve and have a nice grain that shows off your work beautifully. Avoid hardwoods like oak until you gain more experience, as they can be quite challenging!
- What are the basic techniques I should learn?
Start with whittling and relief carving. Whittling is all about removing material to shape your flower, while relief carving involves carving into the surface for a more three-dimensional effect. Mastering these will set a solid foundation for your carving skills!
- How important is design planning before carving?
Planning your design is crucial! Sketching out your flower beforehand helps you visualize the final product and ensures you don’t miss any important details. Think of it like a roadmap for your carving journey; it keeps you on track and prevents you from getting lost!
- Can you walk me through the carving process?
Absolutely! Start by rough shaping your wood, then gradually refine the details. Focus on one part at a time, like the petals or leaves, and work your way to finer details. It’s like sculpting a masterpiece; every stroke counts!
- What finishing touches should I apply?
Finishing touches can make or break your project! Sand your flower to smooth out rough edges, then consider painting or staining it to enhance its beauty. Finally, seal it with a protective finish to ensure your artwork lasts for years to come!
- What common mistakes should I avoid?
Many beginners rush the process or choose the wrong wood. Take your time and don’t be afraid to practice on scrap pieces first. Also, remember to keep your tools sharp; dull tools can lead to frustration and mistakes!
- Where can I find inspiration and resources?
Look for inspiration in woodworking books, online tutorials, and community forums. Joining a local carving group can also be a great way to learn from others and share your progress. The more you connect with fellow carvers, the more ideas you'll gather!


