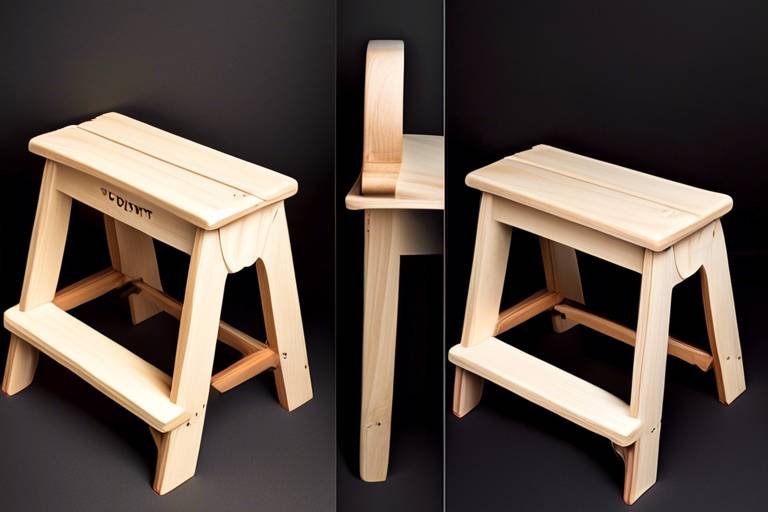
Design and Build Your Own Wooden Desk Organizer
Creating a personalized wooden desk organizer is not just a fun DIY project; it’s a way to bring order and style to your workspace. Imagine stepping into your office or home study and seeing a beautifully crafted organizer that not only holds your essentials but also reflects your personality. This article will guide you through the entire process—from choosing the right materials to showcasing your finished product. So, roll up your sleeves, grab your tools, and let’s dive into the wonderful world of woodworking!
When it comes to building your desk organizer, selecting the right type of wood is crucial. You want a material that is not only durable but also visually appealing. Hardwoods, like oak and maple, are known for their strength and beautiful grain patterns, making them excellent choices for a high-end look. On the other hand, softwoods like pine and cedar are lighter and easier to work with, perfect for beginners. Consider the following factors when choosing your wood:
- Durability: Will it withstand daily use?
- Aesthetics: Does it match your decor?
- Workability: How easy is it to cut and shape?
Ultimately, the choice of wood sets the tone for your entire desk organizer, so choose wisely!
Before you start building, it’s essential to gather the right tools and materials. A well-equipped workshop can make all the difference in the world. Here’s a quick rundown of what you’ll need:
| Tool/Material | Purpose |
|---|---|
| Saw | To cut the wood pieces to size |
| Drill | For making holes and joining pieces |
| Sandpaper | To smooth out rough edges |
| Wood Glue | For secure bonding of pieces |
| Finishing Supplies | To protect and enhance the wood's appearance |
These tools will help you bring your vision to life, ensuring a smooth and enjoyable building experience.
Planning is the backbone of any successful project. Start by taking accurate measurements of your workspace to determine the ideal size for your desk organizer. Sketching your design on paper can help visualize the final product. Think about how you want to arrange your items—pens, notepads, and other essentials—and create a blueprint that reflects your needs and style. Remember, a well-thought-out design can save you time and materials in the long run!
What’s the point of a desk organizer if it doesn’t serve your needs? Consider adding functional features like compartments for different items, drawers for hidden storage, or even cable management solutions to keep your workspace tidy. These elements not only enhance practicality but can also make your organizer a unique centerpiece on your desk. Think about your daily tasks—what do you reach for most often? Design accordingly!
The finish you choose can dramatically alter the look of your desk organizer. Whether you prefer a natural wood finish that highlights the grain or a bold color that makes a statement, the right finish can elevate your creation. Options include stains, paints, or natural oils. Each has its own characteristics and application methods, so consider experimenting with samples before committing to a final choice.
Now that you have your materials and design ready, it’s time to assemble your desk organizer. Start by cutting your wood pieces according to your measurements. Next, use a drill to make holes for joining the pieces with screws or dowels. As you assemble, ensure everything is aligned properly to avoid any wobbly structures. Sand down any rough edges for a smooth finish, and apply your chosen finish to protect the wood and enhance its beauty.
Customization is where your personality shines through! Consider adding personal touches like engraving your name or a favorite quote on the surface. You can also play with color schemes or decorative elements that resonate with your style. This is not just an organizer; it’s a reflection of you!
To keep your wooden desk organizer looking fantastic, regular maintenance is key. Dust it regularly with a soft cloth and consider using a gentle wood cleaner to preserve its finish. If it starts to look worn, don’t hesitate to sand it down and reapply your finish. With a little care, your desk organizer can remain a beautiful and functional piece for years to come.
Once you've completed your desk organizer, it’s time to show it off! Place it prominently on your desk, and consider adding some decorative items around it to enhance its visual appeal. You might even snap a picture to share on social media—after all, you’ve put in the hard work, and it deserves to be celebrated!
Q: What type of wood is best for beginners?
A: Softwoods like pine are great for beginners due to their ease of handling and lower cost.
Q: How long does it take to build a desk organizer?
A: Depending on your design and experience level, it can take anywhere from a few hours to a couple of days.
Q: Can I use recycled wood for my project?
A: Absolutely! Recycled wood can add character and is an eco-friendly choice.

Choosing the Right Wood
When it comes to crafting your own wooden desk organizer, the choice of wood is not merely a matter of aesthetics; it's a decision that significantly impacts the durability and functionality of your creation. Think of wood as the backbone of your project—without a solid foundation, everything else can fall apart. So, what are the best options out there? Let’s dive into the world of wood!
First off, you have two main categories to consider: hardwoods and softwoods. Hardwoods, like oak, maple, and walnut, are known for their strength and durability. They can withstand the test of time, making them ideal for a desk organizer that will see daily use. Plus, they often come with beautiful grain patterns that can add a touch of elegance to your workspace. On the flip side, softwoods such as pine and cedar are generally more affordable and easier to work with, making them great for beginners. They may not be as durable as hardwoods, but they can still make a charming and functional organizer.
Here’s a quick comparison to help you decide:
| Type of Wood | Durability | Cost | Workability | Aesthetic Appeal |
|---|---|---|---|---|
| Hardwoods | High | Higher | Moderate | Elegant Grain Patterns |
| Softwoods | Moderate | Lower | Easy | Warm and Rustic Look |
Now, let’s also consider the environmental impact of your wood choice. Sustainable sourcing is becoming increasingly important. Look for woods that are certified by organizations like the Forest Stewardship Council (FSC), ensuring that your material comes from responsibly managed forests. This not only helps the planet but also adds a story to your desk organizer—a piece that’s not just functional but also eco-friendly!
In addition to type and sustainability, think about the finish you want to achieve. Different woods take stains and finishes differently, so if you have a specific look in mind, it’s worth testing a small sample first. For example, oak can take on a rich, dark stain beautifully, while pine might require a lighter touch to maintain its natural charm. The right finish can elevate your desk organizer from a simple project to a true centerpiece of your workspace.
Ultimately, the choice of wood will depend on your personal preferences, budget, and the overall look you want to achieve. Whether you go for the robust elegance of hardwood or the rustic appeal of softwood, remember that your desk organizer is a reflection of you. So take your time, explore your options, and choose wisely!

Essential Tools and Materials
Creating your very own wooden desk organizer is not just a fun project; it’s a chance to express your creativity while crafting something useful for your workspace. However, before you dive into the world of woodworking, it’s essential to gather the right tools and materials. Think of this as gathering your armor before heading into battle—each piece is crucial for a successful outcome.
First and foremost, let’s talk about the tools. Here’s a quick rundown of what you’ll need:
- Saw: A circular saw or a hand saw will work wonders for cutting your wood to size.
- Drill: An electric drill is essential for making holes and driving screws.
- Screwdriver: A good quality screwdriver will help you assemble your organizer with ease.
- Measuring Tape: Accurate measurements are the backbone of any woodworking project.
- Sandpaper: For smoothing out edges and surfaces, ensuring a polished finish.
- Clamps: These are vital for holding pieces together while the glue dries or while you fasten screws.
Now, let’s not forget about the materials. Choosing the right type of wood is crucial for both aesthetics and durability. Here’s a simple table to help you understand your options:
| Type of Wood | Characteristics | Best For |
|---|---|---|
| Oak | Strong, durable, and has a beautiful grain. | Long-lasting organizers with a classic look. |
| Pine | Lightweight and easy to work with, but softer. | Budget-friendly projects or beginner builds. |
| Maple | Hard and resistant to scratches, with a fine grain. | High-end organizers that need to withstand wear. |
| Birch | Strong and has a smooth finish, easy to stain. | Versatile projects requiring a clean look. |
Once you have your tools and materials ready, you’ll be well on your way to building a stunning desk organizer. Remember, investing in quality tools and materials can make a world of difference in the outcome of your project. It’s like cooking; using fresh ingredients can elevate a simple dish into a culinary masterpiece. So, gather your supplies, and let’s get crafting!
Q: What is the best type of wood for a beginner?
A: Pine is often recommended for beginners due to its affordability and ease of handling.
Q: Can I use recycled wood for my desk organizer?
A: Absolutely! Recycled wood can add character and is a sustainable choice.
Q: How do I choose the right finish for my desk organizer?
A: Consider the look you want to achieve; stains can enhance the wood grain, while paints can provide a pop of color.
Measuring and Planning Your Design
When it comes to crafting your own wooden desk organizer, measuring and planning your design is the cornerstone of a successful project. Think of it as laying the foundation for a house; without a solid base, everything else can crumble. Start by determining the space available on your desk. Measure the width, depth, and height of the area where you intend to place the organizer. This will ensure that your creation fits perfectly without overcrowding your workspace.
Next, grab a piece of paper or a digital drawing tool to sketch out your design. This is where the magic begins! Don’t just draw a box; think about how you want your organizer to function. Do you need compartments for pens, sticky notes, or perhaps a section for your phone? Visualize the layout and consider how you can maximize space. A well-planned design not only enhances functionality but also adds a personal touch to your workspace.
To help with your planning, consider creating a blueprint that includes:
- Dimensions of each compartment
- Overall dimensions of the organizer
- Placement of any additional features like drawers or cable management
This blueprint acts as your roadmap during the building process, guiding you through each step and ensuring that you stay on track. Remember, it’s always better to measure twice and cut once! Take the time to double-check your measurements and make adjustments as necessary. A small error can lead to frustrating rework later.
Once you have your measurements and design down, it’s time to think about the materials you’ll need. Each piece of wood will have specific dimensions based on your design, so jot those down as well. Create a list of materials that includes the type of wood, screws, and any finishing products you plan to use. This not only keeps you organized but also makes your shopping trip more efficient.
In summary, measuring and planning your design is about more than just numbers; it’s about envisioning your ideal workspace. By taking the time to carefully consider your design, you’ll be setting yourself up for a smoother building process and a stunning final product that you’ll be proud to showcase. So grab your measuring tape, let your creativity flow, and get ready to bring your vision to life!
Q: How do I determine the size of my desk organizer?
A: Measure the available space on your desk and consider the items you want to store. Sketch a design that fits comfortably without cluttering your workspace.
Q: What tools do I need for measuring and planning?
A: A measuring tape, ruler, pencil, and paper or a digital drawing tool are essential for accurate measurements and planning.
Q: Can I modify my design once I start building?
A: Absolutely! While it's best to stick to your original plan, feel free to make adjustments as you go if you find a more efficient layout or design feature.

Incorporating Functional Features
When it comes to designing your wooden desk organizer, the **functional features** you choose to incorporate can truly make or break the usability of your creation. Think about it: a desk organizer isn’t just a pretty face; it needs to work for you! Imagine having a clutter-free workspace where everything you need is within arm's reach. Sounds dreamy, right? Well, let’s make that dream a reality by adding some clever features to your organizer.
First off, consider **compartments**. These are essential for keeping your stationery items—like pens, pencils, and sticky notes—organized and easy to access. You might want to create different sizes of compartments to accommodate various items. For instance, a larger compartment for notebooks and a smaller one for paper clips can help maintain order. You could even use a modular design that allows you to rearrange the compartments based on your needs. This flexibility can be a game changer!
Next, let’s talk about **drawers**. Adding a small drawer or two can be a fantastic way to store items that you want to keep out of sight but still within reach, such as chargers or personal documents. Imagine having a drawer specifically for your tech gadgets, neatly tucked away but still easily accessible. You could even add a soft-close mechanism to give your organizer that high-end feel.
Another feature to consider is **cable management**. In today’s digital age, we all have a plethora of cables—charging cables, USB cords, and more—cluttering our desks. Incorporating cable management solutions can help keep these wires organized and out of sight. Think about adding a cable hole at the back of your organizer or a designated cable tray underneath. This way, you can keep your workspace looking sleek and tidy, without any unsightly tangles.
Lastly, consider integrating a **phone or tablet stand** into your design. With so many of us relying on our devices for work and play, having a dedicated space for them can enhance both functionality and convenience. You could design a small slot or groove that holds your device at an angle, making it easy to view notifications or video calls without taking up additional desk space. This feature not only adds to the practicality of your organizer but also elevates its overall aesthetic.
Incorporating these functional features into your wooden desk organizer will not only enhance its usability but also reflect your personal style and work habits. So, as you sketch out your design, keep these ideas in mind. After all, a well-thought-out desk organizer can transform your workspace into a haven of productivity and inspiration!
Q: What type of wood is best for a desk organizer?
A: Hardwoods like oak or maple are great for durability and aesthetics, while softwoods like pine are easier to work with for beginners.
Q: How can I ensure my desk organizer is stable?
A: Make sure to use sturdy joints and consider the weight distribution of your items. Adding a wider base can also improve stability.
Q: What finishes are recommended for a wooden desk organizer?
A: Natural oils, stains, or paints can enhance the appearance. Choose a finish that complements your workspace while protecting the wood.
Q: Can I customize my desk organizer?
A: Absolutely! Personal touches like engraving or unique color schemes can make your organizer truly one-of-a-kind.
Choosing a Finishing Touch
When it comes to crafting your own wooden desk organizer, the finishing touch is where you can truly let your creativity shine. It's not just about making your piece look good; the finish also plays a crucial role in protecting the wood and enhancing its natural beauty. So, what options do you have? Let's dive into the world of finishes!
First up, we have stains. Staining is a fantastic way to bring out the grain of the wood while adding a splash of color. You can choose from a variety of hues, ranging from rich mahogany to a light oak, depending on the look you're going for. Just remember, the type of stain you choose can dramatically alter the appearance of your desk organizer. For example, a dark stain can give a more sophisticated vibe, while a lighter stain can create a more casual feel.
Next, there's paint. If you're feeling bold, why not go for a pop of color? Painting your desk organizer can be a fun way to express your personality. You could opt for a solid color or even get creative with patterns or designs. The only caveat is that paint can sometimes hide the beautiful grain of the wood, so consider using it strategically, perhaps on the sides or back of your organizer. And don't forget to use a primer to ensure a smooth finish!
For those who prefer a more natural look, natural oils are an excellent choice. Oils like tung or linseed penetrate the wood, providing a protective barrier while enhancing its natural color and texture. This option is particularly appealing if you want to maintain the authentic feel of the wood. Plus, natural oils are often easier to apply and can be reapplied as needed, making them a practical choice for long-term care.
Now, let’s not forget about varnishes and lacquers. These finishes create a hard protective layer on the surface of the wood, making it resistant to scratches and spills. If your desk organizer is going to see a lot of action, a varnish or lacquer might be the way to go. However, be mindful of the application process, as it can be a bit more involved than simply applying a stain or oil.
Before you make your final decision, consider creating a small test piece with your chosen finish. This way, you can see how the finish interacts with the wood grain and color before committing to your entire organizer. Remember, the goal is to enhance the beauty of your creation while ensuring it remains functional for years to come.
In summary, the finishing touch is more than just aesthetics; it’s about protecting and celebrating the craftsmanship of your wooden desk organizer. Whether you choose stains, paints, oils, or varnishes, each option offers unique benefits. So, take your time, explore your choices, and let your personality shine through!
- What type of finish is best for a desk organizer? It depends on your style and usage. Stains and natural oils are great for a natural look, while paints offer bold colors. Varnishes provide extra protection.
- Can I mix different finishes? Yes, you can! Just be cautious and test on a small area first to see how they interact.
- How often should I reapply the finish? It varies by finish type. Natural oils may need reapplication every few months, while varnishes can last years.

Step-by-Step Assembly Process
Assembling your wooden desk organizer is where the magic truly happens! It’s like putting together a jigsaw puzzle, but instead of a picture, you’re crafting a functional piece of art for your workspace. Before diving into the assembly, ensure you have all your materials and tools ready. A clean and organized workspace will help keep distractions at bay and make the process smoother.
Start by laying out all your pieces according to your blueprint. This initial step is crucial because it allows you to visualize how everything will fit together. Once you have a clear layout, it’s time to cut the wood to size. Use a saw that feels comfortable to you—whether it’s a hand saw or a power saw, just make sure it’s sharp and suitable for the wood type you’re using. Remember, measure twice and cut once! Accuracy here will save you from headaches later on.
After cutting, the next step is to join the pieces. You can use wood glue, screws, or dowels, depending on your design. Wood glue is fantastic for creating a clean look, while screws offer extra strength. If you opt for screws, pre-drill the holes to prevent the wood from splitting. As you assemble, check for squareness by measuring diagonally across the corners. If both measurements are equal, you’re on the right track!
Once the main structure is assembled, it’s time to focus on the functional features you’ve planned. If you’ve decided to add compartments or drawers, now is the moment to install them. This may involve additional cutting and joining, so keep your tools handy. If you’re adding cable management solutions, consider drilling holes or creating channels in the back or bottom of your organizer to keep those pesky cords out of sight. A clean workspace is a happy workspace!
After everything is put together, it’s time for sanding. This step is crucial for achieving a smooth finish and removing any sharp edges that could snag on your clothes or belongings. Start with a coarse grit sandpaper and gradually move to a finer grit for the best results. Don’t forget to wear a mask and goggles to protect yourself from dust!
Finally, once you’re satisfied with the assembly and sanding, it’s time to apply your chosen finish. Whether you go for a stain, paint, or natural oil, this is where your personality can shine through. Apply the finish with a brush or cloth, following the manufacturer’s instructions, and allow it to dry completely before using your new desk organizer. Trust me, the wait will be worth it!
In summary, the assembly process of your wooden desk organizer involves careful planning, precise cutting, thoughtful joining, and finishing touches. It’s a rewarding journey that not only enhances your workspace but also allows you to express your creativity.
- What type of wood is best for a desk organizer? Hardwoods like oak or maple are great for durability and aesthetics, while softwoods like pine are easier to work with and more affordable.
- Do I need special tools to build a desk organizer? Basic tools like a saw, drill, and sandpaper will suffice. However, having clamps and a level can help ensure a more professional finish.
- How can I personalize my desk organizer? You can personalize it through engraving, custom paint colors, or adding decorative elements that reflect your style.
- How do I maintain my wooden desk organizer? Regularly dust it with a soft cloth and apply a wood conditioner or polish to keep it looking fresh.

Personalizing Your Organizer
When it comes to creating a desk organizer that truly reflects your personality, the sky's the limit! Personalization is not just about aesthetics; it’s about making a statement and ensuring that your workspace feels uniquely yours. Imagine walking into your office and seeing a wooden desk organizer that not only keeps your essentials in place but also showcases your favorite colors and designs. It’s like having a piece of art that serves a purpose!
One of the most exciting ways to personalize your organizer is through engraving. Whether it’s your name, a motivational quote, or a meaningful symbol, engraving can add a special touch that makes your organizer stand out. You can either use a laser engraver if you have access to one or opt for hand engraving if you’re feeling crafty. The result will be a piece that not only looks great but also carries sentimental value.
Color schemes are another fantastic way to express yourself. You might want to stick with classic wood tones for a timeless look, or you could go bold with vibrant stains or paints. For instance, a deep navy blue or a bright coral can add a pop of color to your workspace, making it feel more inviting. If you’re unsure about which colors to choose, consider using a color wheel to find complementary shades that work well together.
Don’t forget about the little details! Adding decorative elements such as stickers, washi tape, or even small plants can enhance the overall look of your desk organizer. Imagine a small succulent perched on one of the compartments or a colorful sticker that brings a smile to your face every time you reach for your pens. These small touches can transform a simple organizer into a lively centerpiece.
Here’s a quick overview of some popular personalization options:
- Engraving: Names, quotes, or symbols.
- Color Schemes: Bold stains or paints for a vibrant look.
- Decorative Elements: Stickers, plants, or additional embellishments.
Lastly, don’t shy away from incorporating functionality into your design. Personalization doesn’t just mean looks; it can also mean making your organizer work better for you. Consider adding specific compartments for your favorite tools or tech gadgets, or even customizing the layout based on how you like to work. By tailoring the design to your habits, you’re not just creating a beautiful piece; you’re crafting a functional asset that enhances your productivity.
Q: What materials are best for engraving?
A: Hardwoods like oak and maple are excellent choices for engraving due to their dense grain, which holds details well. Softwoods can also be used, but they may not provide the same level of detail.
Q: How can I choose a color scheme for my organizer?
A: Consider the colors in your workspace and select shades that either complement or contrast with them. Using a color wheel can help you find harmonious pairings.
Q: What are some easy decorative elements to add?
A: Stickers, washi tape, and small potted plants are all easy and effective ways to add personality to your desk organizer. You can also use fabric or paper to line the compartments for a unique touch.
Remember, personalizing your desk organizer is all about creativity and self-expression. So, let your imagination run wild and create a workspace that inspires you every day!
Maintenance Tips for Longevity
Maintaining your wooden desk organizer is essential to ensure it remains a stunning centerpiece in your workspace for years to come. Just like a car needs regular oil changes and a house requires paint touch-ups, your desk organizer deserves some TLC. The good news? Keeping it in tip-top shape is not as daunting as it sounds!
First and foremost, cleaning your desk organizer regularly is vital. Dust and grime can accumulate, dulling the finish and potentially damaging the wood over time. Use a soft, dry cloth to wipe down the surfaces at least once a week. For deeper cleans, you can slightly dampen the cloth with water or a gentle wood cleaner. Just be sure not to soak the wood, as excess moisture can warp or damage it.
Another crucial aspect of maintenance is refinishing. Depending on the type of finish you chose during construction, you might need to reapply it every few years. If you used a stain or oil, consider applying a fresh coat to rejuvenate the color and shine. This not only enhances the appearance but also adds a protective layer against scratches and spills. If you notice any scratches or imperfections, don’t fret! A little bit of wood filler can work wonders, and sanding it down lightly can help blend the repair into the surrounding area.
It’s also wise to avoid placing your desk organizer in direct sunlight or near heat sources. Wood can expand and contract with temperature changes, which might lead to cracks or warping. Instead, try to position it in a stable environment where it won’t be exposed to extreme temperatures or humidity.
For those who like to personalize their workspace even further, consider using coasters under your mugs or drinks. This simple step can prevent unsightly water rings and stains that can mar the beauty of your wood. Additionally, if your organizer has compartments for pens and other items, ensure they are not overloaded. Overstuffing can lead to wear and tear, especially on the edges and corners.
Lastly, if you ever notice any signs of pests, such as wood-boring insects, act quickly! Affected areas should be treated promptly to prevent further damage. Regularly inspecting your desk organizer will help catch any issues before they become significant problems.
By following these maintenance tips, you can keep your wooden desk organizer looking fresh and beautiful, ensuring it continues to be a functional and stylish addition to your workspace for many years. Remember, a little care goes a long way in preserving the charm and utility of your handcrafted creation!
- How often should I clean my wooden desk organizer? It's best to clean it at least once a week to prevent dust buildup.
- Can I use any type of cleaner on wood? No, always use a gentle wood cleaner or a damp cloth to avoid damaging the finish.
- How do I know when to refinish my organizer? If it looks dull or has scratches, it’s time to apply a fresh coat of finish.
- What should I do if I find a pest in my wooden organizer? Treat the affected area immediately and consider consulting a professional if necessary.
Showcasing Your Finished Product
After putting in the hard work and creativity into building your very own wooden desk organizer, it’s time to let it shine! Showcasing your finished product not only adds a personal touch to your workspace but also serves as a conversation starter. Imagine walking into your office or study and seeing that beautiful piece you crafted with your own hands. It’s not just a desk organizer; it’s a testament to your skill and creativity!
One of the best ways to display your desk organizer is to place it in a prominent spot on your desk where it can be easily admired. Consider positioning it near your computer or in the center of your workspace. This not only makes it functional but also allows it to be the focal point of your desk. You could even complement it with other handmade items, like a matching pen holder or a photo frame, to create a cohesive look.
Lighting plays a crucial role in showcasing your creation. Natural light can enhance the wood’s grain and finish, making it appear more vibrant. If your workspace has a window, position your desk organizer to catch the light during the day. Alternatively, you can use desk lamps with warm tones to highlight the beauty of the wood in the evening. A little spotlight can turn your desk organizer into a stunning centerpiece!
Don’t forget about the background! The wall behind your desk can add to the overall aesthetic. Consider painting it a color that complements the wood of your organizer or hanging artwork that enhances the vibe of your workspace. A well-thought-out backdrop can elevate the entire presentation, making your desk organizer stand out even more.
Additionally, think about incorporating some greenery into your display. A small potted plant or succulent can bring life to your desk and complement the natural look of the wood. Plants not only add a splash of color but also improve air quality and create a calming atmosphere, making your workspace more enjoyable.
Finally, consider sharing your creation with others! Snap some high-quality photos of your desk organizer and post them on social media or woodworking forums. Not only will you inspire others to take on similar projects, but you may also receive valuable feedback and tips from fellow enthusiasts. Plus, who doesn’t love a little recognition for their hard work?
- How can I ensure my desk organizer is sturdy?
Using quality wood and proper joinery techniques will significantly enhance the durability of your organizer. Make sure to sand down edges and joints for a smooth finish. - What type of wood is best for beginners?
Pine is an excellent choice for beginners due to its affordability and ease of handling. It’s soft and easy to cut, making it perfect for your first project. - How often should I refinish my desk organizer?
It depends on usage, but a good rule of thumb is to refinish it every couple of years or whenever you notice it starting to look worn or dull. - Can I customize my organizer after I’ve built it?
Absolutely! You can always add new compartments or paint it a different color to refresh its look. Customization is part of the fun!
Frequently Asked Questions
- What type of wood should I use for my desk organizer?
Choosing the right wood is crucial for both durability and aesthetics. Hardwoods like oak or maple are excellent for their strength and beautiful grain, while softwoods like pine are more affordable and easier to work with. Consider your budget and the look you want to achieve when selecting your wood.
- What tools do I need to build a wooden desk organizer?
To create your desk organizer, you'll need some essential tools. A saw (hand saw or power saw), a drill for making holes, sandpaper for smoothing edges, and wood glue for joining pieces are fundamental. Don't forget measuring tools like a tape measure and square to ensure everything fits perfectly!
- How do I measure and plan my design?
Start by sketching your design on paper. Think about the dimensions of your workspace and how much storage you need. Use a ruler or measuring tape to take accurate measurements and create a blueprint. This planning stage is crucial to avoid mistakes during assembly!
- Can I add functional features to my desk organizer?
Absolutely! Consider incorporating compartments for pens, a drawer for sticky notes, or even cable management solutions to keep cords tidy. These features can significantly enhance the practicality of your desk organizer, making it not just stylish but also super functional.
- What finishing options are best for a wooden desk organizer?
Finishing your desk organizer can really elevate its look. You can choose from stains that highlight the wood grain, paints for a pop of color, or natural oils that enhance the wood's beauty while providing protection. Each option gives a different vibe, so pick one that reflects your style!
- What are the steps for assembling my desk organizer?
Start by cutting your wood pieces according to your design. Then, use wood glue and clamps to join the pieces together. Follow this by drilling holes for screws if needed, and finally, sand down any rough edges. Take your time to ensure everything fits snugly!
- How can I personalize my desk organizer?
Customization is key to making your desk organizer truly yours! You can engrave your name or a favorite quote, choose a specific color scheme, or add decorative elements like stickers or paint patterns. Let your personality shine through in your design!
- What maintenance is required to keep my desk organizer looking good?
Regular maintenance is essential for longevity. Clean your organizer with a damp cloth and mild soap, and avoid harsh chemicals. Depending on the finish, you may need to refinish it every few years to keep it looking fresh and new.
- How can I showcase my finished desk organizer?
Once your desk organizer is complete, display it proudly! Place it on your desk as a centerpiece, or use it to organize your workspace. You could even add some decorative items like plants or photos around it to enhance its visual appeal!