Advanced Woodworking Projects to Challenge You
This article explores intricate woodworking projects designed for experienced craftsmen. From furniture to intricate carvings, these projects will push your skills to new heights while providing a sense of accomplishment.
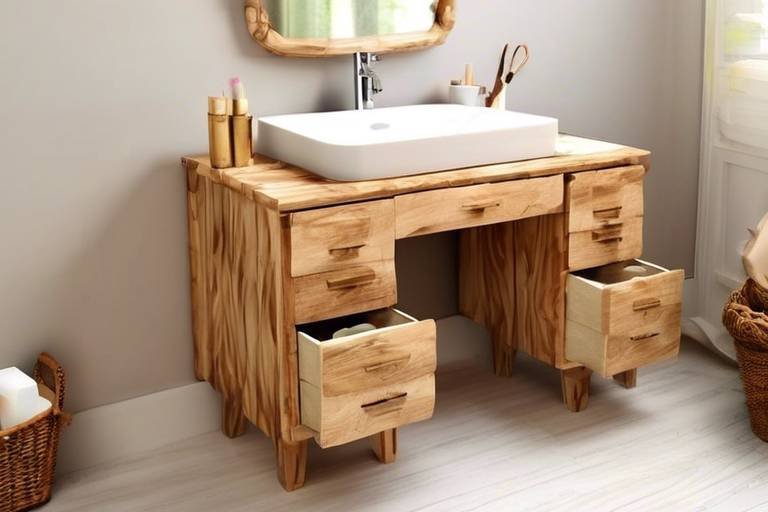
Creating complex furniture pieces, such as dining tables or cabinets, requires precision and creativity. Imagine transforming a simple piece of wood into a stunning centerpiece for your home! The beauty of woodworking lies not only in the final product but also in the journey of crafting it. In this section, we will guide you through advanced techniques and tips for producing stunning, functional furniture that can become a family heirloom.
When embarking on furniture projects, consider the following key elements:
- Design Planning: Sketch your ideas before you start. A well-thought-out design can save you time and materials.
- Material Selection: Choose high-quality wood that complements your design. Hardwoods like oak and walnut are excellent choices for durability and aesthetics.
- Joinery Techniques: Mastering advanced joinery techniques such as dovetails or mortise and tenon can elevate your project.
Wood carving can elevate your woodworking projects to a whole new level. It's like painting with a chisel! The beauty of detailed carvings can enhance the overall aesthetic of your pieces, making them truly unique. Here, we will discuss methods and tools for creating detailed carvings that not only add beauty but also tell a story.
Relief carving involves creating a three-dimensional effect on wood surfaces, allowing your designs to pop out and capture attention. This technique is perfect for adding depth to furniture or creating standalone art pieces. To achieve stunning results, it's essential to understand the various methods of relief carving, such as:
- Low Relief: This involves carving only a small amount into the wood, creating a subtle effect.
- High Relief: Here, the design stands out significantly from the background, creating a dramatic effect.
Selecting the appropriate tools is crucial for successful relief carving. The right tools can make the difference between a frustrating experience and a fulfilling one. Some essential tools include:
| Tool | Use |
|---|---|
| Chisels | For detailed cuts and shaping |
| Gouges | To remove larger sections of wood |
| V-tools | For creating fine lines and details |
Finishing techniques can enhance the visual appeal of your carvings. A well-applied finish not only beautifies the wood but also protects it from the elements. Consider using:
- Oil Finishes: These penetrate the wood, enhancing its natural grain.
- Varnishes: Provide a protective layer and can add gloss.
Inlay work adds depth and character to woodworking projects, creating striking visual contrasts. Imagine embedding a beautiful piece of contrasting wood or even materials like mother-of-pearl into your project! This technique can transform ordinary pieces into extraordinary works of art.
Building outdoor structures, like pergolas or garden benches, presents unique challenges. The elements can be harsh, and your projects must withstand the test of time. This section will offer insights into materials, designs, and techniques suitable for outdoor woodworking that not only look good but also endure.
Choosing the right materials for outdoor projects is essential for durability. Some excellent choices include:
- Cedar: Naturally resistant to decay and insects.
- Redwood: Offers beauty and durability.
- Treated Pine: Cost-effective and long-lasting when properly maintained.
Creating functional outdoor spaces requires thoughtful design. Think of your garden or patio as an extension of your home! This subsection will guide you through planning and executing outdoor woodworking projects that enhance your outdoor living experience. Consider elements like:
- Comfort: Choose designs that invite relaxation.
- Functionality: Ensure your structures serve a purpose, whether for shade, seating, or storage.
Q: What tools do I need to start advanced woodworking projects?
A: Essential tools include a quality saw, chisels, clamps, a router, and a sander. As you progress, you may want to invest in more specialized tools.
Q: How do I choose the right wood for my project?
A: Consider the project's purpose, location, and desired aesthetic. Hardwoods are typically more durable, while softwoods are easier to work with.
Q: Can I learn advanced techniques on my own?
A: Absolutely! There are many resources available, including online tutorials, books, and local woodworking classes.
With these insights and techniques, you're well on your way to tackling advanced woodworking projects that will not only challenge you but also fill you with pride and accomplishment. Happy woodworking!

Complex Furniture Designs
Creating complex furniture pieces is like embarking on a thrilling adventure in the world of woodworking. It's not just about assembling wood; it's about crafting a masterpiece that showcases your skills and creativity. Imagine designing a stunning dining table that becomes the centerpiece of family gatherings or a beautifully crafted cabinet that holds your cherished belongings. These projects not only challenge your technical abilities but also ignite your passion for woodworking.
When diving into , precision is paramount. Each measurement must be accurate, and every joint must fit perfectly. The beauty of woodworking lies in its details, and this is especially true for intricate furniture pieces. For instance, when constructing a dining table, consider the type of joints you will use. Mortise and tenon joints provide strength and stability, while dovetail joints add a touch of elegance. Understanding these techniques can elevate your project from ordinary to extraordinary.
Furthermore, creativity plays a vital role in the design process. Don't be afraid to think outside the box! Incorporating unique elements, such as curved lines or mixed materials, can set your furniture apart. For example, a table with a live edge can bring a touch of nature indoors, while a cabinet with glass doors can showcase your favorite items. Remember, the goal is to create functional art that reflects your personal style.
As you embark on these advanced projects, consider the following tips to enhance your results:
- Plan Thoroughly: Sketch your designs and create detailed plans before starting. This will save you time and materials.
- Choose Quality Materials: Invest in high-quality wood that not only looks good but also stands the test of time.
- Master Your Tools: Familiarize yourself with both hand and power tools. Knowing how to use them effectively can make a significant difference in your craftsmanship.
Moreover, don't underestimate the power of finishing. The right finish can enhance the natural beauty of the wood and protect your work from wear and tear. Whether you choose oil, varnish, or lacquer, applying a finish can transform your project into a stunning piece of art.
In conclusion, complex furniture designs are not just projects; they are an opportunity to express your creativity and skill. With careful planning, attention to detail, and a willingness to experiment, you can create furniture that not only serves a purpose but also tells a story. So, roll up your sleeves, grab your tools, and let your imagination run wild!
Q: What types of wood are best for complex furniture designs?
A: Hardwoods like oak, walnut, and cherry are excellent choices for their durability and aesthetic appeal.
Q: How can I ensure my joints are strong?
A: Using quality adhesives and precise joinery techniques, such as mortise and tenon or dovetail joints, can significantly enhance joint strength.
Q: What finishing techniques should I consider?
A: Popular finishing techniques include oil, polyurethane, and shellac. Each offers different levels of protection and aesthetics, so choose based on your project needs.

Intricate Wood Carvings
Wood carving is an art form that transcends mere craftsmanship; it’s a way to express creativity and bring life to a piece of wood. If you’re ready to take your woodworking skills to the next level, diving into is the perfect challenge. Imagine transforming a simple block of wood into a breathtaking piece of art that tells a story. Whether it’s a delicate floral design or a detailed animal figure, the possibilities are endless, and the satisfaction of seeing your vision come to life is unparalleled.
To get started on your wood carving journey, it's essential to understand the various techniques and tools that can elevate your work. For instance, mastering the art of relief carving can add depth and dimension to your projects. This technique allows you to create a three-dimensional effect, making your carvings pop out from the surface. It’s like bringing a painting to life, where shadows and highlights play a crucial role in the overall appearance.
Relief carving isn’t just about cutting into the wood; it’s about creating a narrative through your design. The technique can be broken down into several key steps:
- Planning Your Design: Before you even touch the wood, sketch your design. This will serve as your roadmap, guiding you through the carving process.
- Choosing Your Depth: Decide how deep you want to carve. The depth will affect how light interacts with your design, so consider this carefully.
- Layering Techniques: Start with the background and work your way to the foreground. This layering creates a natural flow and enhances the three-dimensional effect.
Once you’ve got your design down, the next step is to select the right tools for the job. Having the appropriate tools can make a world of difference in the quality of your work. For relief carving, you’ll want to invest in a few key items:
Here’s a quick overview of some essential tools you might consider:
| Tool | Purpose |
|---|---|
| Chisels | Used for removing large sections of wood. |
| Gouges | Perfect for creating curves and details. |
| V-tools | Great for fine lines and intricate details. |
| Knives | Ideal for detailed work and finishing touches. |
Each tool serves a unique purpose, and knowing when to use them can significantly impact the outcome of your carving. Don’t be afraid to experiment with different tools and techniques to find your style!
After you’ve painstakingly carved your masterpiece, the final step is adding the finishing touches. Finishing techniques can greatly enhance the visual appeal of your carvings. You might consider using stains, oils, or varnishes to bring out the natural beauty of the wood. Each finish can change the way your carving looks, highlighting different aspects of your design. Imagine applying a rich walnut stain that deepens the shadows of your intricate carvings, making them stand out even more.
In conclusion, intricate wood carvings are not just about skill; they’re about passion and creativity. As you embark on this journey, remember that every piece you create is a reflection of your artistic vision. Embrace the challenges, learn from your mistakes, and most importantly, enjoy the process. Your next project could be the one that truly showcases your talent!
Q: What type of wood is best for carving?
A: Softwoods like pine and basswood are excellent for beginners due to their easy workability. However, hardwoods like cherry or walnut can provide stunning results for more experienced carvers.
Q: How do I maintain my carving tools?
A: Regularly sharpen your tools and clean them after each use. Proper maintenance will extend their lifespan and ensure you achieve clean cuts.
Q: Can I learn wood carving without any prior experience?
A: Absolutely! While it helps to have some basic woodworking skills, many resources are available, including online tutorials and local classes, to help you get started.

Relief Carving Techniques
Relief carving is an art form that transforms a flat piece of wood into a stunning three-dimensional masterpiece. If you’ve ever admired a beautifully carved wooden panel, you know the magic that relief carving brings to woodworking. This technique allows you to create depth and texture, making your projects stand out in any space. But how do you achieve such captivating results? Let’s dive into some essential techniques that will elevate your relief carving skills.
First off, it’s crucial to understand the different types of relief carving: **low relief** and **high relief**. In low relief, the design barely stands out from the background, creating a subtle effect. High relief, on the other hand, projects significantly from the surface, often giving the illusion of figures emerging from the wood. Each type has its unique charm and applications, so consider what best suits your project.
To start your relief carving journey, you’ll want to sketch your design directly onto the wood. This initial step is vital as it lays the groundwork for your carving. Don’t rush this part; spend time refining your design until you’re satisfied. Once your outline is ready, it’s time to grab your tools. A variety of chisels and gouges are at your disposal, and each serves a specific purpose. For instance, U-gouges are excellent for creating rounded shapes, while V-gouges are perfect for fine details and lines.
As you begin carving, remember to work in layers. Start with the background, removing material gradually to create depth. This technique not only helps in achieving a professional look but also allows you to adjust your design as you go. It’s like sculpting a masterpiece from a block of marble; every cut reveals more of the beauty hidden within the wood.
Another key aspect to consider is **shading**. By varying the depth of your cuts, you can create shadows that enhance the three-dimensional effect of your carvings. A well-executed shading technique can make a simple design appear incredibly intricate. To achieve this, practice varying the pressure and angle of your tools, and don’t be afraid to experiment with different depths.
Finally, let’s not forget the finishing touches. Once your relief carving is complete, applying the right finish can make all the difference. A simple coat of oil or varnish can enrich the wood’s natural color and highlight the intricate details of your work. Consider using a matte finish for a more rustic look or a glossy finish for a modern touch. Whatever you choose, ensure that it complements the overall aesthetic of your piece.
In summary, relief carving is a rewarding endeavor that challenges your creativity and technical skills. By mastering these techniques, you’ll be able to create stunning pieces that are not only functional but also works of art. So, grab your tools, sketch out your ideas, and let your imagination run wild!
- What tools do I need for relief carving? For relief carving, you’ll need a variety of chisels, including U-gouges and V-gouges, as well as a mallet for striking the chisels.
- Can I use any type of wood for relief carving? While you can use various types of wood, softer woods like basswood or butternut are recommended for beginners due to their ease of carving.
- How do I prevent mistakes while carving? Take your time and carve slowly. If you make a mistake, you can often fix it by adjusting your design or using wood filler for minor errors.

Choosing the Right Tools
When it comes to relief carving, selecting the right tools is not just important; it's absolutely crucial for achieving the results you desire. Imagine trying to paint a masterpiece with a brush that’s too coarse or too small—your vision would remain unrealized. Similarly, your choice of tools can either make or break your woodworking project. So, what should you consider when choosing your arsenal of carving tools?
First and foremost, you need to understand the various types of tools available. Each tool serves a distinct purpose, and knowing what to use for each task will save you time and frustration. Here’s a quick rundown of essential tools for relief carving:
- Chisels: These are your primary tools for removing wood. They come in various shapes and sizes, so having a selection is beneficial.
- Gouges: These tools have curved blades and are perfect for creating rounded shapes and deep cuts.
- V-tools: Ideal for adding fine details and textures, these tools will help you achieve intricate designs.
- Knives: A sharp carving knife is essential for making precise cuts and refining details.
- Rasps and Files: Use these for smoothing out surfaces and adding finishing touches to your carvings.
Next, consider the quality of the tools. Investing in high-quality tools may seem daunting at first, but think of it as laying a solid foundation for your woodworking journey. Quality tools last longer, perform better, and provide a more enjoyable carving experience. Just like a chef wouldn’t use dull knives, you shouldn’t settle for subpar tools that hinder your creativity.
Another factor to consider is the ergonomics of the tools. Since carving can be a time-consuming process, having tools that fit comfortably in your hands will help prevent fatigue. Look for tools with well-designed handles that provide a good grip. You’ll be amazed at how much easier and more enjoyable your carving sessions will be when you’re not fighting against discomfort.
Now, let’s talk about maintenance. Just like your favorite pair of shoes, your tools require care to perform their best. Regularly sharpening your chisels and gouges will ensure they remain effective and safe to use. A dull tool can lead to accidents and frustration, while a sharp tool glides through wood like a hot knife through butter.
Lastly, don't forget about storage. Keeping your tools organized not only protects them but also makes it easier to find what you need when you need it. Consider investing in a dedicated tool chest or a wall-mounted pegboard to keep everything in its place. A well-organized workspace can inspire creativity and streamline your workflow.
In summary, choosing the right tools for relief carving is a multifaceted process that involves understanding the types of tools available, investing in quality, considering ergonomics, maintaining your tools, and organizing your workspace. By paying attention to these factors, you'll set yourself up for success in your woodworking endeavors, allowing your creativity to flourish and your skills to advance.
Q: What is the best wood for relief carving?
A: Softwoods like basswood and pine are excellent choices for beginners due to their ease of carving, while hardwoods like cherry and walnut offer durability and a beautiful finish for more advanced projects.
Q: How do I maintain my carving tools?
A: Regularly sharpen your tools with a whetstone or sharpening system, clean them after each use, and store them in a dry place to prevent rust.
Q: Can I use power tools for relief carving?
A: Yes, power tools can speed up the process, but they require skill and caution. Many woodworkers prefer hand tools for the control and precision they offer.
Q: How long does it take to become proficient at relief carving?
A: Proficiency varies by individual, but with consistent practice, you can expect to see significant improvement within a few months.

Finishing Touches
When it comes to woodworking, the can make all the difference. Imagine crafting a stunning piece of furniture, only to overlook the final details that elevate it from ordinary to extraordinary. Finishing is not just about aesthetics; it also serves to protect your hard work from the elements and daily wear. Whether you're working on a beautifully carved chair or a sleek dining table, the right finish can enhance the natural beauty of the wood while providing a durable shield against scratches, stains, and moisture.
There are various types of finishes available, each offering unique benefits and visual effects. For instance, oil finishes penetrate deeply into the wood, bringing out its grain and providing a warm, natural look. On the other hand, polyurethane finishes create a tough, protective layer that is ideal for high-traffic furniture. It's essential to choose a finish that complements your project’s purpose and desired aesthetic. You might want to consider factors such as the wood type, the intended use of the item, and whether it will be placed indoors or outdoors.
To help you navigate the world of finishes, here’s a quick overview of some popular options:
| Finish Type | Benefits | Best Used On |
|---|---|---|
| Oil Finish | Enhances grain, easy to apply | Indoor furniture, decorative items |
| Polyurethane | Durable, water-resistant | High-traffic areas, outdoor projects |
| Lacquer | Fast-drying, glossy finish | Fine furniture, cabinetry |
| Varnish | UV protection, tough finish | Outdoor furniture, boats |
Applying the finish is where your skills truly shine. Start by preparing the surface; sanding is crucial to ensure a smooth application. Use progressively finer sandpaper to eliminate any imperfections, and always sand in the direction of the grain to avoid scratches. Once you’ve achieved a silky-smooth surface, it's time to apply your chosen finish. Depending on the type, you might use a brush, cloth, or spray can. Always follow the manufacturer's instructions for the best results.
After applying the finish, patience is key. Allow adequate drying time between coats, and don't hesitate to sand lightly between applications. This process will create a flawless finish that not only looks stunning but also extends the life of your woodworking project. Finally, consider adding a protective topcoat for extra durability, especially for pieces that will see heavy use.
- What is the best finish for outdoor furniture?
For outdoor projects, polyurethane or varnish are excellent choices due to their water resistance and durability against the elements.
- Can I use oil finishes on outdoor projects?
While oil finishes can be used outdoors, they require more frequent reapplication to maintain protection. Consider using a marine oil for better results.
- How many coats of finish should I apply?
Typically, 2-3 coats are recommended for optimal protection and appearance, but always refer to the product instructions for specific guidance.

Inlay Work for Advanced Projects
When it comes to woodworking, inlay work is like adding a secret ingredient to a recipe—it can transform an ordinary piece into something extraordinary. Imagine a beautifully crafted table that features intricate designs inlaid with contrasting materials. This technique not only enhances the visual appeal but also showcases your craftsmanship skills. However, diving into the world of inlay work requires a solid understanding of the materials and methods involved.
First off, let’s talk about the materials. Inlay can be done using a variety of materials, such as wood, metal, or even stone. Each option brings its own unique flair. For example, using exotic woods for inlays can create a stunning contrast against a lighter wood base. Here’s a simple rundown of some popular inlay materials:
| Material | Characteristics | Best Used For |
|---|---|---|
| Wood | Natural look, easy to work with | Furniture, decorative pieces |
| Metal | Durable, adds a modern touch | Artistic designs, accents |
| Stone | Heavy, unique textures | Tables, coasters, art pieces |
Once you've chosen your materials, the next step is to plan your design. This is where your creativity can truly shine. You might want to sketch out your design on paper first. Think of it as a blueprint for your masterpiece. Consider the scale and placement of your inlays. Will they be scattered throughout the piece or form a cohesive pattern? Taking the time to plan will save you headaches later on.
Now, let’s dive into the process. The first step is to create a recess in the wood where the inlay will go. This typically involves using a chisel or router to carefully carve out the shape. Precision is key here; any mistakes can lead to a less-than-perfect fit. Once the recess is ready, you can place your inlay material into the space. Make sure to use a strong adhesive to secure it in place.
After the adhesive has dried, the next step is to sand the surface smooth. This is crucial for achieving a seamless look where the inlay meets the surrounding wood. You want it to look like it was always meant to be there. A fine-grit sandpaper will help you achieve that flawless finish.
Lastly, don't underestimate the power of finishing touches. Applying a finish not only protects your work but also enhances its beauty. You might choose an oil finish for a natural look or a polyurethane for added durability. The choice is yours, and it can dramatically affect the final appearance of your inlay work.
Inlay work is not just a technique; it's an art form that can elevate your woodworking projects to new heights. While it may seem daunting at first, the satisfaction of completing an intricate inlay design is immeasurable. So, gather your materials, sketch out your designs, and let your creativity flow. You’ll find that the journey of inlay work is as rewarding as the final product itself.
- What tools do I need for inlay work? You will need chisels, a router, and a strong adhesive. A fine-grit sandpaper is also essential for finishing.
- Can I use any type of wood for inlays? Yes, but it's best to choose woods that contrast well with your base material for a more striking effect.
- How do I ensure my inlays fit perfectly? Take your time when carving the recess and always measure twice before cutting.

Outdoor Woodworking Challenges
Building outdoor structures can be an exhilarating adventure for any seasoned woodworker. However, it comes with its own set of unique challenges that can test your skills and creativity. From selecting the right materials to designing for durability and functionality, outdoor woodworking requires careful planning and execution. Imagine crafting a stunning pergola that not only enhances your garden but also withstands the test of time—sounds rewarding, right? Let’s dive into the essential aspects of outdoor woodworking that will help you rise to the challenge.
One of the primary challenges in outdoor woodworking is choosing the right materials. Unlike indoor projects, outdoor structures are constantly exposed to changing weather conditions, which can lead to deterioration if the wrong materials are used. For instance, using untreated wood can result in rotting or warping, while choosing weather-resistant woods can significantly enhance the longevity of your projects. Below is a table highlighting some of the most popular weather-resistant woods:
| Wood Type | Durability | Common Uses |
|---|---|---|
| Teak | Very High | Outdoor furniture, decking |
| Cedar | High | Fencing, garden beds |
| Redwood | High | Decking, pergolas |
| Pressure-Treated Pine | Medium | Decking, outdoor structures |
When it comes to designing functional outdoor spaces, the challenge lies in harmonizing aesthetics with practicality. You want your outdoor woodworking projects to not only look good but also serve a purpose. For example, a garden bench should provide comfortable seating while complementing the surrounding landscape. To achieve this, consider the following:
- Scale and Proportion: Ensure your project fits well within the space, maintaining a balance with existing elements.
- Accessibility: Design structures that are easy to access and use, enhancing the overall experience of your outdoor space.
- Integration with Nature: Use natural colors and textures that blend seamlessly with your garden or patio.
Moreover, don’t forget about the importance of protective finishes. Applying the right finish not only enhances the appearance of your outdoor projects but also provides a barrier against moisture and UV rays. Products such as marine varnish or penetrating oils can be excellent choices for outdoor wood, ensuring your hard work remains beautiful for years to come.
In conclusion, outdoor woodworking challenges are not just hurdles; they are opportunities to elevate your craftsmanship. By choosing durable materials, designing with purpose, and applying the right finishes, you can create stunning outdoor structures that are both functional and visually appealing. So, gear up and embrace these challenges—your next masterpiece awaits!
Q: What is the best wood for outdoor projects?
A: The best woods for outdoor projects include teak, cedar, redwood, and pressure-treated pine, as they offer excellent durability and resistance to weather conditions.
Q: How can I protect my outdoor wood projects?
A: You can protect your outdoor wood projects by applying a high-quality finish such as marine varnish or penetrating oil, which will help shield the wood from moisture and UV damage.
Q: Are there specific design considerations for outdoor woodworking?
A: Yes, consider factors like scale, accessibility, and integration with nature to ensure your outdoor woodworking projects are both functional and aesthetically pleasing.

Weather-Resistant Materials
When embarking on outdoor woodworking projects, choosing the right materials is crucial for ensuring durability and longevity. The elements can be harsh, and your creations deserve to withstand rain, sun, and snow without deteriorating. Imagine investing hours into crafting a beautiful garden bench, only to have it warp or rot after a season of exposure. To avoid such heartbreak, let’s explore some of the best that can elevate your outdoor woodworking game.
First up, we have Western Red Cedar. This wood is not only stunning with its rich color and aroma but also naturally resistant to moisture and insects. Its inherent oils help it resist decay, making it a top choice for outdoor furniture and structures. Another excellent option is Teak, known for its impressive durability. Teak wood contains natural oils that protect it from water damage and UV rays, which means it can last for decades with minimal maintenance. If you’re looking for a more budget-friendly option, consider Pressure-Treated Pine. While it may not have the same aesthetic appeal as cedar or teak, it’s treated to resist rot and insects, making it a reliable choice for outdoor projects.
Additionally, composite materials have gained popularity in recent years. These materials, made from a blend of wood fibers and plastic, offer the best of both worlds: the look of wood with the durability of plastic. They are resistant to fading, warping, and splintering, which makes them ideal for decking and outdoor furniture. However, it’s essential to choose high-quality composites to ensure they stand the test of time.
Now, let’s not forget about finishes! A good finish can significantly enhance the weather resistance of your wooden projects. Applying a high-quality water-repellent sealant or UV-blocking finish can protect your wood from moisture and sun damage. Regular maintenance, such as reapplying these finishes every couple of years, will keep your outdoor pieces looking fresh and new.
In summary, selecting the right weather-resistant materials is vital for any outdoor woodworking project. Whether you opt for the natural beauty of cedar, the longevity of teak, the affordability of pressure-treated pine, or the modern appeal of composite materials, each choice comes with its unique benefits. Pairing these materials with proper finishes will ensure your creations not only withstand the elements but also remain a source of pride for years to come.
- What is the best wood for outdoor furniture?
Western Red Cedar and Teak are both excellent choices due to their natural resistance to moisture and insects. Pressure-treated pine is also a viable option for those on a budget.
- How often should I apply a protective finish to my outdoor wood projects?
It’s recommended to reapply protective finishes every 1-3 years, depending on exposure to the elements and the type of finish used.
- Can composite materials be used for all outdoor projects?
While composite materials are great for decking and furniture, they may not be suitable for projects requiring intricate detailing that solid wood can provide.

Designing Functional Outdoor Spaces
Designing functional outdoor spaces is like crafting a masterpiece; it requires a blend of creativity, practicality, and a dash of inspiration. When you step outside, what do you want to feel? Comfort? Serenity? Maybe a touch of adventure? The key to achieving this lies in thoughtful planning. Imagine transforming your backyard into a personal oasis where every corner serves a purpose. From cozy seating areas to vibrant gardens, the possibilities are endless!
First, it’s essential to consider the layout of your space. Think of it as a canvas where each element plays a role in the overall picture. You might want to start by identifying the main activities you envision. Will it be a space for entertaining guests, a serene garden retreat, or perhaps a playful area for kids? Once you have a clear idea, you can begin sketching out a rough layout. This doesn’t have to be fancy; even a simple drawing can help visualize how different components will interact.
Next, you'll want to think about seating arrangements. Comfortable seating is a must for any outdoor space, as it invites people to linger and enjoy the surroundings. Consider a mix of seating options, such as benches, chairs, and even hammocks. A well-placed fire pit can also add warmth and a gathering point for family and friends. Here’s a quick tip: arrange your seating to face each other, creating a cozy atmosphere that encourages conversation.
Now, let’s talk about landscaping. Plants can transform any outdoor area into a lush paradise. Think about incorporating a variety of plants that bloom at different times of the year, ensuring your space is vibrant year-round. You could even create themed areas, such as a herb garden for culinary enthusiasts or a butterfly garden to attract pollinators. The beauty of landscaping is that it can evolve over time, allowing you to experiment with different plants and designs.
Another crucial aspect to consider is lighting. Outdoor lighting can dramatically change the ambiance of your space. Imagine hosting an evening gathering with soft, twinkling lights strung above, or strategically placed lanterns that guide guests through your garden. Not only does lighting enhance the aesthetic, but it also improves safety, allowing you to navigate your outdoor space after dark. You might want to consider solar-powered lights for an eco-friendly option that requires minimal maintenance.
Finally, don’t overlook the importance of accessories. These finishing touches can elevate your outdoor space from ordinary to extraordinary. Think about adding decorative elements like outdoor rugs, cushions, or even art pieces that reflect your personality. These details not only enhance the visual appeal but also make the space feel more inviting and comfortable.
In summary, designing functional outdoor spaces is about creating a harmonious balance between aesthetics and practicality. By considering your layout, seating, landscaping, lighting, and accessories, you can craft an outdoor area that is not only beautiful but also serves your lifestyle needs. So, grab your tools, unleash your creativity, and watch your outdoor space transform into a stunning retreat!
- What are some essential elements for a functional outdoor space? Key elements include comfortable seating, effective lighting, and thoughtful landscaping.
- How can I make my outdoor space more inviting? Incorporate accessories like cushions, outdoor rugs, and decorative elements that reflect your style.
- What type of plants should I use for my outdoor space? Choose a variety of plants that bloom in different seasons to ensure year-round beauty.
- How important is lighting in outdoor design? Lighting is crucial for both ambiance and safety, allowing you to enjoy your space after dark.
Frequently Asked Questions
- What are some advanced woodworking projects I can try?
If you're looking to challenge yourself, consider tackling complex furniture designs like dining tables or cabinets. You might also explore intricate wood carvings or inlay work, which can really elevate your skills and creativity. Outdoor projects such as pergolas or garden benches can also be a great way to test your abilities while enjoying the fresh air!
- How do I choose the right tools for intricate wood carvings?
Selecting the right tools is crucial for achieving stunning results in wood carving. Look for specialized carving tools like gouges, chisels, and knives that suit the specific techniques you plan to use. Investing in quality tools will make a significant difference in the precision and detail of your work.
- What finishing techniques can enhance my woodworking projects?
Finishing techniques are essential for protecting and beautifying your wood creations. You can use stains, oils, or varnishes to enhance the natural beauty of the wood while providing a layer of protection. Experimenting with different finishes can help you find the perfect look for your projects!
- What materials should I use for outdoor woodworking projects?
When working on outdoor projects, it's vital to choose weather-resistant materials. Woods like cedar, redwood, and pressure-treated lumber are great options due to their durability against the elements. Additionally, using exterior-grade finishes will help protect your projects from moisture and UV damage.
- How can I design functional outdoor spaces with woodworking?
Designing functional outdoor spaces involves thoughtful planning. Consider how you intend to use the space, whether for relaxation, dining, or entertainment. Create a layout that incorporates seating, tables, and pathways, ensuring that your woodworking projects enhance the overall functionality and aesthetic of your garden or patio.