Creative Ideas for Recycled Garden Decor
Have you ever looked at your garden and thought it could use a little more personality? Or maybe you have a pile of old items just sitting around, waiting for a new purpose? Well, you're in luck! This article explores innovative ways to transform everyday recyclable materials into beautiful garden decor that not only enhances your outdoor spaces but also promotes sustainability and creativity. Imagine stepping into your garden and seeing a vibrant display of colors and textures, all made from items you would typically throw away. It's not just about beautifying your space; it's about making a statement. By using recycled materials, you’re not only saving money but also reducing waste, which is a win-win for both your wallet and the planet. So, let’s dive into some fantastic ideas that will inspire you to bring your garden to life with recycled decor!
One of the easiest ways to add charm to your garden is by creating upcycled planters. Think about those old containers, bottles, and tires that are just taking up space in your garage. Instead of tossing them, why not turn them into unique planters? For instance, an old tire can be painted in bright colors and stacked to create a whimsical flower bed. Glass bottles can be cut and turned into hanging planters that catch the sunlight beautifully. The possibilities are endless! Just imagine how your garden will pop with these creative touches. Plus, it’s a fantastic conversation starter when friends visit!
Let’s talk about garden art. This is where your creativity can really shine! You can create stunning pieces using discarded materials like metal scraps, glass bottles, and wooden pallets. Picture this: a colorful mosaic made from broken tiles or glass bottles arranged in a beautiful pattern. Not only does it serve as art, but it also adds a personal touch to your garden. Each piece tells a story, reflecting your unique style and personality. So, roll up your sleeves and let your imagination run wild!
What’s more relaxing than the gentle sound of wind chimes? You can easily make your own using recycled items like old utensils, bottle caps, and tin cans. These wind chimes not only look great but also add a melodic touch to your garden. Imagine sitting outside, sipping your favorite drink, while the wind carries soft chimes through the air. It’s a simple pleasure that can transform your outdoor experience.
For a more elegant touch, consider creating beautiful hanging wind chimes that sway gracefully in the breeze. You can use materials like bamboo sticks, old keys, or even colorful beads to craft something truly unique. Hang them from trees or hooks around your garden to create an enchanting atmosphere that delights the senses.
Another fantastic idea is to transform old forks, spoons, and other utensils into decorative garden stakes. These quirky stakes can serve both functional and aesthetic purposes, guiding visitors through your garden while adding a touch of whimsy. You can paint them in bright colors or leave them as is for a rustic look. Either way, they’ll surely catch the eye!
Why not take it a step further and repurpose old furniture into stylish garden pieces? Think about turning an old wooden chair into a charming plant stand or a discarded table into a unique outdoor dining area. With a little creativity and some paint, you can breathe new life into these items, making your outdoor living area both functional and fashionable. Imagine lounging on a bench made from reclaimed wood while enjoying the beauty of your garden!
Creating sustainable pathways is another great way to enhance your garden’s visual appeal. You can use recycled bricks, stones, and wood to form beautiful walkways that lead through your garden. Not only do these paths serve a practical purpose, but they also add character to your outdoor space. Consider laying down old bricks in a unique pattern or using flat stones to create a natural look that blends seamlessly with your garden.
Want to add a personal touch to your pathways? Why not make personalized stepping stones from recycled materials? You can use concrete, old tiles, or even decorative glass to create stones that reflect your style. Imagine walking through your garden and stepping on stones that feature your favorite designs or family handprints—what a special touch!
Finally, don’t overlook the importance of mulch and ground cover! Utilizing shredded paper, cardboard, and other recyclable materials as mulch can improve soil health while reducing garden waste. Not only does it help retain moisture in the soil, but it also keeps weeds at bay. Plus, it’s an eco-friendly way to give your plants the nutrients they need to thrive. Who knew being sustainable could be so beautiful?
- What materials can I use for upcycled planters? You can use almost anything! Old tires, containers, bottles, and wooden crates are great options.
- How do I make wind chimes from recycled items? Gather items like old utensils, bottle caps, and string. Attach them to a base and hang them where they can catch the wind.
- Can I really use cardboard as mulch? Yes! Shredded cardboard can be an excellent mulch option, helping to retain moisture and suppress weeds.

Upcycled Planters
Are you ready to breathe new life into your garden while keeping Mother Earth smiling? are not just a trend; they are a fantastic way to showcase your creativity and sustainability. Imagine transforming everyday items that would typically end up in the landfill into vibrant homes for your plants. It’s like giving a second chance to objects that still have plenty of stories to tell!
Let’s dive into some fun ideas for upcycling containers that you might already have lying around. Old pots, tin cans, and even discarded shoes can become stunning planters with just a little imagination. For instance, have you ever thought about using an old tire as a planter? Not only does it add a unique touch to your garden, but it also provides a deep space for your plants to grow. Just give it a splash of paint to match your garden’s theme, and voilà—an eye-catching planter!
Here’s a quick breakdown of some common items that can be upcycled into planters:
| Item | How to Use | Benefits |
|---|---|---|
| Old Buckets | Drill holes for drainage, paint or decorate. | Durable and can hold a variety of plants. |
| Wine Bottles | Cut in half for shallow planters or use whole for vertical gardens. | Stylish and perfect for herbs or succulents. |
| Wooden Pallets | Stack and fill with soil to create a vertical garden. | Space-saving and adds rustic charm. |
But wait, there’s more! You can also consider using plastic containers or even styrofoam boxes that are often discarded after grocery shopping. These can make excellent planters with a little creativity. Just remember to poke some holes in the bottom for drainage. You can even enhance their look by wrapping them in jute or burlap for a natural touch. The possibilities are endless!
Now, let’s not forget about the personal touch. You can paint your upcycled planters with vibrant colors or patterns that reflect your personality. How about adding some funky designs or even painting inspirational quotes? This not only personalizes your garden but also makes it a delightful place to relax and unwind.
Incorporating upcycled planters into your garden isn’t just about aesthetics; it’s also about fostering a sense of community and encouraging others to think creatively about waste. When friends and neighbors see your unique creations, they might be inspired to join in on the fun. Who knows? You could even start a local upcycling group where everyone shares their projects and ideas. Now that’s a garden party waiting to happen!
So, whether you’re a seasoned gardener or just starting, consider embracing the world of upcycled planters. It’s a beautiful blend of art, sustainability, and functionality that can transform your outdoor space into a vibrant oasis. Plus, every time you look at your unique planters, you’ll be reminded of the creativity and effort you put into making your garden not just a place for plants, but a reflection of you!

Garden Art from Recyclables
When it comes to sprucing up your outdoor space, can truly transform your garden into a vibrant oasis. The beauty of using discarded materials is not just in the cost savings; it’s about making a statement and embracing your creativity. Imagine walking through your garden and seeing a stunning sculpture made from old metal scraps or a colorful mosaic crafted from shattered glass bottles. These artistic expressions not only enhance the aesthetic appeal of your garden but also promote sustainability by giving new life to items that would otherwise end up in a landfill.
One of the most exciting aspects of creating garden art is the endless possibilities. You can incorporate various materials, such as:
- Metal scraps - Old tools, pipes, or cans can be welded or assembled into whimsical sculptures.
- Glass bottles - These can be transformed into beautiful garden borders or even bird feeders.
- Wooden pallets - Perfect for creating rustic signs, vertical gardens, or even trellises.
Let’s dive deeper into some specific projects that can ignite your imagination. For instance, using old bicycle wheels can yield stunning garden decorations. You can paint them in vibrant colors and hang them on walls or fences to create a focal point. Another fantastic idea is to use wine bottles as garden borders. Simply bury the necks of the bottles into the ground, and you’ll have a unique and eye-catching edge to your flower beds.
One particularly enchanting project involves creating garden totems. These are tall, colorful structures made from stacking various recycled materials like plates, bowls, and vases. The result is a mesmerizing piece of art that can serve as a conversation starter during garden parties. You can customize these totems with your favorite colors and patterns, making them a true reflection of your personality.
Moreover, don’t overlook the potential of wind chimes crafted from recycled items. Whether you use old utensils, bottle caps, or even tin cans, the gentle sounds they produce can add a magical touch to your garden. The tinkling of wind chimes can be soothing, creating a serene atmosphere as you relax outdoors. Imagine the delight of hearing them sway in the breeze while enjoying a cup of tea on a sunny afternoon.
In conclusion, creating is not only a fun and fulfilling activity, but it also helps in fostering a sense of community and environmental responsibility. So, gather your materials, unleash your creativity, and let your garden tell a story of sustainability and artistic expression!
Q: What types of materials are best for garden art?
A: Almost anything can be used! Look for items like metal scraps, glass bottles, wooden pallets, and ceramics. The key is to choose materials that can withstand outdoor conditions.
Q: How do I ensure my garden art is safe for the environment?
A: Use non-toxic paints and sealants, and avoid materials that may leach harmful substances into the soil.
Q: Can children participate in making garden art?
A: Absolutely! Involve your kids in the creative process. It’s a fantastic way to teach them about recycling and creativity.
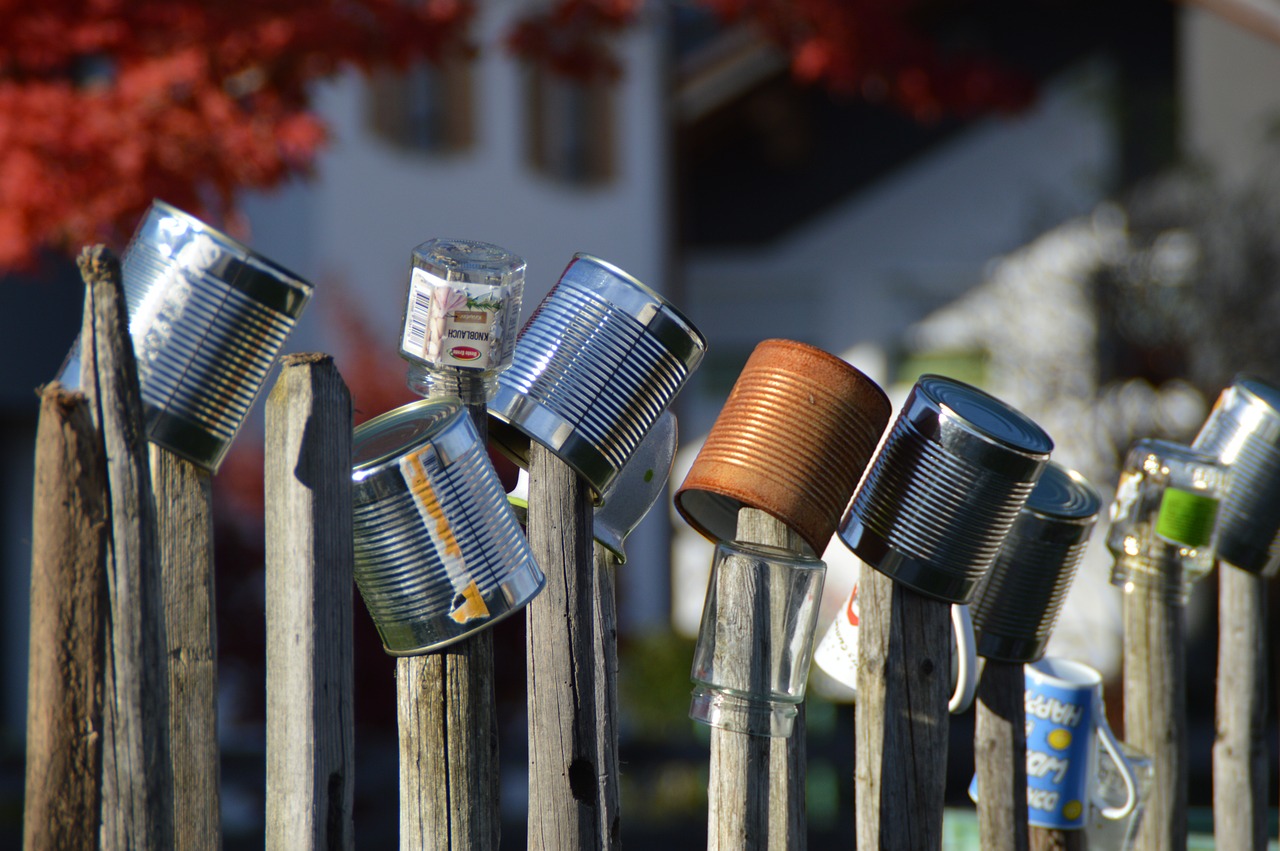
Wind Chimes
Wind chimes are more than just decorative pieces; they are a delightful way to bring music and serenity to your garden. Imagine stepping outside and being greeted by the gentle sounds of wind chimes dancing in the breeze. They can transform an ordinary outdoor space into a tranquil oasis, creating a symphony of nature that soothes the soul. The best part? You can easily make your own wind chimes from recycled materials, allowing you to express your creativity while promoting sustainability.
When it comes to crafting your wind chimes, the possibilities are endless. You can use a variety of items you might already have lying around your home. Here are some fantastic materials to consider:
- Old Utensils: Forks, spoons, and knives can be repurposed into stunning chimes that tinkle beautifully in the wind.
- Bottle Caps: These little gems can create a playful sound, and their vibrant colors add a pop of personality.
- Tin Cans: With a little creativity, you can turn tin cans into charming chimes that resonate with a rustic feel.
- Glass Bottles: Cut and shaped properly, glass bottles can produce lovely melodic tones.
To get started on your wind chime project, gather your materials and follow these simple steps:
- Choose your base: This could be a sturdy branch, a wooden dowel, or even a repurposed coat hanger.
- Prepare your chimes: Cut your chosen materials to the desired lengths. For utensils, consider bending them for a unique look.
- Assemble: Attach your chimes to the base using strong string or fishing line, ensuring they hang freely for optimal sound.
- Finish with flair: Add beads, shells, or other decorative elements to personalize your wind chimes.
As you hang your newly crafted wind chimes in your garden, take a moment to appreciate the beauty of your creation. Not only have you transformed discarded items into a functional art piece, but you've also contributed to a more sustainable world. The sounds produced by your wind chimes will remind you of the beauty of recycling and creativity, resonating with every breeze that passes through your garden.
Q: What materials work best for making wind chimes?
A: Almost any lightweight material can be used, including metal utensils, glass bottles, and wooden scraps. The key is to ensure they can produce sound when they hit each other.
Q: How can I make my wind chimes more colorful?
A: You can paint your materials or incorporate colorful beads and other decorations into your design.
Q: Do I need special tools to make wind chimes?
A: Basic tools like scissors, a drill (for glass or wood), and some string or wire are usually sufficient.

Hanging Wind Chimes
Imagine the gentle sound of wind chimes dancing in the breeze, each note a whisper of creativity and sustainability. are not just beautiful additions to your garden; they are a celebration of upcycling and a testament to your artistic flair. The best part? You can create them using items that would otherwise end up in the trash! From old utensils to bottle caps, the possibilities are endless.
To get started, gather some materials that you might already have lying around the house. Think about those old forks and spoons that have seen better days or the collection of bottle caps from your last party. You can also use tin cans, which can be easily transformed into charming chimes. The beauty of using recycled items is that each piece tells a story, adding a personal touch to your garden.
Here's a simple way to create your own hanging wind chimes:
- Collect your materials: Look for items like old keys, beads, shells, or even pieces of driftwood. The more eclectic, the better!
- Prepare your base: You can use a sturdy branch, an embroidery hoop, or even a metal ring as the base to hang your chimes.
- Assemble your chimes: Use fishing line or twine to attach your chosen items to the base. Experiment with different lengths to create varying sounds.
- Finish it off: Hang your wind chime in a spot where it can catch the breeze, and enjoy the soothing sounds it creates.
As you craft your wind chimes, think about the colors and textures you want to incorporate. You can paint some of the materials for a pop of color or leave them as they are for a rustic feel. The key is to let your imagination run wild! Not only will you have a unique piece of art, but you'll also contribute to reducing waste and promoting sustainability.
Once your wind chimes are complete, you’ll find that they do more than just look good. They can serve as a gentle reminder of your commitment to the environment. Plus, every time they tinkle in the wind, you’ll be reminded of the creativity that can arise from what we often consider 'junk'. So, why not gather your materials and start crafting? Your garden will thank you!
Q: What materials can I use for making wind chimes?
A: You can use a variety of materials such as old utensils, bottle caps, tin cans, driftwood, and even shells. The more creative, the better!
Q: How do I ensure my wind chimes are durable?
A: Choose sturdy materials and secure them well using fishing line or twine. Make sure to hang them in a sheltered spot to protect them from harsh weather.
Q: Can I paint my recycled materials?
A: Absolutely! Painting can add a vibrant touch to your wind chimes. Just ensure the paint is suitable for outdoor use to withstand the elements.

Garden Stakes
Transforming everyday utensils into is not just a fun DIY project; it’s a fantastic way to add a personal touch to your garden while keeping the environment in mind. Imagine walking through your garden and being greeted by a whimsical display of old forks and spoons, each telling its own story. By repurposing these items, you not only reduce waste but also create an eye-catching focal point that sparks conversation. Who knew that a simple fork could stand tall among your flowers, proudly marking the rows of your favorite herbs?
To get started, gather some old utensils that you no longer use. Forks, spoons, and even knives can be transformed into unique stakes. The beauty of using these items lies in their varied designs—each piece has its own character, from ornate vintage forks to simple, sturdy spoons. You can leave them as they are for a rustic look, or you can give them a fresh coat of paint to match your garden's theme. The possibilities are endless!
Here's a quick guide to creating your own garden stakes:
- Choose Your Utensils: Select a variety of forks, spoons, and knives in different sizes and styles.
- Prepare the Stakes: Clean the utensils thoroughly. If you want to paint them, use outdoor-safe paint.
- Attach a Base: Use a sturdy stick or dowel to attach your utensils. You can bend the handles to create a more dynamic look.
- Insert into the Ground: Simply push the stakes into the soil where you want them, ensuring they are secure.
Not only do these garden stakes serve as markers for your plants, but they also add a touch of whimsy and creativity that can enhance your outdoor space. Plus, they are an excellent conversation starter for guests who might be curious about your unique garden decor. You can even turn this into a fun family project—get the kids involved and let them paint and decorate their own stakes!
As you create your garden stakes, consider incorporating other recycled materials for added flair. For instance, you can attach old buttons, beads, or even pieces of broken jewelry to the tops of your stakes. This will not only beautify your garden but also showcase your creativity. The result? A garden that reflects your personality and commitment to sustainability.
Q: What materials do I need to make garden stakes?
A: You will need old utensils (forks, spoons, knives), a sturdy stick or dowel, outdoor-safe paint (optional), and any decorative items you wish to add, such as buttons or beads.
Q: Can I use any type of utensils?
A: Yes! You can use any utensils you have on hand, but keep in mind that some materials may be more durable than others when exposed to the elements.
Q: How do I ensure my garden stakes last?
A: To increase durability, consider sealing your painted stakes with a clear outdoor sealant. This will protect them from moisture and fading.
Q: Can I sell my recycled garden stakes?
A: Absolutely! Many people appreciate handmade, eco-friendly decor. Consider setting up a booth at a local craft fair or selling them online.
Garden Furniture
Imagine stepping into your backyard and being greeted by a cozy seating area that exudes charm and personality. Repurposing old furniture into stylish garden pieces not only enhances your outdoor space but also tells a story of creativity and sustainability. From weathered chairs to vintage tables, the possibilities are endless when it comes to giving new life to discarded items. Why not transform that old wooden chair into a delightful planter, or turn a forgotten picnic table into a rustic outdoor dining area? The beauty of upcycling is that it allows you to express your unique style while being kind to the planet.
One popular idea is to take an old wooden pallet and convert it into a functional garden bench. With a bit of sanding, some paint, and a few cushions, you can create a comfortable spot to relax and enjoy your garden. Or consider using an old door as a table top, supported by sturdy crates or even stacked tires for a quirky touch. This not only saves you money but also makes for a great conversation starter when guests come over.
When it comes to garden furniture, think beyond traditional designs. You can create colorful seating by painting old chairs in vibrant hues, or even using fabric scraps to make cushion covers that add a pop of color. The key is to let your imagination run wild. After all, your garden is an extension of your home and should reflect your personality.
Additionally, using recycled materials for your garden furniture is a fantastic way to reduce waste. You can even involve your family in the process, making it a fun weekend project. Imagine the satisfaction of sitting on a bench made from a repurposed item that you all worked on together. You'll not only have beautiful furniture but also cherished memories to accompany it.
| Furniture Type | Recycled Material | Creative Idea |
|---|---|---|
| Bench | Wooden Pallet | Add cushions for comfort |
| Table | Old Door | Support with crates or tires |
| Chair | Vintage Dining Chair | Paint in bright colors |
In conclusion, creating garden furniture from recycled materials is not only an eco-friendly choice but also a way to add a personal touch to your outdoor space. So, gather those old items you were about to throw away and start crafting! You’ll be amazed at what you can create with a little bit of imagination and effort.
Q: What types of materials can I use for recycled garden furniture?
A: You can use a variety of materials, including wooden pallets, old doors, vintage chairs, and even metal scraps. The key is to ensure they are safe and sturdy for outdoor use.
Q: How do I ensure my recycled furniture lasts outdoors?
A: Treat your furniture with weatherproof finishes or paints to protect it from the elements. Regular maintenance, such as cleaning and reapplying protective coatings, will also help extend its life.
Q: Can I involve my kids in the upcycling projects?
A: Absolutely! Involving children in creative projects is a great way to teach them about sustainability while having fun. Just ensure that they are supervised, especially when using tools.
Q: What if I don’t have any old furniture to recycle?
A: Check local thrift stores, garage sales, or online marketplaces. You can often find inexpensive items that just need a little love to transform into beautiful garden decor.
Recycled Pathways
Creating in your garden is not only a sustainable choice but also a fantastic way to express your creativity. Imagine transforming your outdoor space into a beautiful, eco-friendly haven where every step tells a story. By using materials that would otherwise end up in a landfill, you can create pathways that are both functional and visually appealing. Whether it's old bricks, stones, or reclaimed wood, the possibilities are endless!
One of the most popular options for recycled pathways is using old bricks. These can be sourced from construction sites or even your own home renovations. With a bit of cleaning and arranging, you can create a rustic pathway that adds charm and character to your garden. You can lay them in a traditional herringbone pattern or get creative with a more abstract design. The beauty of using bricks is that they are durable and can withstand the elements, ensuring your pathway lasts for years to come.
If you're looking for something a bit more unconventional, consider using recycled stones. You can collect stones from your local area or use leftover stones from landscaping projects. Arranging these stones can create a natural-looking path that blends seamlessly with your garden environment. Plus, stones come in various shapes and sizes, allowing you to play around with textures and colors to create a unique look.
Another innovative idea is to utilize reclaimed wood. Old wooden pallets can be disassembled and repurposed into a stunning pathway. Not only does this method reduce waste, but it also gives your garden a warm, inviting feel. Simply cut the wood to your desired size and lay them down in a pattern that suits your style. You can even leave some space between the planks and fill it with gravel or small plants for an added touch of greenery.
To enhance your recycled pathways, consider incorporating stepping stones. These can be made from various materials, including concrete, stone, or even old tiles. Not only do they provide a practical solution for navigating your garden, but they can also serve as decorative elements. Personalizing your stepping stones with painted designs or embedded glass can turn them into stunning focal points in your garden.
For those who want to go the extra mile, using shredded paper or cardboard as mulch along the sides of your pathways can improve soil health while giving your garden a polished look. This not only helps to suppress weeds but also retains moisture, ensuring your plants thrive. Plus, it's a great way to utilize materials that would otherwise be thrown away.
In conclusion, creating recycled pathways is a wonderful opportunity to showcase your style while promoting sustainability. By using materials that are readily available and often overlooked, you can craft a garden that is not only beautiful but also eco-conscious. So why not get started today? Your garden will thank you!
- What materials can I use for recycled pathways? You can use old bricks, stones, reclaimed wood, and even concrete for creating unique pathways in your garden.
- How do I maintain my recycled pathway? Regular cleaning and occasional repairs will help maintain the beauty and functionality of your recycled pathways.
- Can I use recycled materials for other garden projects? Absolutely! Recycled materials can be used for planters, garden art, and furniture as well.
Stepping Stones
Creating personalized for your garden is not just a fun project; it’s a fantastic way to showcase your creativity while being eco-friendly. Imagine walking through your garden, stepping on unique stones that reflect your personality and style. Not only do these stones provide a practical path through your garden, but they also serve as a canvas for your artistic expression. You can use a variety of recycled materials to craft these stones, making each one a little masterpiece.
To get started, you’ll need some basic materials. You can use old tiles, broken concrete, or even wooden planks as your base. The beauty of stepping stones lies in their versatility. For instance, if you have leftover tiles from a home renovation, those can be perfect for creating a mosaic effect. You can also incorporate items like pebbles, seashells, or even glass shards to add a pop of color and texture. The possibilities are endless!
Here’s a simple guide to making your own stepping stones:
- Gather Materials: Collect your recycled items, such as tiles, concrete, or wood. Don’t forget to have some concrete mix or resin if you’re using a mold.
- Create a Mold: You can use plastic containers, cardboard, or even a pre-made stepping stone mold. Just make sure it’s sturdy enough to hold the mixture.
- Mix and Pour: If you’re using concrete, mix it according to the package instructions and pour it into your mold. For a more eco-friendly option, consider using a resin that’s made from recycled materials.
- Add Decorations: Before the mixture sets, add your decorative elements. Press them gently into the surface to ensure they stick.
- Let It Cure: Allow your stepping stones to cure for the recommended time. This is crucial for durability.
Once your stones are ready, place them in your garden to create a whimsical path. You can arrange them in a straight line or create a winding trail that leads to your favorite garden spot. Not only will this add visual interest to your garden, but it will also make navigating through your plants a breeze.
In addition to being functional, these stepping stones can be a great conversation starter. Imagine hosting a garden party and your guests admiring your creativity! You can even involve your kids in the process, making it a fun family activity. Let them decorate their own stones with handprints or their favorite designs. It’s a wonderful way to create lasting memories while also teaching them the importance of recycling and sustainability.
So, why not take that leap into creativity? Start collecting your recycled materials today and transform them into beautiful stepping stones that will not only enhance your garden but also reflect your unique style. It’s a small project that can make a big impact!
Q: What materials are best for making stepping stones?
A: You can use a variety of materials, including old tiles, broken concrete, wooden planks, and decorative items like pebbles and seashells.
Q: How long do stepping stones take to cure?
A: Typically, concrete stepping stones take about 24 to 48 hours to cure, but it’s best to follow the instructions on the concrete mix package.
Q: Can I use paint on my stepping stones?
A: Yes! You can use outdoor paint to add designs or patterns to your stones after they have cured. Just make sure to seal them afterward to protect the paint from the elements.
Q: Are there eco-friendly alternatives to concrete?
A: Absolutely! You can use recycled glass, resin made from recycled materials, or even natural clay as alternatives to traditional concrete.

Mulch and Ground Cover
When it comes to maintaining a healthy garden, play a crucial role. Not only do they serve as protective layers for your soil, but they also help in retaining moisture, suppressing weeds, and enhancing the overall aesthetic of your garden. What if I told you that you can create effective mulch and ground cover using everyday recyclable materials? That's right! With a little creativity, you can transform items that would otherwise end up in the landfill into eco-friendly solutions for your garden.
One of the simplest ways to make mulch is by using shredded paper. This can include old newspapers, magazines, or even cardboard. Not only is it an excellent insulator for your soil, but it also breaks down over time, enriching the soil with organic matter. Just be sure to use paper that is free of glossy finishes or colored inks, as these can contain harmful chemicals. Shredded paper can be layered around your plants, providing a soft, protective blanket that keeps the soil moist and cool.
Another fantastic option for mulch is cardboard. You can use cardboard boxes or leftover packaging materials. Simply tear them into smaller pieces and lay them down around your plants. Cardboard not only suppresses weeds effectively but also decomposes slowly, offering nutrients to the soil as it breaks down. Plus, it’s a great way to recycle those boxes piling up in your garage!
For those looking to add a bit more texture to their garden, consider using wood chips or shredded bark from old furniture or landscaping projects. These materials not only look great but also provide excellent insulation for your plants. You can even create a layered effect by combining different types of mulch, which can enhance both the visual appeal and the effectiveness of weed suppression.
And let’s not forget about grass clippings. After mowing your lawn, instead of bagging those clippings, spread them around your garden beds. Grass clippings are rich in nitrogen, which is essential for plant growth. Just be cautious not to apply them too thickly, as they can mat down and create a barrier that prevents water from reaching the soil.
When it comes to ground cover, you might consider using old fabric scraps. These can be cut into strips and laid down in areas where you want to prevent weeds from taking over. They act as a barrier while also adding a unique, rustic look to your garden. Plus, as they degrade, they will contribute organic matter back to the soil.
In conclusion, utilizing recyclable materials for mulch and ground cover is not just a sustainable choice; it’s also a fun and creative way to personalize your garden. By integrating these eco-friendly practices, you can contribute to a healthier environment while showcasing your unique style. So, next time you’re about to throw something away, think twice! It might just be the perfect addition to your garden.
- What types of paper can I use for mulch? It's best to use plain, uncoated paper like newspapers or cardboard. Avoid glossy or colored papers as they may contain harmful chemicals.
- How thick should I apply mulch? A layer of 2-4 inches is typically recommended to effectively suppress weeds and retain moisture.
- Can I use plastic as ground cover? While plastic can prevent weeds, it doesn't allow water and air to permeate the soil, which can harm your plants. It's better to stick with organic materials.
Frequently Asked Questions
- What materials can I use for upcycled planters?
You can use a variety of materials for upcycled planters, such as old containers, plastic bottles, tires, and even wooden crates. The key is to ensure that they can hold soil and have proper drainage. Be creative—almost anything can become a planter with a little imagination!
- How do I create garden art from recyclables?
Creating garden art from recyclables is all about using your creativity! Gather discarded materials like metal scraps, glass bottles, and wooden pallets. You can paint them, assemble them into sculptures, or even create mosaics. The goal is to express your artistic flair while giving new life to items that would otherwise be thrown away.
- What are some ideas for making wind chimes from recycled items?
Wind chimes can be made from various recycled items, such as old utensils, bottle caps, and tin cans. To make them, you can string together these materials using fishing line or twine. Experiment with different lengths and weights to create a pleasing sound. Just imagine the melodic tunes dancing through your garden as the wind blows!
- Can I use old furniture for garden decor?
Absolutely! Old furniture can be repurposed into stylish garden decor. Think of turning a wooden chair into a plant stand or using an old table as a potting station. Not only does this enhance your outdoor living area, but it also adds a unique touch that reflects your personality.
- How can I create sustainable pathways in my garden?
Sustainable pathways can be made using recycled bricks, stones, or even reclaimed wood. Arrange these materials in a way that suits your garden layout and style. This not only adds functionality but also creates visual appeal, guiding visitors through your beautiful outdoor space.
- What are personalized stepping stones, and how do I make them?
Personalized stepping stones are unique garden features that you can create using recycled materials like old tiles, concrete, or even flat stones. You can mold them using a simple concrete mix and add decorations like pebbles or glass pieces. This way, you can leave your personal mark on your garden paths!
- Can I use recycled paper or cardboard as mulch?
Yes, shredded paper and cardboard can be excellent mulch options! They help retain moisture, suppress weeds, and improve soil health as they decompose. Just make sure to shred them into smaller pieces and layer them around your plants. It’s a fantastic way to reduce waste while nurturing your garden!


